Monday 30 September 2013

First Experiments with Mouldable Foam

Hello Everybody,

It's been a while since I last posted anything.

I trust you are all well, that you had an enjoyable weekend and that Monday has been kind to you. 

The craft space has been sorely neglected these last few days but I did squeeze in some time to have fun with mouldable foam.
I sourced some Magic Stamp Moldable foam, from Sticky Tiger Craft Supplies, as far back as June just as we were going off on holiday. Consequently, it's been on a shelf and forgotten until now, even though it seemed a really neat way of making my own stamps. The way it works is that you heat the foam with heat tool and then press it on to any cool textured surface for 15 – 20 seconds and what you find, once it is inked up, is that it produces a reverse image stamp. To remove the image all you have to do is reheat. As you can see, I used a collection of buttons for one stamp, this worked very well, and the net wrapping from a pack of oranges for the other - this worked well too but I think it would have made a better impression if it had been opened up to just one layer.  I tried out a variety of ink pads too and ended up with four very nice impressions.
And with them, I made these four cards ... two very useful baby cards, a yellow card with a cute cartoon cow image suitable for a baby's birthday and the red and black card for a model railway enthusiast in the family.
The boy's card ... the button embossing folder went very nicely with the newly formed button stamp. Here it is stamped in turquoise ink then die-cut (a Spellbinders Label) and matted on to teal cardstock. The polka-dot paper that forms the layer beneath the embossed panel and the upper layer of the butterflies is from stash, maker unknown, as was the blue seed shaped pearls. The butterflies are a mix of die-cut (various dies) and punched shapes.
The basis of the girl card is the same as the one for the boy but this time it's embellished with flowers (Marianne's Collectibles), tiny pink polka-dotted buttons and pink gems. 
For the yellow piece I chose a Nellie Snellen stamp, Cow-Boy, coloured with ProMarkers and the paper is double-sided Dots & Stripes, Lemon Drops Small Dots, by Echo Park. The little windmill is handmade from a 2" square of the paper. 
The last card uses the piece stamped with the orange netting impression. It's teamed with a panel embossed using Tim Holtz Steampunk folder, black card gilded with silver wax, and Stamps Away's Steam Train stamp (from CleverCuts) coloured with ProMarkers.

It was great fun trying out the foam and now my mind is buzzing with ideas of what could be used to create more stamps, e.g, cogs, wheels and sprockets from timepieces, sequin waste, shells, etc. I've even kept the trimmings of a stamp plate I cut up recently to make a mosaic - could be interesting. Now you've seen my humble efforts, I hope some of you are persuaded to try these fun little mouldable squares out for yourself - I'm sure you can think of even more interesting items with which to produce your very own stamps. 

I used one or two snippets here, of course :) The white card for the toppers on both the yellow and the red card, and the black card for the embossed panel in the red too, which means I can hop over to Di's, Pixie's Sunday Snippet Playground - Week 92, and join in the fun.  

I apologise for not being around much at the moment, can't say when I'll be back but I will try to keep posting whenever possible until normal service can be resumed :) 

Take care and happy crafting,

Friday 27 September 2013

Happy Holidays

Evening All

When I submitted a card to Craftyhazelnut's Christmas Challenge Extra for September, on Wednesday this week, I thought it would be the last for this month and rather unwisely said as much. Hazel's response to that was 'I live in hope of seeing more - you still have a few days left'! 

Well, that's like throwing down the gauntlet, is is not? How could I resist? 

So, Hazel, for just one last time this month here's a card for both the CHNC Extra challenge and CHNC 143 - stamp, stamp, stamp  :)
Plenty of stamping going on here, with my favourite holly stamp. The topper was created from a piece of leftover card that had been inked up, stamped with VersaMark and brushed with mica, all for an earlier project. Here I've over-stamped it with the holly stamp and a greeting, matted it on to black card and embellished it with ribbon, sequins and gems. 
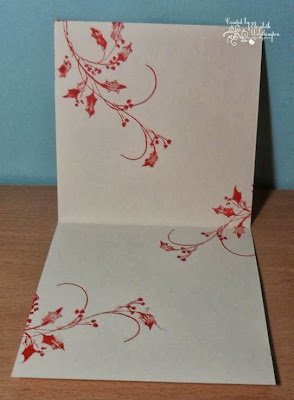
The card base has also got holly stamped all over it, top, inside and back.

Materials used: 
  • square ivory card base
  • scraps of black card and the inky/mica piece
  • Penny Black's Winter Bough Stamp and Tim Holtz Festive Berries ink pad
  • greeting from Stampendous Holiday Messages and Memento Tuxedo Black ink pad
  • green ribbon (a car boot find), red sequins and Anita's tiny green gems to embellish
Even though the temperatures are not too bad here, there's no escaping the fact that winter is on its way. So what makes that prospect a tad more bearable to contemplate? Well, I'll tell what it is for us ... Downton Abbey returned on Sunday, this evening sees the return of Strictly Come Dancing, and Doc Martin is making us laugh on Monday evenings. How Martin Clunes keeps such a stern look in some of his scenes is a mystery ...  out of character he never seems to stop smiling!

Unfortunately, the EM took a tumble two days ago, in the kitchen of all places ... tripped over his own feet ... and has bruised his ribs. It's stopped him in his tracks and he is having to rest up a bit ... something he finds incredibly difficult to do ... he likes to keep busy.  So the packing has been put on hold for a few days. Can't say I'm complaining ... while he has been watching endless repeats of games shows on daytime TV, I've been able to potter away for longer in the craft room :) 

Oh, and the dentist appointment ... I came out with a gold star, well a pack of TePe Interdental Brushes but at my age that's about as good as it gets. Not so good for himself, he needs to return next week for a small filling. Oh, and Di, you may skip out of the dentist knowing you won't be returning for 6 months, but it's every 4 months ... why the difference, I've no idea :(
 
I hope you are all well and enjoying your Friday evening too. I wish you all a great weekend.

Happy crafting,

Thursday 26 September 2013

September Tag

Morning Folks,

I hope life is treating you well wherever you are and whatever you are doing.

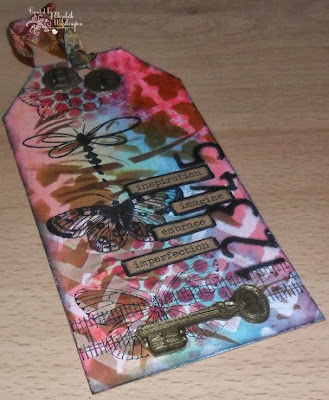
I have a tag, made for a swap, to share with you today and it's my homage to the great man himself, Tim Holtz.
Needless to say, I had almost nothing from the supplies required for this month's tag but nothing ventured, nothing gained :)  I simply followed his instructions, improvising, adapting and substituting as I went.
For example, where TH used a manila label, I cut a scrap of white card to size and shape, and where he used a star patterned stencil, I substituted star-shaped sequin waste. Embossing paste, I had none ... so I made some up, a vaguely remembered recipe Ali Reeves mentioned during a TV demo some time ago, mixing PVA (white/Elmers) glue with cornflour (cornstarch) ... it worked perfectly :)  And that is pretty much how I continued ... I got pretty stumped on a few of the steps but, after cogitating and deliberating over the instructions, usually thought of a suitable substitute for almost everything needed to complete the tag.

One of Tim's mantra's is that we should 'embrace imperfection'. Well, I have, quite literally by including it on the tag ... seemed appropriate somehow given how imperfect the tag is :))

I won't say there wasn't times when the little grey cells felt defeated but it was a very satisfying exercise and a great way to use a few snippets of card. And at the mention of snippets, I am reminded that I can submit my tag to Pixie's Crafty Snippets Playground - any excuse to visit the duck pond and feed the ducks :))

Materials used:

  • scraps of white card from the snippet box
  • Tim Holtz distress inks - Festive Berries, Peacock Feathers; Dried Marigold, Brushed Corduroy, Vintage Photo and Black Soot
  • dimensional paste made with PVA glue and cornflour
  • sequin waste, masks from Special Touch and Crafter's Workshop and a plastic stencil for numbers
  • white acrylic paint
  • stamps - Craft Stamper butterflies, Denami Design dragonfly and the ruler from a sewing set that was free with a magazine, Artemio key, alpha set for letters - maker unknown
  • gold embossing powder
  • punches - circles in two sizes
  • Archival Jet Black ink, VersaMark
  • Tim Holtz Idea-ology Chitchats and black marker
  • white American seam binding - coloured with distress ink
Edit Note: having been ordered by BJ to enter this on Tim Holtz' blog NOW ... how do I dare to disobey :) 
Thus, I'm submitting this tag to Tim Holtz 12 Tags of 2013 - September 

It's dental check-up day, again :( Two appointments, one for the hygienist and the other for the dentist himself, groan ... I know it's essential but that doesn't make it any easier. Ah well, it will be soon over.

Hope you have something much more pleasant in your diary for today.

Take care and happy crafting,
Wednesday 25 September 2013

Rudolph Day - September 2013

It's Rudolph day over at Stamping For Pleasure and here's the card I made for the event.
Pink and gold ... not, I think, a colour combination you would associate with Christmas, but I've been challenging myself to try non-traditional colours this year ... there's been brown and red, brown and white, yellow and red, and even purple and green so why not pink and gold. Besides, I'm still working my way through the snippet pile and that's where I found all the materials for this card :)

Materials used:

  • pink square shaped card for base - The Works
  • pink check paper - source long forgotten :(
  • pink textured card - Papermania
  • gold satin finish card for topper, embossed with Sizzix Winter Botanicals
  • gold ribbon - Anna Griffin
  • punches - Stampin' Up ovals and X-cut scalloped edge
  • stamp - from Stampendous Holiday Messages and Archival Jet Black ink pad
  • pink gems - Anita's

As well as submitting this card to Sarn's challenge, I'm off over to Di's, that is Pixies Crafty Snippets Playground, to join in with all the other snippeteers again this week.

It's also for Craftyhazelnut's Christmas Challenge Extra for September, where, as ever, anything goes as long as it's Christmas.

Right, it's back to tying up bundles of books ready for transporting to the new house. That clever little pixie Di passed on this tip after I'd mentioned in a previous post that I'd learnt, the hard way, not to put too many books in a box ... they are too heavy and quite likely to burst through the bottom of the box landing, of course, on my toes :(  So a big thank you and hugs for that, Di, it's much appreciated ... another of those why didn't I think of that ideas :))

Take care all and happy crafting,

Tuesday 24 September 2013

Red Bird - Inky Background from Dusters

Morning Everyone,

Because it's been a school holiday here in Scotland, it has been an extended weekend, but I hope, wherever you are, that the last few days have been good for you. I've had a bout of sciatica ... probably brought on from packing boxes ... it is easing off now so I did spend a short time in the craft room yesterday making today's share.

Have you ever spotted a great idea, filed it in the old grey matter and then, when you come to use it, forget where exactly you saw it? Well, that's what happened to me yesterday!?!? I've just spent an hour or so trawling through hundreds of blogs, well, okay, I exaggerate, but it felt like hundreds! I finally remembered that I'd spotted this particular idea as a snippet card submission over on Pixie's Crafty Snippets Playground last week. Which means, thankfully, that I can now give Sally, Crafty Salutations, credit for being my inspiration today with this bright idea to moisten ink dusters and see what combinations result :)
For the background of this topper I've moistened several of my ink dusters and swiped them over the card then, when dry, some sequin waste was inked through with Tim Holtz Peacock Feathers distress ink. That done, the robin, thistles and leaves were stamped in Jet Black Archival. Keeping it all very quick and simple, the topper was matted on to smooth black cardstock and then adhered to the front of the card.

Materials used:

  • white card cut and scored to form a DL (3.9"× 8.2") size card
  • snippets of white and black card for topper 
  • inky ink dusters for blue, green, red and brown inks
  • sequin waste and Tim Holtz DI, Peacock Feathers
  • Jet Black Archival Ink and stamps - Robin by Caroline, Keep Crafting, Thistle from Hobbycraft and Botanicals from We Are Memory Keepers 


I'd like to submit this card to the following:

6th Lady Anne's Challenge - must have wings
Get Inky Challenge 13 : Birds, Bees, Flowers, Trees, Moon Above, and LOVE
Crafty Cardmakers #100 - Winged Things
The Crafty Bloggers Network September Challenge - Things With Wings

And last, but certainly not least, I'm hopping and skipping over to Pixie's Crafty Snippets Playground - Week 91 and see what Di, Parsnip and the Snippeteers have been up to :)

I wish you all a good night and a lovely day tomorrow.

Happy crafting,

Friday 20 September 2013

Decopatched Letter E

Afternoon Folks

And a very nice afternoon it is here in my little bit of paradise. The sun is actually shining and it looks set to get even better for the weekend :)

Anther quick share for you today.
I'm still on a making anything but a card thing so this time I've tried my hand at decopatching! This papier mache letter E has been sitting on a shelf, half forgotten, for long enough ... time something was done about it. And all I've done really is cover the letter using decopatch papers and PVA glue that came free with a Crafts Beautiful magazine a month or two ago ... couldn't be simpler. I had fun tearing up the paper into small workable pieces and gluing and covering all the surfaces, trying to ensure that the patterns were fairly evenly distributed.
Once it was completely dry it was decorated with a selection of flowers from Prima, Wild Orchid Crafts and The Works using a hot glue gun. I made the lace layer you can see under the gorgeous grey flower, simply by running thread along one edge of a length of white cotton lace, drawing it up and sewing it together to form the flower shape. Some of the flowers are made of layers hot glued together, giving them a lot more dimension than if left as one layer. The swirly gem flourishes, from K&Company, complete the embellishment.

This is going to look very decorative in my new craft room and, as a bonus, I've used up yet more stash that's been lingering in my drawers forever :)

Right, almost time for Pointless and then dinner.

Have a lovely evening and happy crafting,

Thursday 19 September 2013

Christmas Wishes - a combined CHNC and Snippets Challenge Card

Afternoon Folks

Hope all is well with you wherever you are ... it's nearly Friday and that's where the weekend starts and that can't be bad :)

The card I have for you today was actually made some time ago, I just hadn't gotten around to posting it. And that is just fine because I think it fits in well with Hazel's CHNC challenge this week to 'cut it out'.
The topper, recycled from an old card, has definitely been cut out - die-cut with Spellbinders Nestabilities Labels 25 - and it's matted on to a scrap of red mirror card that was cut out, with scissors, after I'd traced around the die to get just the right shape. I've added three teeny-weeny red gems (Anita's) to the holly spray to bling it up a bit.

The papers are snippets of Graphic 45 Christmas Emporium. The top one has been stamped using Penny Black's Winter Bough stamp and Tim Holtz Festive Berries distress ink. And to finish it off, a length of red ribbon decorated with a few more Anita's not so teeny gems.

Winter Bough is stamped inside and on the back ... can you tell I love that stamp :)

I'm submitting this card to the following:

 CHNC 142. Of course ... I've 'cut it out' as required :)

 CHNC Challenge Extra for September - where, as always, the challenge is for anything as long as it's Christmas.

Pixie's Crafty Snippet Playground Week 90 - the Graphic 45 paper and the red mirror matting are the snippets.

The insurance assessor popped along this morning, to look at the damage caused by the fire for himself. He was most sympathetic and hoped that the person responsible will be caught. Somehow, I rather think that is not going to happen any day soon.

Packing is going full steam ahead. Two more boxes filled today ... mostly books and a few personal items. I've learnt from experience to pack only one layer of books in a box and top up with lightweight items, otherwise the boxes become too heavy and there's a danger the bottom will come apart ... it doesn't bear thinking about. 

Oh, and talking of experience in the moving department, chatting to my daughter last night, I totted it up and I have moved 31 times in my 65 years. Most of the moves were due to army postings ... my father was in the army, then I was in the army and, of course, my first husband was also in the army ... the experience sure gave me itchy feet :) However, this is definitely the last time ... no more ... not ever again! Somehow the excitement seems to have gone out of it for me :))

I'm hoping to sneak a bit of time in the craft room this evening, for a bit of rest and recuperation. Perhaps I'll do some scrapping ... it's a wee while since I did any. 

I hope you all have an enjoyable evening planned too.

Happy crafting,


Wednesday 18 September 2013

Spring Broom Wall Hanger

Evening Everyone,

It's been another busy and disruptive day at the present Casa Worthington ... I may have said this before so at the risk of repeating myself, I hate moving house!?!?

So it's been a case of NOMWW - Nothing on My Workdesk Wednesday - and no time to play, sigh, or not much time because I did sneak in for a few minutes to finish this small wall hanger.
 I've rather tired of making cards for the time being, besides I have a drawer full, so I thought I'd make something to hang on the wall instead. And I know Spring feels as though it's a long way off but it will come again, surely!

The base is a 6" square piece of recycled cardboard packaging covered in a patterned paper, the design is a paint distressed looking one, perfect for this project. The background is stamped with the Broom stamp from A Country Diary of an Edwardian Lady set, first in Versafine Vintage Sepia and then VersaMark brushed with gold mica powder. The sentiment, stamped in Momento Rich Cocoa, is from Sheena's A Little Bit Sketchy Spring.
To make the topper, a stamp block was inked with three shades of Adirondack, Sunshine Yellow, Peach Bellini and Willow, then sprayed with water to create the background. Once dry it was stamped with the same Broom stamp as used on the background. This was then coloured with Memento markers in yellows and greens.
The ribbon and the embellishments, gold die-cut butterflies, gems, pearls and sequins are all from stash.

I'm submitting this to Pixie's Crafty Snippets Playground Week 90 - the topper is made from snippets of white and brown card. While I'm over there I'll take the opportunity to see Di's first Zentangled project ... something I have yet to try, and as it looks so complex and arty, I may never try :)

I hope you are all well and that Wednesday has been good to you.

Take care and happy crafting,

Monday 16 September 2013

Have a Wonderful Day - my card for DH

Morning Everyone,

I hope you are all well, and that everyone caught up in the gales, storms and generally nasty weather, is okay.

I have a busy day scheduled so this will, of necessity, be a very quick post. I just wanted to share the card I made for the EM's birthday today.
Difficult to photograph this one because of all the shiny surfaces. This is the best of a bad batch of pics. This was a painty, inky, messy job that took way longer than anticipated, but was great fun to do :)

The topper is made from one of the many prints pulled of the Gelli plate a few weeks ago, inked, stamped, waxed silver and Frantaged,  The base layer has been embossed with a little-used M-Bossibilities folder, inked and waxed ... that gilding wax gives gorgeous results but, oh boy is it messy :))
Materials used:

  • Black and teal Papermill Direct card
  • Spellbinders M-Bossibilities Regal folder, Martha Stewart Arches edge punch, Tim Holtz DIs, Black Soot, Peacock Feathers and Pebeo Silver Gilding Wax for base layer
  • Gelli plate, black, blue and orange acrylic paints; Special Touch Circles mask and bubble wrap for print Stamp from Sheena's A Little Bit Sketchy Only Words - Through The Rain and Black fine tip pen; Turquoise Frantage
  • silver card candi from Craftworks

That's it - I said it was going to be brief, didn't I. Got to get on :)

Take care and have a happy Monday.

Sunday 15 September 2013

Sunday Snippet - Trimming the Tree

Afternoon Everyone,

From a very stormy Ayrshire today. Actually, the weather was foul this morning, but it's not too bad now. It's still blowing a gale, but the sun is out ... come to Scotland and experience all weathers in one day :))

The EM dismantled a shelf in the room the computer is in this morning  and has been filling in holes made by screws so now there's a layer of fine dust lying on top of everything ... I had to dust down the keyboard before starting to type. I fear there is going to be a lot more dust-making over the next few weeks :(

Happily, he's not started on the craft room yet which means I've been able to make this little snippet card so I can nip over to Pixie's Crafty Snippets Playground - where it's Week 90 and Di is already anticipating reaching the magic 100 :)
It's a brown Christmas ... not very traditional I know, but I had this polka dot design paper leftover from yesterday's card which I wanted to use up. I dug around the snippets pile and found a scrap of brown textured card and a rummage in the toppers box unearthed a wee pack of LOTV pre-coloured images in just the right tones. And, as luck would have it, the die cut poinsettia which was still lying on my desk from the beginning of the week ... sometimes it pays not to tidy up :)) It was too white though so I inked it over with a sepia shade of ink to tone it down a bit.

The sparkle is from iridescent glitter and some rather special aurora borealis gems ... these have been in the stash for months because, much as they are gorgeous, and like a magpie I could not resist them, usability is limited by the colours. More NBUS being cracked open ... Darnell will be pleased :))

Materials used: 
  • white 4" square card base
  • Papermania textured cardstock, brown
  • polka dotted DP printed from Grafter's Companion SWALK CD
  • LOTV pre-coloured topper from Christmas Animals - Decorations set
  • poinsettia cut from smooth white card using Spellbinders Poinsettia die set and inked with VersaFine Vintage Sepia
  • X-cut scalloped edge punch for belly band
  • Habico iridescent gems, aurora borealis
  • iridescent glitter

It's back to the craft room for me now. I have a VIP card to make, in a hurry ... it's the EM's birthday tomorrow ... his 75th! I don't think either of us can quite believe it ... the years seem to be just flying by. It seems only yesterday that we were young and old age was eons away. One of the few advantages, perhaps the only advantage, to having lived for so long is that he now no longer needs to pay for a television licence ever again :)) 

All this talk of gales, rain and old age and all that, has brought to mind a favourite Longfellow poem, and for no better reason than it's Sunday I hope you will forgive me this little indulgence. 
The Rainy Day
THE day is cold, and dark, and dreary;
It rains,and the wind is never weary;
The vine still clings to the mouldering wall,
But at every gust the dead leaves fall,
And the day is dark and dreary.

My life is cold, and dark, and dreary;
It rains,and the wind is never weary;
My thoughts still cling to the mouldering past,
But the hopes of youth fall thick in the blast,
And the days are dark and dreary.

Be still, sad heart, and cease repining;
Behind the clouds is the sun still shining;
Thy fate is the common fate of all,
Into each life some rain must fall,
Some days must be dark and dreary.

Henry Wadsworth Longfellow

Take care and happy crafting,
Saturday 14 September 2013

Hugs SWALK ... plus some news from Casa Worthington

Afternoon Everyone,

I hope your Saturday has been a good one so far. We are enjoying some autumn sunshine here - very nice.

I've been super busy so I've only a quick and simple card to share with you.
Once again, the materials for this card came from that pile of stash to use up that's lying on the corner of my desk.  The little lady hugging her kitten was stamped some time last year, or maybe it was the year before, so no chance of me remembering which ProMarkers I used to colour her in. Similarly, the papers were printed off from the SWALK CD all that time ago, and then forgotten, sigh!

I think, I hope, I've redeemed myself by finally making a card with a little help from my Cuttlebug, a circle die to cut out the topper and a new set of flower dies from Marianne, tiny but cute. I've added a touch of Glossy Accents to the eyes of both her and the kitten, and just a touch to the kitten's nose ... I think you can spot the gloss in the photo.

Materials:
  • square white fancy-edged card base
  • papers printed from SWALK Papercrafting CD
  • Hugs stamp from the SWALK Stamp Collection stamped on to smooth white card and coloured with ProMarkers
  • Docraft's CartUs Circles die and Marianne Collectables Flower die set
  • lilac/white Baker's twine
  • Glossy accents on eyes and kitten's nose
  • gems for embellishment

Now for the news mentioned in the title. It's simply that we are moving house. And, as this might cause some disruption to normal service, I thought it best to let you know. 

We had intended to stay in this house forever but the garden has proved our undoing. We love our garden but it's steep and there is a flight of steps to negotiate just to get to the bins - not good for two arthritics like ourselves. It's taken a year of searching for somewhere more suitable, somewhere with the garden on one level, but happily we've found just the place. It's a red-brick semi with a decent sized sized garden with no steps to climb. It needs some work done to it, the central heating has to be replaced, a new kitchen, the bathroom converted to a shower-room, and new floors throughout, etc., etc., but it should be ready to move into by mid-November. 

We started packing just this week and already I'm beginning to panic! What to throw out, what to keep back 'til the last minute, and where to put all the boxes ... I hate moving house!!! 
On the plus side, it's exciting planning the decor, looking at wallpapers and paint colours. I'm not sure if it is the crafting industry that is dictating what is trendy or what, but look as these wallpaper samples I picked up from our local DIY shop ... postcards, newsprint, and birds and blossoms.  Even if they never go up on a wall, they will certainly find a place in my crafting stash :))

Right, it's time for a break, dinner and a nice cup of tea. 

Take care everyone and happy crafting,

Friday 13 September 2013

Going Purple Patchwork Crazy - and how it was made

Morning Everyone,

It's still morning here, just!

And it's Friday 13th!!! Hope you all get through the day without incident :)

I thought I'd not only show you the patchwork cushion that featured on my desk on Wednesday's WOYWW post now that it is finished, but also show a few photos of it in the making.
I realise it doesn't go well with the chair it's photographed on, but it was designed for a room decorated in shades of purple and white so it will look better there :)

The crazy style is a very old form of patchwork - the earliest example is reportedly from 12th century Venice, however it really became popular in the US in Victorian times. Although it is thought to be an ideal way of using up scraps of fabric I don't do that. Because I've not been sewing for years, I no longer have a box of leftovers and trimmings to work from. Instead, I'm working with a bunch of fat quarters bought at my local shop. And the advantage of that is that I can pick out colours and designs that are perfect for any project.

A goodly few of you have said that you might like to go crazy too, so here's a few photos to show how I make crazy patchwork ... it's not the only way it can be done, purists will probably shudder at this, but it's the way that works for me.
Stage 1- was to cut the central piece ... always a 5-sided irregularly shape - as large as required and including a ¼" seam allowance on all 5 sides. I use a Simplicity Simply Crazy template which can be seen in the Stage 3 photo. You can see the rows of embroidered stitches I've added, done in two colours of thread to add interest.
Stage 2 - cut a square a of calico to fit the size of cushion plus, in this case 16½", the ½" is for the ¼" seam allowance needed for all 4 sides. This is the base onto which the patchwork will be sewn. Cut odd shaped strips of fabric in a variety of widths to be sewn around the 5 sides of the centre piece.
Stage 3 - this is where the strips are sewn, always with a ¼" seam allowance, folded over, pressed and then top-stitched with a row of embroidery stitches ... traditionally this stage was done by hand. If your machine doesn't have fancy stitches then rows of zigzag stitching would be a lovely alternative. Before sewing on some of the strips I've layered a length of lace, just to add a bit more texture and interest to the cushion cover. Keep adding strips until the calico base is completely covered. Turn to the wrong side and trim the excess from around the edge of the calico base. In this photo you can see, lying on top, the plastic template used to cut the centre piece of fabric.
Final stage - I make an envelope style backing by cutting a piece of fabric, here it's the same plain purple as some of the strips, the same width as the calico base, 16½", and the length that measurement plus 5½" - total length 22". This is then cut in two pieces, one two-thirds, leaving the other measuring one-third. The next job is to finish off the edges that will form envelope closure by sewing a neat seam on one 16½" wide edge of each piece. To finish arrange all the pieces, right sides together, overlapping the backing to form the closure, and stitch around the 4 sides of the cover. Because I used cotton fabrics, some of which had a tendency to fray, I added a row of zigzag around the edges ... hopefully that will keep it all nicely together when laundered. Trim the corners, turn to right side, pushing out the corners, and give the cover a final press.

This is a quick and easy way of doing crazy patchwork so I hope with this post I have encouraged those of you who would like to make something similar to give it a go. I've seen even smaller and simpler projects - hearts, pot holders, tea cosies, make-up and toilet bags - which would make great starter projects. There's plenty of YouTube demos and fabulous blogs of patchworker/quilters where you can pick up ideas, tips and wrinkles ... they are all much more experienced and talented than I am too.

It was morning when I started to type up this post! It's afternoon now, so I'll wish you a very happy afternoon and hope you have a very enjoyable weekend lined up.

Take care and happy crafting,

Thursday 12 September 2013

Wee Westies - Two Cards from One Kit

Morning Everyone,

I hope you are all well on this fine September morn. Okay, it is autumn, but it's rather nice here in my little corner of paradise, not exactly sunny, in fact it's overcast, but it's warm and dry. The perennial sweetpeas are still blooming, although the annuals have gone over, and, totally out of season, there's one lone and confused columbine bringing joy to this old gardener's heart.
In yesterday's show-all post I pointed out a pile of stuff on the left of my desk as some of the stash I want to use before I buy any more. Later, when I had half an hour to spare ... truth is, I was watching a craft programme at the same time ... I dug out this old Kanban kit, bought because my middle sister loves Westies and still unused. I think it was intended that it made one card, it had one tartan card base pre-printed with one Westie image, two toppers, and several sentiments/greetings to cover a variety of possible occasions, but that seemed a tad extravagant, particularly at a time when Royal Mail is penalising us for every extra layer we add to our cards!
So I split the card base in half and added one topper to both pieces, chose two of the sentiments/greetings, and used a couple of white fancy edged card bases. Glossy accents applied to eyes and nose, card candy, enamel dots and red glitter glue for embellishments and the job was done.
Some of the leftovers were used to decorate the inside and back - love the little paw prints.

The kit cost £1.50 (US$2.37) and made two cards, which means, taking in to account the cost of card bases and embellishments, each card cost no more than 90p (US$1.42) to make. As I don't make cards to sell, I've no idea if that is good or bad, but it feels like a bargain to me :)

Materials used:

  • Square white fancy-edged card bases
  • Kanban Westie Concept Card Kit 
  • Red Card Candi - Craft Works
  • My Mind's Eye Winter Wonderland enamel dots
  • Stickles Xmas Red glitter glue

Heavens, it's lunch time  already! I'm off to have a bite to eat and then it will be back to the craft room to finish off the cushion cover that was also on my desk yesterday.

Thanks for looking, take care and happy crafting,