Friday 30 June 2017

Friday Smiles

Hi Everyone,

I can't believe how late I am to join in with Annie's Friday Smiles. I've been intending to find time all day but instead it's run away from me. Still, I'm here now.

So, what's made me smile this last week. Well, rather a lot actually, but I'll try to keep it brief.

First of all, the really good news is that my niece, Louise, had the liver transplant she has been waiting a year for last Saturday. All went well given how, due to Type 1 diabetes, ill she is though she did go into an anaphylactic shock after one injection she was given after the operation. However, she was allowed home yesterday to recuperate so here's hoping all continues to go well for her.

As you might have noticed we've been on holiday. We stayed at Kirriemuir, the Gateway to the Glens. Here's a few photos taken there that made me smile.
We don't see nearly enough of these ice cream carts anymore. This one was in the restaurant we visited a few times - tasty food and they make a delicious Knickerbocker Glory.
Himself resting in front of Peter Pan. Kirriemuir is the birthplace of J M Barrie, author of Peter Pan.
This crooked chimney pot was spotted just outside the house where Barrie was born.
The house where Barrie was born. His father was a weaver there.
Finally, the wash house just outside where Barrie, as a boy, put on his first play. The old boiler where Barrie's mother did the washing for a family of ten is still there.

Finally, this little lad had his second birthday on Saturday.
Callum seems to know how to make himself comfortable eating out.

Well, it's still Friday so I'm just, only just, on time to join Annie and her smiley friends.

I hope you had a host of reasons to smile this week and that the weekend will bring many more.

Rudolph Day Card for June

Hello Everyone,

It's last minute but I just found some time this afternoon to make this little card for ScrappyMo's Rudolph Day Card Challenge for this month.
The background is another one of the pieces I made a few weeks ago using Brusho powder paints. The colour is Brilliant Red. The stamp set is an old one that I think came free with a magazine a couple of years ago - I particularly like the leaping deer.

Materials used:

  • a white card base cut to measure 4¼" x 4¾" - I know that's an odd size but I wanted the topper to be centred.
  • a scrap of red cardstock for matting the topper
  • the piece of Brusho spattered card
  • the Magical Christmas stamp set
  • Stazon Jet Black ink pad
  • Nuvo Crystal Drops Red Berry
  • black & white cord which came in a pack of three from WH Smith at Christmas

I think Maureen's Mister Linky is still open so I'm off to add this card to the list.

I wish you all a lovely weekend.

Thursday 29 June 2017

The Quilted Scrappy Box Bag

Hello Everyone,

Following on from yesterday's WOYWW post here's the finished scrappy bag.
After I recovered from zippergate I'd like to say it was a piece of cake but attaching the handle gave me a bad moment or two ... it's attached from the inside so I was working blind and had to make sure it wasn't twisted! Still, I got there in the end and I'm pleased with the result, warts and all.
Although the outer is made from a combination of black and white fabrics I've gone for a pop of colour for the lining. It's hidden but I know it's there ... it's the little things that make me happy!

I'm slowly getting back into the old routine after the holiday ... you'd think we'd been away for a month and not a week ... and hope to get down to making a June Rudolph Day card tomorrow.

That's it for this evening. Hope you're having a good one.

Wednesday 28 June 2017

WOYWW 421

Hi Everyone,

I'm back from my sojourn in the Highlands and I can report that it was fabulous. We even had a few wonderfully hot and sunny days. Sadly, the weather has been dismal since we returned on Sunday - could be that we've had our summer. Sigh. Enough. On to why I'm here, that'll be What's On Your Workdesk Wednesday over at Julia's, and why I'm so late, that'll be because I've been out most of the day at a patchwork/quilting class.
So not my usual desk today and please don't take a magnifying glass to those squares ... it will give the perfectionists among us a fit of the vapours. What you see are the side panels for a scrappy box bag. I'd love to show you the finished project but slow coach here didn't get it finished and, sadly, it's still a work in progress. Putting in the zip proved to be my Achilles Heel!!!

Here's a photo of some of the ladies beavering away.
We are in a former classroom in what is now Prestwick Community Centre but was at one time a Public School, built in 1882 to accommodate 350 pupils.
It's a lovely old building and it's also where the craft club I go to on Thursday afternoons is held.

I'll be back to share my make just as soon as it's done - hopefully, tomorrow.

In the meantime, I wish you all a very belated happy WOYWW and a great crafty week to come.

Friday 23 June 2017

A Notecard - Breathe

Hello Everyone,

This is the last of the posts I've scheduled for the week and today I'm sharing a card made for the UKPC Craft Group Swap challenge for this month.

The theme for June is The Sea with this photo as a prompt.
As you can see, I was very influenced by the image of the sea. It's another Brusho background too - I'm obsessed with Brushos at the moment!

Supplies used:

  • a square white card base, measuring 5" square, with a scalloped edge (from The Works)
  • a scrap of white cardstock cut to create the background piece,spritzed with water and dusted with Turquoise Brusho ink powder
  • a scrap of white card, also given the Brusho treatment but with a lighter dusting of the powder this time and cut to form a banner shape
  • stamp - Stampendous 'Breathe'
  • ink pads - Vivid Ultramarine (for the sentiment) and a turquoise from G Studio (VP0003) - this last was used to ink the edges of the background and the sentiment.
  • another scrap of white card, just a smidgen larger than the first piece, for layering the sentiment.

So that's it. The holiday is almost over but tomorrow we will be traveling up to Aberdeenshire to visit my son and his family. We haven't seen them for a while so I'm really looking forward to being with them again.

Hope you've all had a wonderful week too.

Wednesday 21 June 2017

Birthday Card - Loads of Fun

Hello Everyone,

Another scheduled post for you today. I'm still in the Highlands visiting lots of Scottish Castles so not around for What's On Your Workdesk Wednesday. Instead I'm sharing a card made for my little great-grandson who celebrates his second birthday this week.

I found the topper while I was sorting through some scrapbooking stickers and thought it would be just perfect for a little boy who is loads of fun to be with.

Supplies used and how I made the card:

- a pre-made white card base measuring 7" x 5" - landscape orientation
- dark brown cardstock for base layer. It's a piece recycled from a studio photo mount... similar to these pictured here: 
The photo is now in an album so it seemed a shame to waste a such a lovely source of free card.
- a piece of Kraft card I'd already embossed using the Hessian Textures Artist Collection folder (Crafter's Companion) cut to fit the brown card leaving a small margin on three sides only.
- the sticker from BoBunny, matted on to a snippet of yellow textured cardstock (Papermania). I trimmed the yellow card to just a tiny bit larger than the sticker to create the mat. 
- I found the letters already cut and ready in a bag that dates from a year or two ago - so long I don't remember cutting them. I think the die used was this one:
There's no maker's name on it - the only hint as to the font is the word 'Rome' in tiny print top left corner.
- the number two is from this big bag of fun foam numbers from Go Create Essentials (The Works). 
I think I have enough numbers to make cards for my great-grandchildren for many years to come.

Hope you are still having a wonderful week in my absence.

Sunday 18 June 2017

Sunday Snippets - Thanks So Very Much

Hello Everyone,

I may be away on holiday but I thought I'd surprise you by scheduling a post to share this card with you.

It's another one featuring a Brushos background and everything apart from the card base is made from snippets.

How it was made:

  • the card base was made by cutting white cardstock to measure 5" wide by 11¾" and folded in half to create a tent shape.
  • a snippet of white card measuring approximately 3½" x 4" (sorry, I forgot to measure it accurately) to create the topper. It was spritzed with water, dusted with two shades of Brusho, Yellow first, then Leaf Green, spritzed again and then left to dry. Once it was dry it was stamped with Impression Obsession's Cover-a-Card Flourishes background stamp using Versafine Olympia Green ink pad. 
  • a snippet of deep yellow textured cardstock (Papermania) was cut to the same size to make the mat for the topper.
  • the topper was layered on to the yellow card at a jaunty angle.
  • cream coloured twine was rapped around the topper and before tying this into a bow I attached a small green button - both items from old stash.
  • another snippet of white card was stamped with the sentiment from Stampin' Up's Simply Wonderful stamp set, again in Versafine Olympic Green. Using a Woodware's corner rounder, I rounded the corners before adhering it to the topper, just under the green button which I then stuck down with a glue dot just to be sure it all stayed in place. 
  • finally, the topper was adhered to the front of the card using sticky pads to add a bit of dimension.

That's my card for today. I hope you will all have a lovely week while I'm away enjoying beautiful Scottish scenery.

Wednesday 14 June 2017

WOYWW ATCs Received

Hi Everyone,

I did say I wasn't joining in with What's On Your Desk Wednesday this week because I'm going off on holiday and just know I won't be able to visit you all, or be able to leave many comments but ...
... I just had to share these lovely W8OYWW ATCs, and the pretty notecards that came with them. They are from Robyn (left) and Darlene (right). As I live very near the sea the theme of Darlene's will take pride of place among our seaside related bits and bobs. And Robyn couldn't have known how appropriate the sentiment on her ATC ... we are planning to adopt a puppy later on in the year.

That's all from me today. I'm in the throes of pre-holiday prep and there still seems to be a lot to do. I'll need a holiday to get over it all. 

Have a lovely WOYWW and a great week ahead.

Tuesday 13 June 2017

Embossed Birthday Card

Evening,

I have this little card to share with you today.

It was made by dipping into that box of embossed scrap - part of the sort out operation I've been working on for weeks, see it in this previous post.

Supplies used:

  • a pre-made white card base, measuring 5¾" x 4¼" - landscape orientation.
  • cardstock - rose pink Coordinations card and aubergine Textured Cardstock from Papermania. 
  • embossing folder -  Folksy Circle (Sizzix). 
  • Happy Birthday die - from China  
  • aubergine satin ribbon to tie around the top of the card.


Just a quick post this evening. I'm still busy preparing for the holiday - just a few more sleeps and we'll be on our way.

Take care,

Monday 12 June 2017

In My Garden Today

Hello Everyone,

For a host of reasons I haven't been able to post my usual In A Vase On Monday these last few weeks. Today is no exception. I'm off on holiday soon so I'd rather not cut flowers that will wilt and die from neglect. So, instead, here's a photo from my garden which I hope you will like as much as I do.
A happy combination of Clematis Sunset and the black elder, Sambucus Black Beauty.

Hope you are having a great Monday.

Sunday 11 June 2017

Sunday Snippet Make - A Minnie Mouse Card

Good Evening,

I hope you are having a happy crafty Sunday.  After quite a pleasant morning here - managed a couple of hours gardening - the heavens have now opened and it's pouring down. Not that I'm too bothered because it gave me the perfect excuse to retreat to the craft room and finish the card I'm sharing today.

Have you ever wondered how I go about designing my cards? Well, I often wonder that myself and actually it's pretty hit and miss. I don't make sketches and I certainly don't have a clear idea of where I'm going before I start. They just sort of develop - usually very slowly. In fact, a quick card is something of a rarity.  Instead I start with a person, an occasion or, as in this case, one item I want to use and then go from there. What follows is an illustrated walk-through of how I made this card.
The idea for this card has been brewing for a few days. The starting point was that I wanted to make a card for a Minnie Mouse enthusiast's birthday using a Disney adhesive topper from a set that has been in my stash for quite some time, Frankly, I'm a sucker for anything Minnie and/or polka dots and I blame Disney entirely for this obsession.
So I had the topper but there has to be more than that to a card. Once the topper was decided on a very vague idea of what I wanted to include in it began to develop. A background was essential and I wanted to make it myself but I wasn't at all sure how. It wasn't until I was watching a recording of a craft show - I 'speed watch' these to avoid the sales chatter - where the demonstrator was making the most fabulous background using alcohol inks and glossy paper. Now the background I've made is clearly not made with alcohol inks but that demo was the prompt for me to dig out my tiny set of Brushos instead.

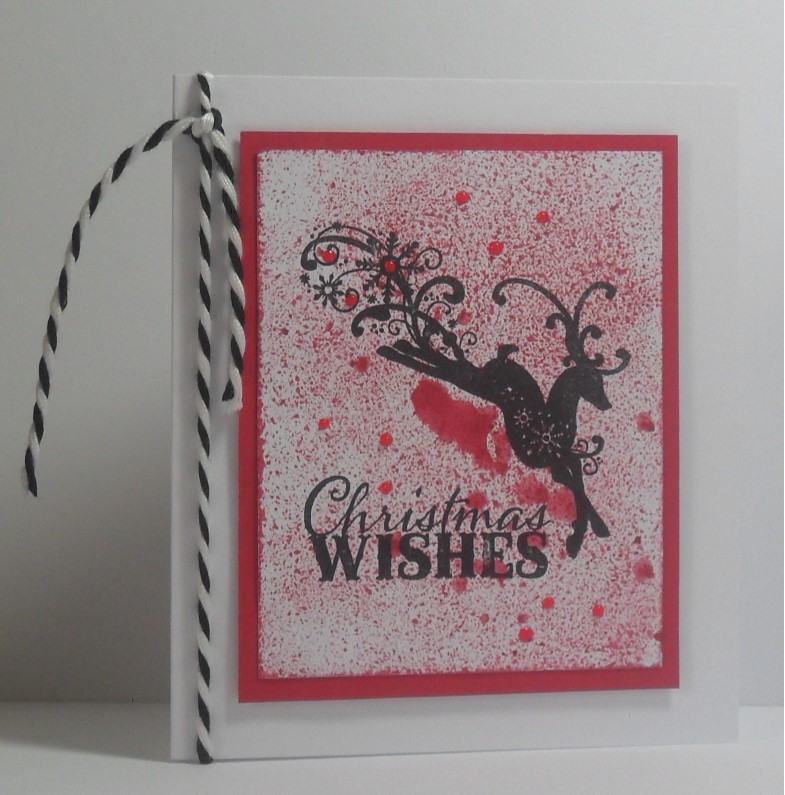
I chose a scrap of white pearlised card - using the reverse (non-pearlised) side, a tip from Sheena Douglass - and on a craft mat spritzed it with water before shaking Brilliant Red Brusho ink dust on to it. I found a second spritzing got the spattered effect I was looking for. After putting the card aside to dry, I mopped up the ink that was left on the craft mat and put that aside too.

While they were drying I cut a sheet of black cardstock - Papermill Direct - to make the matting for the spattered background, which was then adhered to a plain white card base measureing 7"x 5" (The Works Make & Create). Next I die cut the matting and layering for the topper. Dotty paper seemed a must and I was lucky to find a snippet of red/white and a sheet a black/white polka dotted paper in my stash. It's old 6"x 6" paper - Raspberry Road Designs Summer Goodness (2012) and a Crafts-~Too Designer Paper Pack - most probably 2012 too. I used a Chinese die set for this. The packaging has minimal information on it so here's a photo of what it looks like.
And while I was searching through the dies I came across the tiny Interlocking Circles die from Decorette (CLDR 11) which gave me the idea for the embellishments. I cut it twice from leftover black cardstock and attached it to the top right and bottom left corners of the splattered card using liquid glue ... it's so fine any other adhesive wouldn't work.
To make the topper I also die-cut the scrap of card used to mop up the ink and then layered it with the red and black patterned papers before topping it with Minnie. The final touch was to add the greeting which also came with the topper set.

And that is how this card was made. I'm submitting it to the following two challenges:

Di's Pixie's Snippets Playground - Week 285 and 286 - where anything goes as long as it includes snippets.

Allsorts Challenge - Week 419 - Use at least two dies

I hope you enjoyed reading this more detailed description of how I made the card. Normally, I simply itemise the steps that go into making a card, making it all seem so quick and easy, but I thought this blow by blow account would give a truer insight into the tortured thinking that goes into the whole process. I suspect that you have a much more organised approach which makes cardmaking easier, simpler and quicker. I truly am the slowest card maker in the World! I'd never be able to make a living at it, that's for sure.

It's going to be a good night tonight. Poldark is back!

I wish you all a lovely evening.

Wednesday 7 June 2017

WOYWW - Week 418

Hello Everyone,


Where has the week gone??? ... I swear I missed several days this week. Wednesday has come round sooner than expected, again! Many thanks to everyone who wished me well after my falling out of bed injury. Happily, I'm a whole lot better this week but it does feel as though I've lost a few days somewhere. In fact, I've only just remembered that it's Wednesday and, furthermore, it's What's On Your Workdesk Wednesday.  So, here I am, late again, and here's my desk.
Not particularly exciting. Although there has been much progress in the craft room sort out there's still a way to go before I'll be able to call it done. So this is a pile of stickers that I found mixed in with alphabet sets, and therefore forgotten. They await my attention.
On the other desk there's some fabric. I'm planning to make a couple of dust covers for some kitchen equipment. All part of the war of attrition waged against dust on a daily basis. So far, I'm the loser!
Some happy mail that arrived yesterday. I spotted the Altenew stamp set on a YouTube video and just had to have it. Sorry, I can't remember whose video - painkillers numbed the senses, though not enough to prevent me searching for a supplier and ordering ... proving there's no keeping a dedicated crafter down.  All the sentiments are craft related so I think this may prove to be one of my most useful sets ever.
Here's a quick pic of the ATCs I made for the recent swap. Only eight - but that's eight more than I made last year so I'm happy and who knows how many I'll manage for W9OYWW.
And finally, a shot of the view from my window today. Love it!

That's it for me this week. Not a lot to show really but that's down to the ongoing craft room sort out. It will end soon. It has too. We are off on holiday soon and I do not want to return to any more sorting.  And because of the holiday, I won't be participating over the next couple of weeks - we're off to the Highlands. It's our first long holiday for more than three years and I'm really looking forward to it.

Have a lovely WOYWW, what's left of it, and a great week ahead.