Happy Monday Everyone,
I hope you are all well and enjoying a bit more sunshine than we have up in these parts today ... that's none! The bit of sky we can see peeking through the clouds is blue enough but the sun is clearly struggling to break through and failing miserably :(
That makes it a day suitable for staying in and crafting ... there's always a silver lining :) So I have a quick snippet make, the first for Pixie's Crafty Snippet Playground this week, to share with you.
I had the merest scrap of the shaving foam marbled card left over from last week's lavender fest and I couldn't bear to throw it out so I devised this card instead.
Firstly, I punched three 1" squares from the marbled card, taking care to punch around one of the tiny embossed dragonflies. A scrap of lilac card was then trimmed to measure just about 1/16" larger all round - just big enough to mat the dragonfly squares on.
I then stamped a scroll from Dawn Bibby's Delicate Scroll stamp set, inking it up in a combination of the following inks, Tim Holtz distress inks, Shabby Shutters & Peeled Paint; Memento Dual Marker, Bamboo Leaves & Pear Tart on to a white 4" square card base. And using the same stamp and colours the inside and back were stamped too.
Next, after deciding where the squares were going to go, the greeting, from Sheena's A Little Bit Sketchy Only Words Through the Rain stamps set, in a combination of Whispers Rio Purple ink pad and Memento Dual Marker Grape Jelly.
Finally, the dragonfly squares were glued in place over the stamped scroll.
And that is it ... a simple and easy little card to use up those tiny little bits that you just can't bear to throw away :)
Oh, ho! The sun is struggling through ... it could turn out to be very nice after all!
Off to have some lunch and maybe a wander round the garden. I see the doves are waiting expectantly for the EM to appear with lunch too :))
Have a great afternoon everyone and happy crafting,
Showing posts with label Shaving foam method. Show all posts
Monday, 5 August 2013
Sunday, 28 July 2013
Lavender Card and Bookmark Set
Afternoon Everyone,
This month's UKPC SWAP challenged me to create something on the theme of lavender ... it could be the colour or the plant or whatever ... the choice was up to me. I love lavender flowers - the scent as you brush past the plant is delicious - so the decision was easy, especially when I remembered I had the brilliant Pamela West CD set to draw on for materials and this set is the result.
I printed of several sheets for the decoupage and sentiments, backing papers, insert, bookmark and the envelope.
For the card I put together the decoupage and layered it on to the plain backing paper, same with the sentiment.
I added a piece of card, coloured using the shaving foam method and Cosmic Shimmer Mist ... I was shocked to discovered that it's more than two years since I did this piece - click the link for how to of the method. This I embossed with a super Dragonfly folder (a winning from the lovely Di's Pixie's Crafty Snippet Playground) ... dragonflies just seemed right with lavender but unfortunately the little dragonflies don't show up so well in the photo, sigh, isn't that just the way of it! It has been layered with some of the backing paper which has been edged with one of my two precious Martha Stewart punches, I think this one might be called Arch Edge but can't honestly say I'm sure.
I made two more dragonflies by stamping on to scraps of the inky card ... it has a lovely shimmery finish which is perfect for dragonfly wings. Black gems and black Stickles have been used to decorate the bodies.
I did use a sheet of the insert paper, trimmed down, as a layer on the front of the card and the topper sheet provided another little image for the back.
The bookmark was printed out on plain paper and then adhered to white card before folding and adhering the edges together.
The envelope is cleverly designed to give the option of being flat or being a quarter inch or so deep - perfect for a card that has some dimension to it.
Materials used:
This month's UKPC SWAP challenged me to create something on the theme of lavender ... it could be the colour or the plant or whatever ... the choice was up to me. I love lavender flowers - the scent as you brush past the plant is delicious - so the decision was easy, especially when I remembered I had the brilliant Pamela West CD set to draw on for materials and this set is the result.
I printed of several sheets for the decoupage and sentiments, backing papers, insert, bookmark and the envelope.
For the card I put together the decoupage and layered it on to the plain backing paper, same with the sentiment.
I added a piece of card, coloured using the shaving foam method and Cosmic Shimmer Mist ... I was shocked to discovered that it's more than two years since I did this piece - click the link for how to of the method. This I embossed with a super Dragonfly folder (a winning from the lovely Di's Pixie's Crafty Snippet Playground) ... dragonflies just seemed right with lavender but unfortunately the little dragonflies don't show up so well in the photo, sigh, isn't that just the way of it! It has been layered with some of the backing paper which has been edged with one of my two precious Martha Stewart punches, I think this one might be called Arch Edge but can't honestly say I'm sure.
I made two more dragonflies by stamping on to scraps of the inky card ... it has a lovely shimmery finish which is perfect for dragonfly wings. Black gems and black Stickles have been used to decorate the bodies.
I did use a sheet of the insert paper, trimmed down, as a layer on the front of the card and the topper sheet provided another little image for the back.
The bookmark was printed out on plain paper and then adhered to white card before folding and adhering the edges together.
The envelope is cleverly designed to give the option of being flat or being a quarter inch or so deep - perfect for a card that has some dimension to it.
Materials used:
- plain white A6 card base
- Pamela West CD for decoupage topper, backing/layering papers, sentiment, bookmark, insert
- the piece of inked card hand done with the shaving foam technique and Cosmic Shimmer Mists, Meadow Lush, Blue Lime & Purple Violet
- Craft Concepts Dragonfly Embossing Folder
- Martha Stewart Arch Edge punch
- Denami Design Dragonfly stamp
- Memento Tuxedo Black ink pad
- Black ProMarker
- black gemstones, narrow lilac organza ribbon, Black Diamond Stickles from stash
I'm submitting this to Pixie's Crafty Snippets Playground - Week 83 - where Miss Di's only requirement is that we use snippets ... that's the hand coloured Shimmer Mist card on this card. As it's Sunday, start of Pixie's snippet week, I'll be able to skate right through the playground gates today ... unlike yesterday's debacle, talk about being embarrassed :(
Garden update: from my window, I can see a beautifully elegant collared dove preening himself/herself ... I've no idea how you tell the difference! I think it is waiting for the EM who has been patiently trying to tame this one enough to get it eating out of his hand, and he could be close to succeeding :)
Weather update: it's been raining, pouring cats and dogs in fact, but it has dried up now and the sun is struggling through the clouds. It looks like it's going to be a lovely evening.
I hope it is just as pleasant wherever you are. Take care and happy crafting.
Thursday, 4 April 2013
All The Flowers - Shaving Foam, Frantage and Beadazzles
Hi Everyone,
Surprise! I wasn't needed for jury service after all ... just like they didn't want 79 others who received a citation too. So I live to be cited another day :)
Now, what has your day been like ... a good one, I hope.
March's swap challenge on UKPC required a card made using the shaving foam marbling technique so here's what I came up with.
I marbled some white card with a mix of turquoise and brown shimmer inks and the result was very nice. It's not too evident in the photograph but there is also a very pretty scroll with flowers and butterflies stamped in aqua on top of the marbling.
Before matting it on to a turquoise cardstock, it was sprinkled with various Frantage powders and sparkly/flaky bits from a turquoise encrusted jewel kit. Yes, after months of mixing my own powders I caved in and now have one beautiful kit. Love that the result is different every time.
The flowers were stamped, embossed and cut out of turquoise vellum - and that's Beadazzles in the centres - something else for me to love :)
Inside and back were decorated with the trimmings of the marbled cardstock.
Materials used:
Base: white Kanban A6 size card base; scrap of Core'dinations cardstock - turquoise textured - for matting
Background: smooth white cardstock, shaving foam, Luminarte Radiant Rain in Teal Zircon and Autumn Leaf for marbling; Tim Holtz distress ink, Peacock Feathers and Dimensions Crafts Butterfly Scroll; Stampendous Frantage Encrusted Jewel Kit - Teal
Topper: Spellbinders Nestabilities Labels Twenty-Five, Verve Stamps - All The Flowers, VersaMark, Heat-it-Up Gold embossing powder
Flowers: scrap of K&Company turquoise vellum, Dawn Bibby flower stamp from Flowers and Leaf stamp set, Personal Impressions flower stamp, Suze Weinberg's Beadazzles - Jazz
Ribbon: aqua seam binding from Ribbon Girl
It seems I'm going through my turquoise phase at the moment ... but it is a pretty colour that seems to be liked by most people. I once read that it is the only colour that suits everyone, whatever their skin and hair colour and I'm inclined to agree.
Because of the scraps of Core'dination cardstock and vellum used for the flowers I'm hopping and skipping over to Pixie's Crafty Snippets Playground - Week 66 - and I'll stop by to see what Di has been up to today while I'm there :)
Right, methinks it is time for a cuppa.
Thanks for dropping in and do take care, sleep well and have a good day tomorrow.
Oh, and happy crafting too,
Surprise! I wasn't needed for jury service after all ... just like they didn't want 79 others who received a citation too. So I live to be cited another day :)
Now, what has your day been like ... a good one, I hope.
March's swap challenge on UKPC required a card made using the shaving foam marbling technique so here's what I came up with.
I marbled some white card with a mix of turquoise and brown shimmer inks and the result was very nice. It's not too evident in the photograph but there is also a very pretty scroll with flowers and butterflies stamped in aqua on top of the marbling.
Before matting it on to a turquoise cardstock, it was sprinkled with various Frantage powders and sparkly/flaky bits from a turquoise encrusted jewel kit. Yes, after months of mixing my own powders I caved in and now have one beautiful kit. Love that the result is different every time.
The flowers were stamped, embossed and cut out of turquoise vellum - and that's Beadazzles in the centres - something else for me to love :)
Inside and back were decorated with the trimmings of the marbled cardstock.
Materials used:
Base: white Kanban A6 size card base; scrap of Core'dinations cardstock - turquoise textured - for matting
Background: smooth white cardstock, shaving foam, Luminarte Radiant Rain in Teal Zircon and Autumn Leaf for marbling; Tim Holtz distress ink, Peacock Feathers and Dimensions Crafts Butterfly Scroll; Stampendous Frantage Encrusted Jewel Kit - Teal
Topper: Spellbinders Nestabilities Labels Twenty-Five, Verve Stamps - All The Flowers, VersaMark, Heat-it-Up Gold embossing powder
Flowers: scrap of K&Company turquoise vellum, Dawn Bibby flower stamp from Flowers and Leaf stamp set, Personal Impressions flower stamp, Suze Weinberg's Beadazzles - Jazz
Ribbon: aqua seam binding from Ribbon Girl
It seems I'm going through my turquoise phase at the moment ... but it is a pretty colour that seems to be liked by most people. I once read that it is the only colour that suits everyone, whatever their skin and hair colour and I'm inclined to agree.
Because of the scraps of Core'dination cardstock and vellum used for the flowers I'm hopping and skipping over to Pixie's Crafty Snippets Playground - Week 66 - and I'll stop by to see what Di has been up to today while I'm there :)
Right, methinks it is time for a cuppa.
Thanks for dropping in and do take care, sleep well and have a good day tomorrow.
Oh, and happy crafting too,
Friday, 22 March 2013
Friday Smile and card for CHNC 116
Evening folks
I've missed a couple of weeks of Annie's (aka Wipso) Friday Smile - Week 10, not because I don't have anything to smile about, I do, a lot. Trouble is I don't always have my camera handy at the right time. Today, though, I remembered to take a snap of this before it was too late.
A cup of steaming hot tea, a piece the EM's boiled fruit cake and a good book ... what more could anyone want :)
The cake is a recent addition to the EM's baking successes. Once he'd worked out the timings and temperatures for our temperamental oven every cake is a winner :)
The book is a genealogy based mystery ... as an amateur family historian this is just up my street :)
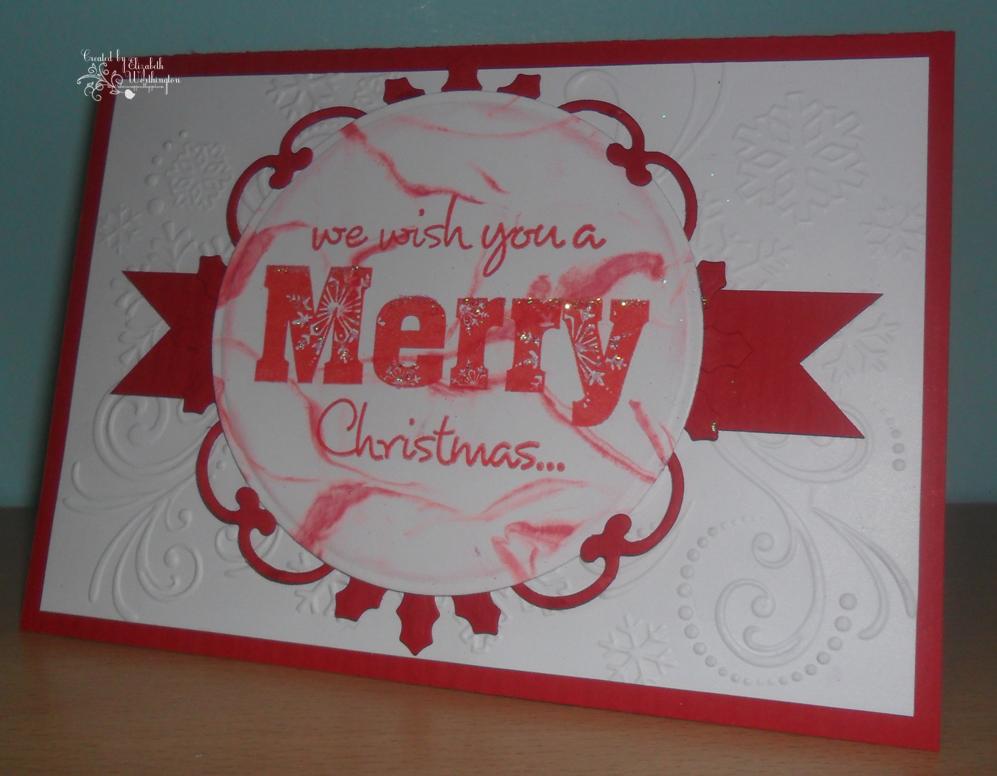
That's the reasons to smile, here's the card - and there will be another smile if I get this submitted to Hazel's CHNC challenge 116 before end of play today. (I so frequently just make it that it is always a reason to celebrate if I have even a couple of hours to spare)
The challenge topic this week is 'Merry and Bright'. I've managed the 'merry' okay and the red/white theme is definitely bright, but just in case that's not bright enough, I've sprinkled some glitter on the topper too.
The topper is made from a piece of marbled card made with shaving foam and shimmer spray - just the one colour used on this one.
The inside has the corner stamped in red with a holly flourish ...
... and the back has been randomly stamped with same.
The card has been made entirely from snippets and leftovers - even the red card had been previously cut in to so I'll be joining the others over at Di's and Pixie's Crafty Snippet Playground - Week 64.
Materials used: smooth white card stock, shaving foam and Cosmic Shimmer Spray, Lava Red; Bazzill Basics textured red cardstock for base, pennant and die-cut topper; Spellbinders Shapeabilities Holly Motifs die set; X-cut nesting Dies Circle; smooth white card and Darice Snowflake Swirl embossing folder; Docrafts Penelope & Percy Christmas Greetings stamp set; Anita's Magical Christmas stamp set; Whispers Cherry Red ink pad: glue pen and iridescent glitter
Must go ... I'm missing Pointless and that will never do.
Take care everyone and have an enjoyable weekend wherever you are.
Edited note: in my haste to see Pointless, and as usual, I neglected to submit this card to Hazel's Extra Challenge for March - Hazel had to remind me, again, as usual!
Happy crafting,
I've missed a couple of weeks of Annie's (aka Wipso) Friday Smile - Week 10, not because I don't have anything to smile about, I do, a lot. Trouble is I don't always have my camera handy at the right time. Today, though, I remembered to take a snap of this before it was too late.
A cup of steaming hot tea, a piece the EM's boiled fruit cake and a good book ... what more could anyone want :)
The cake is a recent addition to the EM's baking successes. Once he'd worked out the timings and temperatures for our temperamental oven every cake is a winner :)
The book is a genealogy based mystery ... as an amateur family historian this is just up my street :)
That's the reasons to smile, here's the card - and there will be another smile if I get this submitted to Hazel's CHNC challenge 116 before end of play today. (I so frequently just make it that it is always a reason to celebrate if I have even a couple of hours to spare)
The challenge topic this week is 'Merry and Bright'. I've managed the 'merry' okay and the red/white theme is definitely bright, but just in case that's not bright enough, I've sprinkled some glitter on the topper too.
The topper is made from a piece of marbled card made with shaving foam and shimmer spray - just the one colour used on this one.
The inside has the corner stamped in red with a holly flourish ...
... and the back has been randomly stamped with same.
The card has been made entirely from snippets and leftovers - even the red card had been previously cut in to so I'll be joining the others over at Di's and Pixie's Crafty Snippet Playground - Week 64.
Materials used: smooth white card stock, shaving foam and Cosmic Shimmer Spray, Lava Red; Bazzill Basics textured red cardstock for base, pennant and die-cut topper; Spellbinders Shapeabilities Holly Motifs die set; X-cut nesting Dies Circle; smooth white card and Darice Snowflake Swirl embossing folder; Docrafts Penelope & Percy Christmas Greetings stamp set; Anita's Magical Christmas stamp set; Whispers Cherry Red ink pad: glue pen and iridescent glitter
Must go ... I'm missing Pointless and that will never do.
Take care everyone and have an enjoyable weekend wherever you are.
Edited note: in my haste to see Pointless, and as usual, I neglected to submit this card to Hazel's Extra Challenge for March - Hazel had to remind me, again, as usual!
Happy crafting,
Tuesday, 19 March 2013
A is for Aqua Aspire
Hello Everyone,
I hope Monday has been good to you, especially those of you who returned to work after the weekend :)
Me, I've had a day of dusting and sweeping - well, okay, that only took up a very brief part of my day, the rest was spent either on the computer or in the craft room. That's what it's like when you're retired - life's a beach :))
Recently, in this post here, I reported that I've been making marbled backgrounds using shaving foam and shimmer sprays. Here's the first card made with a piece that I thought was pretty - I like the subtle colouring.
I used white cardstock marbled with Luminarte Radiant Rain, Teal Zircon and Autumn Leaf, and teamed it with turquoise holographic card and a pale aqua cardstock. The topper is stamped with one of my all-time favourite flower stamps, Penny Black's Aspire, coloured with the only two Ranger Distress Markers I have, Peeled Paint and Aged Mahogany - an unlikely shade for flowers, I know, but it worked well on the marbled background, I think.
Guess who forgot to photograph the inside before writing a message in it!?!? However, I think you can just about see that it is stamped in the lower right corner using the second generation stamping method ...
... on the back too.
I'd like to submit this card to the following:
Stamping Sensations March Challenge - the theme is The Great Outdoors
One Crazy Stamper March 'Anything Goes' Challenge
The Crafting Cafe March Challenge - Your Favourite Colour
and last, but certainly not least, Pixie's Crafty Snippets Workshop - Week 64
It's nine minutes to the witching hours so I think I better call it a day.
Goodnight folks,
I hope Monday has been good to you, especially those of you who returned to work after the weekend :)
Me, I've had a day of dusting and sweeping - well, okay, that only took up a very brief part of my day, the rest was spent either on the computer or in the craft room. That's what it's like when you're retired - life's a beach :))
Recently, in this post here, I reported that I've been making marbled backgrounds using shaving foam and shimmer sprays. Here's the first card made with a piece that I thought was pretty - I like the subtle colouring.
I used white cardstock marbled with Luminarte Radiant Rain, Teal Zircon and Autumn Leaf, and teamed it with turquoise holographic card and a pale aqua cardstock. The topper is stamped with one of my all-time favourite flower stamps, Penny Black's Aspire, coloured with the only two Ranger Distress Markers I have, Peeled Paint and Aged Mahogany - an unlikely shade for flowers, I know, but it worked well on the marbled background, I think.
Guess who forgot to photograph the inside before writing a message in it!?!? However, I think you can just about see that it is stamped in the lower right corner using the second generation stamping method ...
... on the back too.
I'd like to submit this card to the following:
Stamping Sensations March Challenge - the theme is The Great Outdoors
One Crazy Stamper March 'Anything Goes' Challenge
The Crafting Cafe March Challenge - Your Favourite Colour
and last, but certainly not least, Pixie's Crafty Snippets Workshop - Week 64
It's nine minutes to the witching hours so I think I better call it a day.
Goodnight folks,
Wednesday, 6 March 2013
WOYWW 196
Morning WOYWWers, Followers and Fellow Bloggers,
Happy Wednesday to you all. I have a shot of the two desks in my craft space for WOYWW today.
Desk No. 1 - where I usually craft but, as you can see, right now, with the exception of the two Kraft/white pieces of cardstock, it has been taken over for the cataloguing of stamps. So far, I've indexed about half the wood-mounted stamps - the Christmas themed is waiting in the wings - and a tiny fraction of the cling variety ... and that's progress :) The Kraft card is the result of me experimenting with my new white stamp (Colourbox Frost White) and a new Chevron mask. The piece to the front is just simply inking through the mask on to the card and the piece at back is what happens when you don't clean your mask but put it through the Cuttlebug and emboss it - it works a treat to give a different effect. Now I just have to decide what I'm going to do with the pieces. There's a pile of stamping blocks - they've been well-used this week - a couple of distress markers - my entire collection - a black marker, and a bottle of stamp cleaner. I won't itemise the stuff at the back - it's always there - but I have to draw your attention to the fab ATC that's propped up against the plaid accessories. Created by BJ, a frequent WOYWWer, the postie delivered it this morning - many thanks BJ, I love it :)
Desk No. 2 - actually the worktop that I use for guillotining (sounds gruesome) or Cuttlebugging but today it's been cleared so that I can get messy with shaving foam and shimmer mists. I'm working on something for a challenge ... great fun and it smells gorgeous - but my hands are a disgrace.
So that's me done! Short and sweet. Julia will be pleased :)
Happy WOYWW to you all - take care and happy crafting,
Happy Wednesday to you all. I have a shot of the two desks in my craft space for WOYWW today.
Desk No. 1 - where I usually craft but, as you can see, right now, with the exception of the two Kraft/white pieces of cardstock, it has been taken over for the cataloguing of stamps. So far, I've indexed about half the wood-mounted stamps - the Christmas themed is waiting in the wings - and a tiny fraction of the cling variety ... and that's progress :) The Kraft card is the result of me experimenting with my new white stamp (Colourbox Frost White) and a new Chevron mask. The piece to the front is just simply inking through the mask on to the card and the piece at back is what happens when you don't clean your mask but put it through the Cuttlebug and emboss it - it works a treat to give a different effect. Now I just have to decide what I'm going to do with the pieces. There's a pile of stamping blocks - they've been well-used this week - a couple of distress markers - my entire collection - a black marker, and a bottle of stamp cleaner. I won't itemise the stuff at the back - it's always there - but I have to draw your attention to the fab ATC that's propped up against the plaid accessories. Created by BJ, a frequent WOYWWer, the postie delivered it this morning - many thanks BJ, I love it :)
Desk No. 2 - actually the worktop that I use for guillotining (sounds gruesome) or Cuttlebugging but today it's been cleared so that I can get messy with shaving foam and shimmer mists. I'm working on something for a challenge ... great fun and it smells gorgeous - but my hands are a disgrace.
So that's me done! Short and sweet. Julia will be pleased :)
Happy WOYWW to you all - take care and happy crafting,
Sunday, 23 January 2011
Shaving Foam Method for Creating Marbled Effect Tutorial
Hello everyone,
The mention I made in a recent post to shaving foam has whetted the appetite of some of you so I feel I have to explain . . . nay, show you what I have been doing. I thought it best if I took you step-by-step through this method of creating colourful backgrounds.
Materials used:
· Can of spray shaving foam – any cheap make will do fine (I got the one I used from a Pound Shop)
· Shimmer or Mica mist – I used Cosmic Shimmer Mist – in a variety of colours
· White cardstock – mine was cut to approximately A6 size (6”x4”) or to fit your container
· A container deep enough to prevent the sprays from marking your worktop – I used a small plastic tray measuring 9”x7”, part of a Christmas gift of shortbread!
· Roll of kitchen paper
Method:
Step 1
Spray the shaving foam evenly over the tray.
Step 2
Spray first colour of shimmer mist (I used Twilight Black) in patches onto the foam, then the second colour (Meadow Lush) filling in the gaps.
Step 3
Take a pencil shaped object, I used the wrong end of a paint brush, and stroke/swirl through the foam. It will look something like this:
Step 4
Place your card on top of the foam and press down gently.
Step 5
Lift the paper off and taking the kitchen paper wipe off the foam. Ta da! The card will look like this:
And that is about it – all that’s left to do is leave the card to dry and use it to make a project.
However, if, like me, you are a tad generous when spraying the foam on the tray you can go on to do what I did. Being frugal and loathe to wash the foam away I thought I would add a bit more colour – this time Lava Red – doesn’t that look yummy J I then followed through steps 3 & 4 again.
This time I remembered to take a second piece of card and put it on top of the already foam covered card like this:
After doing this you will then have two pieces of card looking like this before cleaning off with kitchen paper.
I was able to try another colour (Purple Violet) before the foam was exhausted and here is the six pieces of card I ended up with.
An added bonus is the card smells gorgeous!!
I hope you found this, my first attempt at a tutorial, clear and easy to follow but if I haven't explained something clearly enough or I've missed out an essential step out please do not hesitate to contact me.
Now to decide what I'm going to do with all this pretty card.
Bye for now,
Elizabeth
Subscribe to:
Posts (Atom)