Thursday, 31 March 2011

William's Baby Page

Good Evening,


A bit of a late post tonight but I've just completed the scrap layout that was lying on my work desk for yesterday morning's WOYWW post. I thought you might like to see the finished page. The page size is to fit an 8" x 8" album, and I've just discovered that it is a great size to be working with as long as it's kept relatively uncluttered. The background paper came from the Papermania Mini Scrapbook Kit - the one that was part of my prize after winning Clare's Challenge a few week's ago. The photo's are cropped scans of snaps that included me and my sister, Margaret, holding William just after he was born 22 years ago. Which is why they are a bit blurry - I'd have had better photographs taken if I'd known then that I was going to scrap them one day : )


The other baby is one from Lili of the Valley's Cute Squares - I thought it went well with the other embellishments including that gorgeous puffy satin flower that I picked up from The Works - a real bargain buy, a pack of 4 for £1. The yellow square die cut was an ebay purchase, the supplier, Ladybird Gardens Nursery. 


The stamp for the journalling is from Papermania's Tweet set. Not a lot of journalling, just the bare details.  Not everyone appreciates a lot of journalling so I'm keeping it to the minimum for this album.


I used Crafter's Companion's SWALK CD to create the title letters, just tweaked the colour till I was happy with it and then printed out onto some light card before cutting out. Love the little polka dots. The whole page is adhered to a backing of white card to strengthen it.

Materials used:
  • Cardstock: Create & Craft A4 White Card, 200gsm
  • Design Paper: Papermania Mini Scrapbook Kit - baby boy
  • Stamps: Papermania's Tweet set, stamped up with Adirondack Earthtones, Stonewashed ink pad
  • CD: Crafter's Companion's SWALK to create the title letters
  • Embellishments: Lili of the Valley's Cute Squares, Babies; square yellow die cut from Ladybird Gardens Nursery; puffed lemon satin flower from The Works; the two tiny blue flowers from my stash

Next layout I'll be working on is of William in his first year, he was a really cute baby so I'm looking forward to planning that. In the meantime, I'm off to bed to read for a while and I'll leave you with the words of Scarlet O'Hara, 'tomorrow is another day.'

Happy crafting,


Wednesday, 30 March 2011

WOYWW 95 - A Flower Haul + Spring Flower Boxes

Happy WOYWW 95 to you all,


After all these months of card making I'm scrapping again so what you see on my work desk today is all about that. What you see is the first page, no; the second page of an album I'm making for my grandchildren's other grandmother. It's the second page because I will have to do a title page but haven't exactly decided what to do with that yet. As I'm the snapper in the family I'm the one with all the photographs and Granny Ann mentioned she had very few so, hopefully, this album will fill in the gaps in her collection.

I've mocked up the page layout but not stuck the elements down yet because I like to take a photo at this stage so that I can refer to when sticking it down. Round it are the supplies I've been working with: Papermania, Tweet stamp set; Adirondack Stonewashed ink pad, a pack of Vellum Writer pens, etc. Propped up at the back you can just see a couple of cute little LOTV squares - one is Christmas themed and I plan to use it in this week's Christmas card.

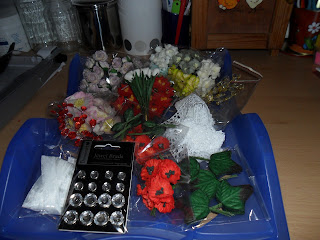
Hanging down is a pack of new jewel brads. My stash of WOC flowers were at an all time low so I had to put in an order and couldn't resist some bling too.

Yummy flowers: pink-edged hellebores, red poppies, red poinsettias, roses, white tulips, mixed cherry blossoms and rose and ivy leaves. There's also some cotton lace, white seam binding, and crystal sprays in red and gold. That should keep me going for a while.

For a sight of many more work desks best to hop over to the Queen of Desks, Julia's place at Stamping Ground - just click on the WOYWW link to the left here and happy desk hopping.
And here's what did me in at the weekend - we tidied up the front garden, rearranged the tubs and planters and added some more window boxes.


The pieris, to the right by the bench, was a present for my 50th birthday so is now about 13 years old. It was a tiny wee thing when it was given to me but is a beauty now and the bees love the flowers. That's a berberis next to it which is not so old, about 7 years old - I worked for a landscaping firm for a few years before going freelance and this plant came from the nursery there. It's a favourite because the blackbirds really enjoy the berries. After a jaunt to the local garden centre the, the Under Gardener (aka, the EM) planted the pots up with pansies, primulas, bellis and trailing lobelia, while I got out the secateurs and tidied up the plants from last year. Result: lovely. But I forgot to pace myself, did too much, and was jiggered for the next couple days. These are the joys of arthritis and impending old age : ) Next on the list is the back garden - it really needs a seeing too!

So that's it for today. Once I've posted this I'm off to look at as many desks as I can before lunch - yes, I'm really late uploading this today :)

Happy crafting to you all and I look forward to hearing from some of you over the next week.


Monday, 28 March 2011

Trip to Robert Burns Birthplace Museum + This Week's Bargain

Good Afternoon to You All


Apologies for being MIA for the last couple of days - I had been doing too much again, gadding about all over the place and even putting in a bit of gardening, and paid the price but rested yesterday and today and feeling able to get going again. The weather here is just gorgeous - the late afternoon sun is streaming into the craft space and lighting up the dust motes : )

The sculptured mouse above is Kenny Hunter's 'muckle, brazen beastie'!  So nothing like the mouse Burns (1759-1796) actually wrote about in his poem 'To A Mouse' then. He describes the mouse as a 'Wee, sleekit, cowrin, tim'rous beastie,' (the standard English translation is 'Small, sleek, cowering, timorous beast,') However, the sculpture commemorates the poem and is situated at the entrance to the Poet's Path which connects the Robert Burns Birthplace Museum to Burns Cottage, now owned and run by the Scottish National Trust.

This is the only time you will ever see me up close and comfortable with a mouse!


The entrance to the museum proper in Alloway, Ayr. We were not allowed to photograph inside but I can tell you that there is a terrific display with lots of opportunities to be interactive, both for adults and children, as well as displays of artefacts and manuscripts associated with Burns himself, and a cinematic experience every hour. There's also two shops, a restaurant and gardens featuring environmental art. For those of you who do not know who Robert Burns is, he is the Scottish National Bard, he was a poet, a lover, and an exciseman (the dreaded tax man). He wrote a vast number of poems - many of which have been set to music. Although a lot of the poems were romantic and written for his many women friends - he had several illegitimate children as well as a great many to his wife, Jean Armour - he also wrote, as a farmer, about his natural surroundings and several with a more political message. Not bad for one who died young at only 37 years.

These fabulous weathervanes, depicting scenes from the poem entitled 'Tam o' Shanter', can be seen on the Poet's Path which leads to the cottage that is Burns' birthplace.


We spent two afternoons down at Alloway taking in the Museum and the Poet's Path and still haven't seen everything so will be going back to go inside the cottage museum and then down to, the Auld Kirk, the Burns Monument and the Brig o' Doon - a humped bridge also depicted in 'Tam o' Shanter'.

One of the pieces of environmental art depicting the field where the mouse in it's nest was disturbed when Burns was ploughing.

Now for something completely different - my bargain of the week. These very useful boxes were going cheap at WH Smith so I grabbed a couple. The first is a place to keep all the craft knives I seemed to have amassed over the last year, and the second is full of glue pens, gold pens and an opaque white pen.


That's me caught up with what I've been up to recently. I hope you enjoyed the wee tour of Burns birthplace - and if you have never been to visit it is well worth the trip.

Now that my mojo has returned I'm off to do something crafty.

Happy crafting to you all,

Friday, 25 March 2011

Silver Christmas - Week 12 Card

Good Evening to you all,


This week's card's colours are white, silver and red. There was a lot of measuring and guillotining for this card as there is quite a few matting layers. The main feature is the embossed pearlescent topper using a new embossing folder which has some of the many phrases associated with Christmas on it.


The insert is another altered digital one from Bearly Mine Designs.


Materials used:
  • Cardstock: Papermill Direct - White Hammered C2 (base); Payper Box - Silver Mirror; Silver Embossed; Black/White Snowflake (matting layers)
  • Paper: Super Smooth Matt Paper (insert); Bearly Mine Design - Christmas Inserts #40
  • Embellishments: Red satin ribbon & square red gems (from stash) 
 And as usual I'm rushing at the last minute - it's been another busy week. I'm entering this card for the usual challenges:
Happy Crafting


Thursday, 24 March 2011

Pampered Pet - A Craft for Life Card

Good Evening Fellow Crafters


A quick post tonight. This card was made strictly to instructions laid down for Docrafts Creativity's support for Cancer Research and these are 1. the card is to be A6 in size; 2. any theme using products of choice; 3. the inside of the card is left blank - difficult for me but I did it.


The design is based on an idea from Kristina Werner, Garden Girl at Two Peas In A Bucket and you can see the demo on YouTube here. Kristina's design consists of making a pattern by drawing 'sunrays' radiating from the left bottom corner on copy paper, then cutting the pieces out to lay on the DP and tracing round the outline of the pattern piece before cutting.

If you are thinking of following Kristina's instructions for cutting the 'sunrays' my advice would be to number the sections as well as labelling them with the paper pattern to be used - makes it so much easier to piece together the sections. Also, it's a good idea to erase any pencil marks - sounds elementary - but I forgot and once I'd run the glue tape round each piece the pencil was nearly impossible to remove without making the most awful mess :-( Fortunately, not all was lost as the addition of the ribbon detail covered it up nicely!)

Materials used:
  • White card cut to A6 size;
  • Docrafts Creativity Magazine free cover gift pack - Pampered Pets;
  • Narrow pink saddle-stitched Anna Griffin ribbon from the Hannah Collection;
  • Polka dotted card candy in blue and pink
The weather has been so very good here that the EM and I have been out and about both yesterday and today down at the Robert Burns Birthplace Museum and on the Burns trail. We took lots of great snaps so I will post a few when I've sorted them out and tell you a bit more about the experience.

In the meantime I wish you all happy crafting,

Wednesday, 23 March 2011

WOYWW 94 - Nothing Doing Yet

Good Morning all you WOYWWers, Followers and Droppers-In


What's going on is not much. The desk is cleared - well, almost, there is only a wee tub of cut-n-dry waiting to be washed -  and ready for action. I had a clear up after the tag making section yesterday - see the tag here in last night's post. So that's the workspace - a place for everything and everything in it's place : ) Earlier this week, well Sunday actually, I had another re-organisation because the way things were was not working for me. I know, this must be about the fifth time but, it's like this, you purchase some goodies and you  find a home for them, then some more, and then some more and over time it all gets muddled up and then everything looks a 'guddle' (a good old-fashioned word for mess). That's where I was on Sunday - in a right old mess. So I re-organised. Most of the cardstock and all of the DP is now stacked on the shelf above the desk, next to the two boxes of ribbons and lace, adhesive and embroidery floss box.  The Cuttlebug is down on the right of the work area where she should be - my right hand girl  - and next to her is her box of folders, etc.

As it is all so boringly clean I thought I'd reveal another one of my drawers:


The basket is full of embossing powders and a few jars of flower soft (not used yet - something else to experiment with). Tucked down the side is my Making Memories thingy for hole punching and attaching eyelets - there's a box of those there too - and a geometry set which comes in handy occasionally. The rest you can see, Big & Juicies, stamp blocks, cut-n-dry and a purple sponge board - handy for punching holes without ruining the work surface.

Julia tells us there was a record number of WOYWWers participating last week so it will come as no surprise to you that I didn't make it round you all. I did my best but I would have to have been velcroed to this seat for the entire week to succeed and my arthritic joints would not have taken it. This is my long-winded way of apologising to those of you I did not send a comment - I may have looked but not written when time was really at a premium! So if you found it difficult to get to me then no worries - WOYWW is for fun and it is not crucial to drop in every week, it's just a bonus when you do :)

And if you have absolutely no idea what I'm talking about, please pop over to the Head Desk Keeper, Julia at Stamping Ground by clicking on the WOYWW link at the side and happy desk hopping.

Finally, it's a lovely day here, so the EM has suggested a trip out to the new Burns Heritage Centre here in Ayr - another photo opportunity methinks. So see you all later and happy crafting.

Tuesday, 22 March 2011

Spring Butterfly Tag

Good Evening All,


After my weekend spending spree I thought it would be nice to use a few of the butterflies on a tag. As it's almost Spring, not quite but almost, I  incorporated my favourite sentiment too. The colours were dictated by the butterfly colours and, anyway, I just love the fresh and zingy lime and lemon combo.


The bee, stamped in black, is a tiny Lavinia stamp that I bought for the amazing price of £1 at the SECC Glasgow - I couldn't believe my luck when I saw these wee stamps going for song!


The wee black butterflies are from Stampin' Up's 'So Happy for You' set and the green butterflies from a set of Anita's toppers - one of my Dobbies bargain deals.

The base of the tag was cut from smooth card in Wild Wasabi SU, then covered with Papermania on the front and Bearly Mine Design paper on the back.A strip of punched the same BMD paper and a die-cut lace strip are adhered up the centre of the card and trimmed with lemon ribbon - also used as the loop tie at the top. The die-cut on the front is distressed with a combination of lemon and lime inks then spritzed with cosmic shimmer in two colours, rich gold and pearl mist (another SECC find).


As you can see, I've used my current favourite stamp, Penny Black's Aspire using a Versafine ink pad in Olympia Green. I made the little duckling topper by stamping in yellow on to white card then cut it out. After colouring the beak, neckerchief, wing and feet with Promarkers, I went over the head and body with Bostick Sticki Pen and then covering with crushed velvet to make it a fluffy duckling.


The back is a little less decorated - but only just!! I've left some space to write a greeting to the recipient and that's about it. Oh, yes, there are a few dew drops sprinkled around because they are so pretty.


Materials used:
  • Cardstock: SU smooth card, Wild Wasabi for tag base; white card for toppers
  • Design Paper: Docrafts Papermania, Pear Tree/Polka; Bearly Mine Design, Vintage #05
  • Stamps: Penny Black, Aspire; Anita's, Duckling; SU, So Happy For You, Butterfly; Sheena Douglass, A Little Bit Sketchy 2, Spring; Lavinia, Bee
  • Colouring: Ink Pads: Tim Holtz Distress Ink, Shabby Shutters; Papermania, Yellow from Serengeti set & Mid Green from Rain Forest set; Whispers, Sunshine; Versafine, Olympia Green; Memento, Tuxedo Black; Cosmic Shimmer, Rich Gold & Pearl Mist; Promarkers
  • Embellishments: Anita's Butterfly Toppers; Dobbies Easter Butterflies; Crushed Velvet, Bumblebee Flock; Clear Dew Drops; Bostik Sticki Pen; Satin-edged organza ribbon in lemon yellow

Not too sure what I'm going to make next - I'm a bit spoiled for choice at the moment. Of course, there is always this week's Christmas card to make so it might be an idea to do that and be early for once - hmmm, doesn't sound like me somehow. First, I think a cup of tea, while I think about it . . .

Happy crafting and goodnight,

Monday, 21 March 2011

Garden Centre Haul

Good Evening All


This is just a quick post with the haul I got from Dobbies Garden Centre on Saturday. Of course, I just went in to get the latest Creativity Magazine but there was my basket and there was all these crafty bargains that I could not resist. The only think I paid full price for was the magazine and the box of pretty yellow butterflies. I found these not in the craft section but in the Easter display and they were £2.50 for a box of 6. There were boxes of bright pink ones but I preferred this lemon/green colourway best.

As I said a quick post. I'm working on a tag at the moment but it's nowhere near finished yet so I'll leave that for another day.

I hope your weekend was as good as mine and happy crafting.


Sunday, 20 March 2011

Celebration Giveaway Winner + 1 Prize + Saturday's Post

Good Evening,

When I announced the Celebration Giveaway it was because my Followers total had reached 50 and I was delighted. However, since the announcement the total has risen to 64 and I'm ecstatic!!! It never ceases to amaze me that anyone would be interested in my crafting enough to follow my blog, and maybe even read my ramblings : )

So the deadline has come and gone and it's time to draw the winner. There were 21 comments left on the post, therefore 21 followers hoping to win but, much as I'd like it, only one of you is going to be lucky.  So, with the help of Mr Random, here with a drum roll and a trumpet voluntary . . .

True Random Number Generator

 
21
 
Powered by RANDOM.ORG
 
That's you Carrie
Congratulations !!
 
So Carrie, if you let me have a note of your snail mail address I'll get the goodies off to you 'toot sweet'. Hope you enjoy playing with your new goodies.
 
You may remember that some time ago I was a winner of Clare's Challenge on the Docrafts website with the card you can see here. I was delighted then and further delighted on Friday when this package arrived containing my prize.


A fabulous pack of Papermania Canvas Textured Cardstock - 75 sheets/colours and a Papermania Mini Scrapbook Kit - I'm going to enjoy using them.

The postman knocked again on Saturday with a small order from Craftsulove that took no time at all to arrive - great service.

 
I was looking for an 8" x 8" scrapbook album for a Christmas gift I have planned and this one fitted the bill - love the peach coloured cover - it contains 10 page protectors so I got an extra pack because I think I'll need more. Oh, and the brads and the ink pads were such a great price, they sort of fell into my basket.
 
I'm off to see the results of Dancing on Ice so


Our Saturday Jaunt

Hi Everyone,


It seems a long time since Saturday and our jaunt out. The EM got the weather forecast right, it was sunny though still a bit nippy and he was right about today too - it's been dull and drizzly all day. Methinks he has missed his vocation, instead of being a scientist he should have been a meteorologist :)

So being sunny, we went about 5 miles down the coast from Ayr to the little fishing village of Dunure. Not the bustling  harbour it once was but there is still some fishing activity and it is well-kept to encourage tourists.


The ruined Dunure Castle is quite a visitor attraction in the summer.


Because I'm usually the one taking the photographs this is a rarity. The EM is testing out his new camera so all the photos here were taken by him for a change. My jacket looks yellow here but actually it is a very pretty light green. So much for the adage the camera never lies, here it definitely is lying because as you may remember from an earlier post I never wear yellow!

Sadly the little local shop closed a couple of years ago but the building is now a really cosy cafe. After we had walked around and trawled the shingle for shells we stopped in at the cafe for a panini and a latte - lovely. There is some really nice fishing related artwork adorning the walls and shelves in the cafe so if you ever get the opportunity please take a trip over to Dunure and take a look.

I hope to be back later to announce the winner of my giveaway and show a couple of hauls I got this weekend.

In the meantime happy crafting to you all,

Friday, 18 March 2011

The Busy Little Girl Card

Hi again,


Two posts in one day - for me that's quite an accomplishment : ) I thought I'd just get this card posted tonight because we are going off on a jaunt tomorrow - the weather forecast is good.

 
So here she is, and yes, Julia, I went with the pink but teamed it up with the pale coffee colour which seemed in keeping with the vintage theme.


I found some card candy that picked up the colours of the dress and, another first for me, I spritzed the coffee coloured seam binding, tinted it a little with pink distressed ink, and left it trendily crinkled.


The matting layers are made up of a coffee & cream card, design paper covered in tiny pink, cream & coffee daisies, and cream pearlescent card, all matted on to a Kraft base.  The very pretty DP is punched along the edge on the front, the inside and also on the back.


And that is it - I almost put a flower on the bottom left corner but decided against it because I like the simplicity of the card as it is.

 
Materials used:
  • Cardstock: Kraft card for base; cream/coffee gingham patterned card & cream pearlescent card for matting; Daler & Rowney watercolour card for stamped image
  • Design Paper: Flutterbyes, Small Daisies All Over paper, edge punched with a Woodware edge punch
  • Stamp: Sheena Douglass' Busy Doing Nothing coloured with Aquamarkers and sentiment stamped in Memento ink pad Rich Cocoa and the edges distressed with TH's Spun Sugar ink pad
  • Embellishments: Seam binding, Camels Hair from The Ribbon Girl; Card candy in coffee and pink/white polka dots

 
That's me for tonight - time for bed, methinks.

 
Happy crafting,


Friday's Christmas Card

Evening All,


True to form I've just finished making the weekly Christmas card. This week the them is 'going for gold' and this card has gold by the shovelful! The background fabric, from a fat quarter bought at my local sewing and craft shop, has gold detail all over it and was sewn on with gold coloured thread - yes, I've finally christened my 'new' sewing machine.

Confession time: my lovely daughter gave me the sewing machine, a Brother, well over a year ago but I'd simply never gotten round to trying it out - in fact, I hadn't even taken it out of it's box. I think I'd gotten it into my head that it would not be as good as my ancient but well-loved Jones. I've made amends now and it won't be going back in the box because it is a great machine, lighter than my old one, but very easy to use.

Tilda is basking in a halo of embossed gold and her present is tied up with gold embossed ribbon.


As are the baubles hanging from the mistletoe on the topper - the image was stamped on to red card with VersaMark, embossed with gold powder then cut around the outline of the design.


The red ribbon is edged with gold and even the card candy is gold. For a change I made a second topper and adhered it to the inside of the card instead of making an insert - in truth I didn't have time to fiddle around making an insert this week.


Materials used:
  • Cardstock: Stampin Up Smooth Card, Wild Wasabi, for base; Docrafts Papermania Capsule Collection Red Card for matting and bauble topper; gold embossed card for Tilda topper; smooth white card for Tilda stamp
  • Fabric: Gold/green/red/ Christmas patterned fat quarter; gold coloured thread to match.
  • Stamps: Tilda Bringing Present- coloured with Promarkers and blinged with iridescent glitter and Heat It Up gold embossing powder; Mistletoe and Bauble - a freebie stamp from Craft Stamper (I think!), stamped with VersaMark and embossed with the gold powder.
  • Embellishments: Anita's Christmas Ribbon - gold-edged red; gold card candy
As usual I will be submitting this card the same two challenges I do every week:
I've completed the Busy Doing Nothing card but I will post it later as I have to get a shift on if I want to get this to Hazel's challenge on time :)

Happy Crafting,