Showing posts with label masking. Show all posts

Thursday, 11 April 2013

Bird of Paradise Canvas

Afternoon All,

I hope your day is going well for you. It's not going too badly here. It's raining and the garden really needed it so I'm not complaining. Rain also means that it is warmer ... yippee!

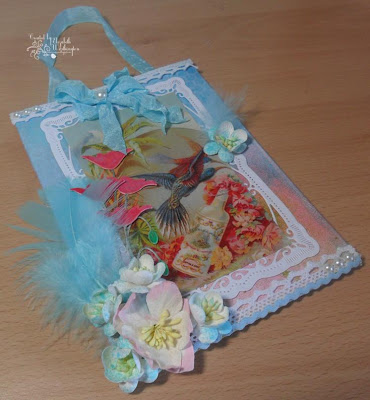
I have a canvas wall hanging to share with you today. Another item from my aqua phase :))


Yes, I know, it's not hanging in this photo - but the photo taken of it hanging is not good ... scroll down to see why.


This is one of those canvas boards that you can pick up in a pack for a song at The Works (UK). Starting with a coat of white gesso, I painted and sprayed with a mix of Pebeo paint and shimmer sprays. I used some sequin waste as a mask. The bird of paradise topper is one of the last remaining items from a scrapping kit bought way back in 1997/98. I was able to use all the items except this and one other topper ... they just didn't fit with the theme of any layouts made with the rest of the kit.

Here's the less than lovely photo of it hanging up.


This is the wall that I always use as a background and in real life the canvas looks lovely on it - it just doesn't photograph well ... rather like myself :))


Really, all I did for the embellishments was raid my stash. The feathers, flowers, lace, seam binding and ric rac - all ready and just waiting to be used. And the die-cuts were gifts from my very generous crafting buddies ... the die-cut poppies I painted with H2Os and the white cherry blossoms were sprayed with teal Radiant Rain. To make the crinkly double bow, I dampened and scrunched up the seam binding first and then tied it.

Materials used: a white canvas board measuring 7"x5"; white gesso; blue Pebeo paint; Luminarte Radiant Rain, Teal Zircon; Cosmic Shimmer Mist, Pearl Mist & Blue Lime; H2Os, Just Peachy, Celedon and Sea Spray from the Summer Fun set; sequin waste for masking; the Spellbinders die-cut and die-cut poppies were gifts from friends; topper unused from a very old kit; feathers and pearls from The Works; white cherry blossoms (sprayed with teal Radiant Rain)and pink tinged hellebore from Wild Orchid Crafts; aqua seam binding from The Ribbon Girl; Marianne Vintage white cotton lace; Anna Griffin Hannah collection blue, ric rac; pearls from stash.

Oops! Almost forgot I wanted to submit this to the following:

Belli Challenge #167 - Pastels - the spirit of the Belli challenges is to encourage you to use your OLD and FORGOTTEN embellishments - I've certainly applied that spirit to my wall hanging :)

That's it for now - it's lunch time here so I'm off to grab a bite to eat.

Take care all. Thanks for visiting. Happy crafting,


Friday, 19 August 2011

Simply Inky Christmas Card

Good Morning All,

Just posting the Week 33 Christmas card for Hazel's challenge - which I try my hardest to enter every week and so often fail miserably ... this week I'm going to make it ... just!


This is the card that appeared on my messy desk revealed on WOYWW post this week. It's very much an experiment in inking based on something I spotted Dawn Bibby doing on TV recently. DB took a decorative/ornate edged white base card, with shapes already cut out around the edges, and inked all over the closed card. The effect was that not only did the face of the card get inked but, where there was a cut out area, the ink went through to leave a decorative effect.  Whilst watching the demo I thought that it should be possible to get the effect using any suitable punch, so here's my version of the DB card using my X-cut falling stars punch (can't remember the real name of this design). I began by punching the corners, then stamping with VersaMark shooting stars and snowflakes randomly over the front and then inking all over with a blue ink pad to reveal the stamping and cover the card.


As you can see it was a success - the ink left an impression of the punch inside on the right-hand side corners of the card. I then punched out a mask on a bit of spare card, placed it in the corners of the left inside and inked through that to give a balanced look. So far so good ... but ...


I didn't intend to do much with the back of the card but ... when I was inking the front, pushing it around and inking away as you do, the back was picking up any ink left on the surface I was working on ... result: an inky mess! So there was nothing for it, I had to ink the back too and having done that it cried out to get the mask treatment as well.

To finish I stamped the greeting in VersaMark on the front of the card and embossed it in white, added the ribbon and sprinkled a few blue & clear gems around the stars and snowflakes.


Materials:
  • 5" square white card base
  • VersaMark ink pad
  • Adirondack Earthtones Stonewashed ink pad
  • X-Cut shooting star paper punch
  • Anita's Magical Christmas stamp set
  • Docrafts Penelope & Percy stamp set
  • Papermania Seafoam White embossing powder
  • Blue/white saddle stitched ribbon
  • blue and clear gems

I'm submitting this card for Crafty Hazelnut's Christmas Challenge - Week 33 - Simply Christmas

The card didn't take long to make, and would have taken even less time had I not messed up the back with ink ... note to self: be more careful next time! Cards could be made for almost any occasion using this technique and different punches - for example, a tiny heart shaped corner punch for a Valentine's Card; a leaf shape for an autumn themed card; or even use a daisy edge punch for a pretty effect ... the possibilities seem endless.

It's POETS day today so time to wish you all a very happy and enjoyable weekend - rather like the one I've promised myself.   My DH has left me to my own devices whilst he is visiting his sister for the weekend.  Of course, The Boss is still here, just to keep an eye on me! That gives me two/three days in which to amuse myself ... mmm ... I wonder what I can do with all that time? Yep, not much guessing needed, I've promised myself a weekend of scrapping ... that is the scrapping weekend I planned for last week which didn't quite come off.

Happy Crafting,


Monday, 11 July 2011

Scrapbooking Barmouth Bay + Stinkin' Cute Blog Award received.

Good Afternoon,

Just checking in because it's a wee while since I posted anything. I hope you are all enjoying the same glorious weather as we are here in Ayr. I finally managed to complete this layout after much humming and hawing over it.


Sorry about the glare from the flash but, after several attempts, this was the best I could do. Maybe I should have taken it out into the garden to photograph. I used dimensional paste (Crafty Notions) for the first time on this - for the sun I mixed in some gold mica powder but the seagulls are made from the paste just as it comes out of the jar.


The base is a cream coloured Bazzil cardstock, the edges distressed with Tim Holtz Stormy Sky DI. The compass is another first - a TH mini mask sponged with the Stormy Sky, but the sea shells are from an ancient (1991!) metal stencil from Laura Ashley , originally used to add a border on the wall of a long forgotten bathroom. The seagulls and starfish are from another, not quite so ancient, scrapbooking stencil and the 'Happiness' & 'Memories' (hidden by the feathers now) stamps are from the Papermania Boutique set.  The papers, shaped using Kiwi Lane templates, also come from various sources. The seashell border and the paper used for the starfish 'flowers' are from the Vintage Sea Paper Kit which I found free on the Far Far Hill blog and the squared paper with the seagull is actually a paper napkin!


The shells, feathers and sea glass were picked up on a beach walk - the glass has been smothered in a layer of Anita's 3-D Clear Gloss. The title letters are from my stash - source also long forgotten.


I am truly delighted and honoured to receive this award from Alice, aka CraftyAlice. I had the pleasure of meeting Alice and her pal, CraftyWhippet, at the craft show at the SECC Glasgow in spring. They are a real bubbly twosome and we had a lovely chat about all things crafty. I found the following over on Alice's blog:

Family isn't always blood.
It's the people in your life who want you in theirs,
the ones who accept you for who you are.
The ones who would do anything to see you smile,
and who love you no matter what.

I'm sure she won't mind me passing it on to you all - I think most of us would agree with the sentiment.

Apparently there are no rules attached to this award although I can pass it on to anyone I'd like to  - well, I think you all deserve it, all your blogs are stinkin' cute, so please feel free to take it if you want.

It's dinner time chez Worthington so I'm off, but I'll be back again.

Happy Crafting,


Friday, 14 January 2011

Christmas Fairy Calendar Card + Winter Bough Christmas Card

Good Evening All,

Two cards for you tonight. The first is a calendar card.


I have made this quick and easy card for the My Crafty Outlook's Christmas Challenge. The remit this week was to use either a freebie or something recycled. I chose to use four freebies for this card - all three stamps and the gorgeous purple and silver handmade paper. I don't do things by half!!

Materials used:

  • Cardstock: White card for base, silver mirror card
  • Paper: Woodland Folk A5 paper pack - used as a mat for fairy image
  • Stamps: Christmas Fairy free from Cardmaking & Papercraft (coloured with Promarkers), Seasons Greetings freebie from Let's Get Crafting Issue 26, Happy New Year, Fiskars - a recent candy win from Sarah - both stamped in Versamark and embossed with Heat It Up silver embossing powder
  • Embellishments: Anita's lilac/silver ribbon, silver snowflake trim, lilac gems
  • Calendar

Close up of Christmas Fairy image

Side view of card

Back view

The back of the stamped image looks pretty because of the matting paper used.

The second card, Winter Bough,  was bit more complicated to make and is for the Snoflake's Christmas Card Challenge on Docrafts.

Materials used:

  • Cardstock - white for base, black & green for matting & Claritystamp white matt-coated A6 postcard (for inking and stamping)
  • Design paper - Cosmo Cricket Sweater Weather (green/white) & Ribbonbox (black/white)
  • Stamp - Penny Black Winter Bough
  • Ink pad - Big & Juicy Mountain Meadow & Memories dye pad in black
  • Embellishments - green/gold printed ribbon, Papermania A Silent Night Epoxy brads, green/black ribbon flower from stash.

Close up of inking and stamp

Close up of ribbon greeting and flower


Holly brads

This is the same technique (fast becoming one of my favourites) used for the Naked Tree card shown in previous post, masking of an area with post-its and inking with two colours from the Big & Juicy Mountain Meadow pad. The Penny Black Winter Bough stamp
Inside decoration (back similarly decorated)

Hope you like today's efforts - they are quite different styles of cards. I've already got someone in mind for the calender card - I have to because it's for 2011 and we are already 14 days into the new year : )

That's me almost finished for this evening and then it will be back to the book that is big enough to choke an elephant - see previous post!

Bye for now,
Elizabeth