
Showing posts with label punching. Show all posts

Monday, 16 June 2014

Bright and Cheerful Get Well Card - with a little matting and layering trick thrown in

Hello Folks

Hope you've had a merry Monday. We've had wall-to-wall sunshine today so most of it has been spent out in the garden just enjoying the warmth. That being so, the card shown in this post is one that was made some time ago.
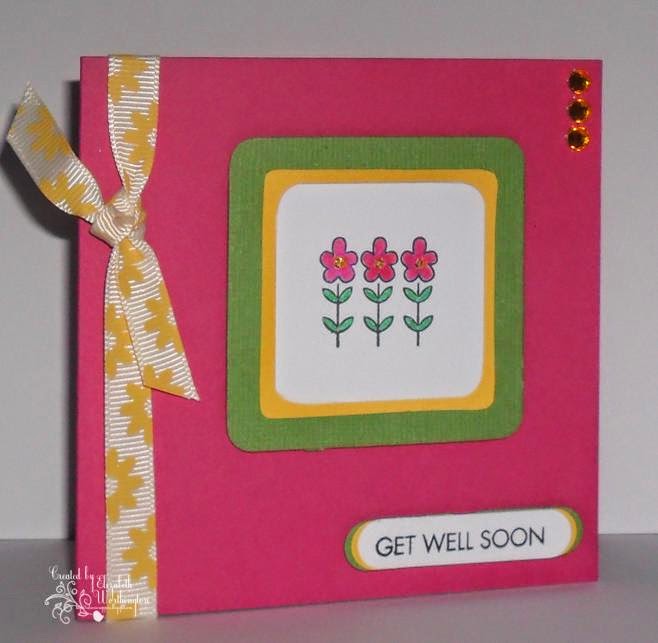
This colourful card is the result of a personal challenge I gave myself to make one as bright and cheerful as possible using mainly snippets, that way if it didn't work or, more likely, I didn't like it, not much material would be wasted! An added bonus is that I've also manage to incorporate another NBUS ... the little floral wood-mounted stamp is another of my very first stamping purchases.

It's a really small card made with a leftover scrap of fuschia pink card measuring 8½" x 4¼" folded in half. The floral  image was stamped in Archival black ink, coloured with H2O's and then cut out with a square-shaped die. The yellow matting layer was cut using the faux die method of tracing round the die and then cut out with scissors. The green layer is a die-cut.  Floral ribbon, yellow coloured gems and yellow glitter glue embellish the card. 

The final touch is the punched greeting label which is also matted on to yellow and green card. Each layer is made with the same punch ... a wee trick I've mentioned in past posts. However, for anybody new to cardmaking I thought this time I'd put together a little photographic record of how I do it here.

To make the greeting label these are the materials need - cardstock, stamp set and ink pad and a suitable punch ... for this sample I used the Word Window label punch from Stampin' Up but other shapes work well too - ovals, circles, squares all work well for this technique. 
Start by punching out the labels that will be used for the matting layers ... for this label I punched out one each in yellow and green.
Next, the greeting is stamped on white card and then punched out with the same label punch.
This photo shows the three labels I used to make the greeting. I should point out that how many layers you add is optional ... I've made a greeting with just one matting layer for other projects.
Before adhering the labels together cut in half, as shown, the punched pieces that will be used for matting.
To put the pieces together, apply adhesive to the back of the greeting then two halves of the first layer are manipulated into place in such a way that a tiny edge of colour showing. The process is then repeated with the next layer.  
This is the finished greeting label. As you can see, the effect is as though three different sized punches were used instead of the one ... a neat trick don't you think :) 

I think the same technique could be done with some dies instead of punches ... I have a set of oblong dies that would be ideal - will have to try that out some time. 

As the card is made almost entirely from bits found in the snippet drawer, I'm off over to Di's at Pixie's Snippet Playground - Week 129 ... second time this week and it's only just begun :)

Hope you found this post useful ... especially if you have never seen this trick for creating several layers from one punch before.

It's late and The Boss will be in any moment now meowing loudly, telling me it's time for bed :) 

Hope you have a good night.

Happy Crafting,
Materials used: scraps and snippets of pink, green, yellow and white cardstock; X-cut square die set; stamps - three flower stamp - no indication of make or name, Hero Arts Classic Messages stamp set; Celedon and Just Peachy H2Os, Summer Fun set; yellow Stickles; Archival black ink pad; Stampin' Up Word Window punch; yellow floral printed ribbon; yellow sticky-backed gems  

Sunday, 29 July 2012

Two Cards from the Snippet Pile

Morning Everyone,

It's Sunday, Snippet # 31 Day over on Pixie's Crafty Workshop, and I'm breaking my own tardy record and posting snippet makes today ... how'z about that? It must be the influence of the Olympics.

Oh, and talking of the Olympics, wasn't that ceremony something! I loved it, though it was just as well we had the presenters interpreting for us at times. Particular highlights for me - the film montages ... got to be an inspired way of including TV viewers; the Queen's bit, proving that she does indeed have a sense of humour; the dark satanic mills rising from the ground; the NHS sequence - the children were a delight; Chris Hoyle, Steve Redgrave, and yes, David Beckham's role ... they did us proud - as did all the volunteers. I didn't want it to end, even though I was dead tired by the finish and could hardly keep my eyes open :))

I'd better get to those snippet cards.


First one up, uses snippets of white card and a piece of embossed gold card that's been lingering in the pile for about eighteen months! It's also monochrome ... I think I've caught the bug for this style after making the green cards earlier this week :)

Not much to it really. I inked the music note embossed card with the same gold yellow ink pad used to stamp the lovely old gramophone player image. I used Di's tip of drawing round the labels die to create the matting for the image - works a treat :) The sentiment is made using another trick. I've only got one size of the label punch, so after punching out the sentiment, use the same punch on the gold card for matting. Next, cut the label down the centre and then adhere it under the sentiment leaving a small margin showing at each end - looks as though you've matted with a slightly larger punch. Oh dear, I do hope I've explained that well enough :( Let me know if you need further explanation ... I could do it with photos if that would help :)

Materials used: 
square white deckle-edged card base
music note embossed white card - another from Chris's package
smooth white card for stamped topper
gold embossed card for matting
Artemio's Office stamp set
Tim Holtz distress ink, Scattered Straw
Ladybug Craft's It's Only Words 2 stamp set
Tools: Cuttlebug; Spellbinders Labels Nine. Stampin' Up label punch

The second card is quite different.


Apart from the card base, all the materials came out of the snippets, experiments and embellishment leftovers boxes. In fact, it is possible that certain WOYWWers may recognise the paper as it started life as the wrapping around a gift received whilst in Wiltshire! For this reason, I have no idea who the maker is or what the design is called - but it was far too pretty to throw away :)

All the edges of the paper are inked with pink, and the rose has had the ink sponges over it. Looking at the card again, I think perhaps I should have also inked all round the edges of the base card - it would have tied it all together. The jewelled embellishments started off as brads but I snipped of the prongs and used glue gel to fix them in place.

Materials used: 
white deckle-edged square card base
snippet of flowery paper - maker/name unknown
smooth white card embossed with the Stampin' Up Manhattan Flower folder
Colourbox Cat's Eye Chalk Inks, Pink Pastel and Warm Red
dark rose satin ribbon; two sizes of pink gem brads
greeting from Dawn Bibby's Delicate Scroll stamps set
Tools: oval punch; Cuttlebug

I see that Di is giving us an extension of an extra week in which to get our homework in on time! That's great, now that I've got my snippet cards in, I'm off out to play on the swings :)

Hope you are all enjoying the weekend, whatever the weather ... here it is dull and breezy, but warm, so not too bad and perfect for stopping in and crafting :)

Happy crafting,