Showing posts with label inking. Show all posts

Monday, 31 August 2020

Christmas Card Club

 Hello Everyone

I know it's been forever but I'm back blogging again and back, too, with a few cards for the Christmas Card Club. Lorraine asked for 'mainly red' this time and I can't honestly say that what I've made fits the challenge so I'm going with the alternative, 'anything goes'. 

There is some red but not nearly enough. I've used another A4 sized 'one sheet wonder' to make these four cards. 

This is what it was like before I chopped it up to create the four toppers. I might just use this photo as my blog header for Christmas this year - it's certainly festive enough. 

A shot of materials used in the making. 

The toppers, once trimmed to size, were matted on to Kraft coloured card, stamped with the greeting and adhered to white card bases. 

I hope you will pop over to see what my teammates have created for today's theme. You'll find a list of their names and links on my right sidebar - as always they are so much more creative than I will ever be.

Take care and stay safe, 

Thursday, 14 September 2017

Birds, Butterfly and Herbs

Morning Everyone

And it's a very early morning for me here. The sun is up - just- and the sky is blue but the scudding clouds are grey and look rain-laden. I can also see from my craft room window that there's quite a breeze blowing out there too. I think we are in for a showery and blustery day which is a pity because I'm going to have to go out in it. I'm off to the quilting class this morning - the first of this new Autumn term.

I did intend joining in with WOYWW yesterday, I even had the photo of my desk all lined up, when a domestic crisis arose, as they do, and all notion of blogging a post had to be put on the back burner. Needless to say, by the time I could get back to thinking about it again it was too late, I gave up and went to bed.  Life's like that these days - one day it's bowling along happily, next it's thrown me a curve ball or two. I suppose I should be better prepared and have a post or two in draft form ready to go, but somehow I'm never that organised - sigh!

Anyway, all is well this morning - so far! - and I have a little card to share.
It was made using bits found in the bit box. I must have stamped and coloured the herb image more than a year ago and the bird covered piece was an experiment in inking done around the same time. They've been matted on to some purple card from the scrap basket and decorated with a butterfly made from the tiniest snippet of leftover card and one of the new Dinky dies I found in The Range recently. The base is a black 5" square card blank. I'd give you more details but, in truth, I've forgotten what I used and even where the stamps are at this moment. If there is anything you need to know about the stamps just ask and I will dig them out later.

That's it for today. Now I must run and get ready or I'll never get to the class on time.

I hope you have a great day.

Happy Crafting,

Thursday, 3 December 2015

Leaves - UKPC November Swap

Hello Everyone

It's been another busy day at Casa Worthington. We've had builders here fixing the pointing on the gable end wall - a temporary fix until the better weather when the entire side and back walls will have to have a total repointing job done on them. Apparently the house has settled down, rather like we have done here too. I've also been sorting out the bookshelves in the spare room with the intention - by weeding stuff out, donating books and tossing magazines - of making it look less like the junk room and more like the guestroom it's supposed to be. Another long overdue job ticked off - it's only taken me two years!
And because of that flurry of activity no crafting got done so I'm sharing a card made recently for the UKPC November card swap - the theme for which was 'Leaves'.

How it was made:

  • Mustard coloured American Crafts Smooth Cardstock was cut to create a 6" square card blank.
  • A square dark brown cardstock, trimmed slightly smaller than the card front, and one of patterned paper, Falling Leaves from the Carta Bella A Perfect Autumn collection were layered together. At this stage I wrapped a length of some gorgeous shimmery red ribbon - been in my stash for eons - from top to bottom of the layers before adhering all to the card front.
  • To make the topper I inked through a Clarity Stamp template, Leaves 3, on to a snippet of smooth white card. Distress inks used, Shabby Shutters, Crushed Olive, Scattered Straw, Dried Marigold, Brushed Corduroy and Fired Brick - in that order too. The intention was to create the gradual change of colour that we see in our autumn leaves, starting with the greens at the base, merging into yellows and golds in the centre and finishing with red around the edges. Once that was done, I stamped the ferns, from IndigoBlu's Nature II stamp set, on the leaf with Memento Rich Cocoa, then it was matted and layered on to a piece of the patterned paper and brown cardstock before gluing it, at a jaunty angle, on the card front.
  • To make the foliage embellishment I raided the snippet box, picking out shades of brown, gold, silver and red card in a variety of textures, and cut out various shapes of leaves and ferns using dies from Tattered Lace Lavish Blooms Leaves set and the ivy spray from the Mini Dies set. Once I had a little pile of die-cuts, I fiddled and fussed until I was happy with how they looked then used a glue gel to adhere them in place. 
  • The aurora borealis embellishment was a bit of an afterthought but it very nicely covers up the area where the leaves all meet in the centre. 
  • Yet another afterthought, and one I really like, was the yellow Stickles used to edge the topper and highlight areas of the fern stamp. I think the extra bling from the glitter glue looks lovely. 
  • The final touch was to add the ribbon bow top left.

I'm submitting this card to the following challenge:

Pixie's Snippets Playground - Week 205 - my second visit this week!

Looking at the card reminds me of how beautiful the trees were here in the west of Scotland this autumn. Such a shame that the series of storms we've had recently have left the trees bare and the leaves a squishy, squelchy mess ... no leaf crunching for us now. Still, there's always next autumn to look forward to.

Hope your day has been good and tomorrow will be wonderful.

Sunday, 14 September 2014

Peony Bouquet Card - Old Fashioned Decoupage for Sunday Snippets

Evening All,

Oh dear, the weekend's nearly over ... I hope it's been wonderful for you. I'm back with card #2 of the three I need to make before the 16th. This time it's one with floral decoupage that was cut from this Anna Griffin paper.
I've had 4 sheets of this gorgeous paper for several years. There's no name on the back for this design and even after a lengthy online search I'm none the wiser. When paper's that old, it's not even on Ms Griffin's website, it is time to put it to good use.
So, I fussy cut out the central bouquet on one sheet, and then cut out individual flower heads on another to create the decoupage. 

To make the background I started with a pre-made die-cut card base (from Creative Crafting World) and using an ink duster, I inked the front with Tim Holtz Stormy Sky distress ink. I then stamped randomly with two stamps, a small leaf stamp (from the much used IndigoBlu stamp set that came free with a magazine) in Brushed Corduroy, and Hero Arts 'Flowers Are Poetry' stamp in Stormy Sky. The next step was to stencil butterflies in Weathered Wood over the front using a Prima Elementals stencil. That done I then decided to edge the card with gilding flakes, Sunshine from Crafty Notions. This was prompted by watching Sarah, on UStream, edging the front of the lovely 80th Birthday Wishes Book she made yesterday - it reminded me that I had gilding flakes tucked away and not being used!
Once all that was done, I attached the decoupaged spray to the front. The greeting was made by stamping the greeting with Crafty Notions craft adhesive on to a snippet of white card and finishing with gilding flakes. The matting for the greeting is another snippet of white card and covered with gilding flakes. Both the greeting and the matting were created using Stampin' Up punches. 
 
I'm submitting this card to Pixie's Snippets Playground - Week 142 ... it's only two teeny-weeny snippets but every little bit helps keep the snippet mountain in check :)

Only one more card to do, the most important one of the three ... it's the EM's birthday ... and I still haven't a clue what I'm going to make yet! 

Better go and think about it :)

Wishing you a lovely evening whatever you are doing.

Happy Crafting,

Tuesday, 27 May 2014

After The Storm

Hello Everyone

I'm back from my childminding stint. It was exhausting but a pleasure ... my grandchildren are lovely and the dog is cute. Call me daft but I took a fully kitted crafting tote with me ... needless to say it was never opened and no crafting was done. I was much too busy and then exhausted for that :)

However, just before I went, I did manage to complete this tag for the UKPC May Swap ... the theme was indigo ... to be interpreted any which way we liked.
As you can see, I opted to combine some IndigoBlu stamps, free with Simply Cards & Papercraft magazine, with blue inks.

I started with a base of white card, stamped the main image using VersaMark and Stampendous clear embossing powder. Next, it was sponged all over with denim blue Gentle Blends, by Pinflair and buffed up with a tissue to remove as much as possible from the stamped image.
The next step was to ink through a couple of Clarity stencils, Square Honeycomb and Circle Dots, randomly around the edges of the tag with Memento Danube Blue, and then stamp the meadow flowers along the bottom edge.
The dragonfly was stamped on to blue textured card (docrafts Papermania) which was then rubbed with silver gilding wax (Pebeo) and decorated with blue gems ... it's attached to the tag with glue gel to give dimension.

I've finished the edges of the tag with the gilding wax before adhering it to a base of the blue textured card - also edged with silver - and decorated the 'hair' on the image with blue gems. The fibres are from a very useful stash I have tucked away in the craft room.

The 'mis'quote - 'with grace in her heart, and flowers in her hair' is from a Mumford and Sons number, After the Storm, hence the title of this post. For those interested here's a link with the official lyrics : https://www.youtube.com/watch?v=SWYG7lZBc6U

It's a sad number but beautiful to listen to despite that.

I've made myself late for Pointless so I'm off to see what's left. I'll be back later because I have a ton of catching up to do :)

I hope you are all well and having a good week so far.

Happy Crafting,

Wednesday, 23 April 2014

Have a Lovely Day

Good Evening Folks

I found some time this evening to finish the card that can be seen lying on my desk in this morning's WOYWW post so I thought I'd share it with you now before I trot off to bed.
It's a wee card, only 4" square, made from scraps of card and paper found during a sort out of the snippet drawer. Even the base is made from a strip of leftover white cardstock (Papermill Direct linen textured card). I just trimmed it to measure 8" x 4" and folded in half.

I then covered the front with a couple of strips of patterned paper in a sunny combination of yellow and aqua blue, added a belly band made of another strip, this time white card - the top and bottom of which were punched using Martha Stewart Butterfly Border and X-Cut's Scalloped Edge punches - wrapped with a length of yellow saddle-stitch grosgrain ribbon.

I've used a free stamp from Craft Stamper, stamped with Memento Tuxedo Black ink, to create the topper. The die used to cut it is from Spellbinder's Labels Nine set and it was Adirondack Sunshine Yellow that was used to sponge around the edges. The die was traced round on turquoise cardstock to make the faux label for matting.

The three small butterflies were punched (using a Woodware punch) out of a scrap of aqua cardstock and decorated with tiny yellow gems (Anita's). The blue and yellow gems decorating the corners are slightly larger in size.

The inside and back are decorated in each corner with triangles of the patterned papers. I used punched squares cut in two diagonally to make the triangles - that simple!

No question that this is a snippet card so I'm off to Pixie's Snippets Playground - Week 121. I hope Parsnip has got over being dressed up as an Easter bunny!

Wishing you all a wonderful day tomorrow.

Happy crafting,

Wednesday, 23 October 2013

Blue Peace & Joy Tag

Hello Everyone,

Another very quick post this evening. I hope this finds you all well and that you've had a good day.

I have a tag to share tonight. One that I made as a change from making cards. It also enabled me to use quite a few snippets and leftovers and to try out a couple of dies for the first time.
The base of the tag was made with a leftover piece of dark blue card (my favourite Papermania Textured) cut and trimmed at one end into the shape of a label. It's covered back and front with some of the same delicately patterned paper that was used to make the card posted on Monday - from Scrapbook Max's Winter Frost collection. On the front, the stamping with two fab stamps - Unity's Itty Bitty Peace & Joy and Penny Black's Winter Bough ... I'm not sure I will ever tire of this stamp - was done with VersaMark and clear embossing powder (Stampendous) before it was sponged all over with a combination of three distress inks - Tim Holtz Weathered Wood, Stormy Sky & Iced Spruce. I'm not too sure about this combination ... the jury's still out I think.
The small baubles were cut from a scrap of gunmetal grey pearlescent card with the super Memory Box Precious Ornaments die. This was the first time I'd used these dies and they cut perfectly. A combination of tiny snowflake stamps taken from Papermania's Urban Stamps Noel set and Heat It Up silver embossing powder were used to decorate the baubles.
The snowflake embellishments were made from a combination of snippets of white card and the last of a sheet of treasured silver paper using dies from the Die'sire Snowflakes set and a small snowflake punch  - make and name unknown. The glitter was applied to them by covering them first with VersaMark, then a heated layer of Ranger Sticky embossing powder. After adding a coating of iridescent glitter another quick blast with the heat tool was used to set the glitter ... this prevents a lot of the shedding that so often happens with glitter :)

Pebeo silver gilding wax applied around the edges, pearl, ribbon and lace trims and blue, grey and white adhesive pearls (various sources) provide the final touches.
The back has been left unadorned ... ready for the addition of a handwritten greeting.

And so it over once again to Pixie's Snippet's Playground - Week 95 - a ton of snippets have been used on the tag :)

Exciting news ... well for me it is! I'm having another day off tomorrow. I know, it's been virtually unheard of over the last couple of months and now two days of in one week. And for why you may be asking? Well, I'm meeting my daughter in Glasgow and we are having a girl's day out. We are going to the Hobby Craft show at the SECC in Glasgow tomorrow.

I have a list of exhibitors and another list of wants desires needs ... I can't wait :)) Hopefully, I'll remember to take photos this time ... last time I was at this show, a couple of years ago now, I forgot to take my camera out of my bag I was so mesmerised by all the goodies available.

And, I'm going to bed now, I have an early start in the morning and I need my beauty sleep :))

Take care and happy crafting,

Thursday, 26 September 2013

September Tag

Morning Folks,

I hope life is treating you well wherever you are and whatever you are doing.

I have a tag, made for a swap, to share with you today and it's my homage to the great man himself, Tim Holtz.
Needless to say, I had almost nothing from the supplies required for this month's tag but nothing ventured, nothing gained :)  I simply followed his instructions, improvising, adapting and substituting as I went.
For example, where TH used a manila label, I cut a scrap of white card to size and shape, and where he used a star patterned stencil, I substituted star-shaped sequin waste. Embossing paste, I had none ... so I made some up, a vaguely remembered recipe Ali Reeves mentioned during a TV demo some time ago, mixing PVA (white/Elmers) glue with cornflour (cornstarch) ... it worked perfectly :)  And that is pretty much how I continued ... I got pretty stumped on a few of the steps but, after cogitating and deliberating over the instructions, usually thought of a suitable substitute for almost everything needed to complete the tag.

One of Tim's mantra's is that we should 'embrace imperfection'. Well, I have, quite literally by including it on the tag ... seemed appropriate somehow given how imperfect the tag is :))

I won't say there wasn't times when the little grey cells felt defeated but it was a very satisfying exercise and a great way to use a few snippets of card. And at the mention of snippets, I am reminded that I can submit my tag to Pixie's Crafty Snippets Playground - any excuse to visit the duck pond and feed the ducks :))

Materials used:

  • scraps of white card from the snippet box
  • Tim Holtz distress inks - Festive Berries, Peacock Feathers; Dried Marigold, Brushed Corduroy, Vintage Photo and Black Soot
  • dimensional paste made with PVA glue and cornflour
  • sequin waste, masks from Special Touch and Crafter's Workshop and a plastic stencil for numbers
  • white acrylic paint
  • stamps - Craft Stamper butterflies, Denami Design dragonfly and the ruler from a sewing set that was free with a magazine, Artemio key, alpha set for letters - maker unknown
  • gold embossing powder
  • punches - circles in two sizes
  • Archival Jet Black ink, VersaMark
  • Tim Holtz Idea-ology Chitchats and black marker
  • white American seam binding - coloured with distress ink
Edit Note: having been ordered by BJ to enter this on Tim Holtz' blog NOW ... how do I dare to disobey :) 
Thus, I'm submitting this tag to Tim Holtz 12 Tags of 2013 - September 

It's dental check-up day, again :( Two appointments, one for the hygienist and the other for the dentist himself, groan ... I know it's essential but that doesn't make it any easier. Ah well, it will be soon over.

Hope you have something much more pleasant in your diary for today.

Take care and happy crafting,

Friday, 6 September 2013

Getting Inky and Painty - a card for CHNC

Evening Everyone,

I've gone so out of my comfort zone with this card for Hazel, over on CHNC. She said 'let's get inky and/or painty so I did!
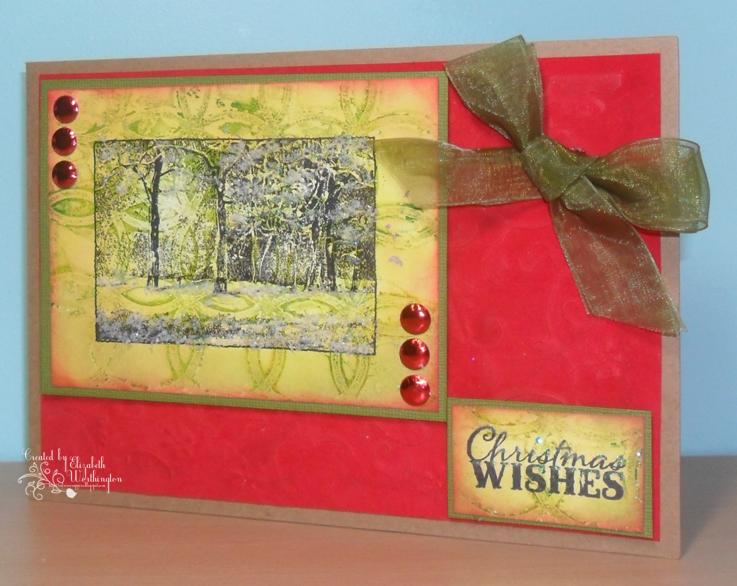
I've used a print I pulled of the Gelli plate recently using sap green and mid-yellow acrylic paint and the Circles Special Touch mask.

It's been sponged with Tim Holtz DIs,, Squeezed Lemonade, Scattered Straw, Shabby Shutters, finishing with just a touch of Festive Berries around the edge.

I then stamped the Penny Black Snowy Park scene in Archival Jet Black. Once dry, I added some iridescent glitter and Polar White Flower Soft to make it look even more wintry.
The greeting was made in the same way using a stamp from the Magical Christmas set by HOTP. Both were then matted on to green Co'redinations, Peeled Paint from the Tim Holtz Distress Collection.

The base is a Kraft card from Docrafts with a layer of Papermania Luxury Velvet Paper Redcurrant Jam, embossed using Cuttlebug's Twinkle folder.

The finishing touches are red mirror card candi (Craft Works) and a double bow in green organza ribbon.

I'm submitting it to the usual challenges:

Hazel's, at Crafty Hazelnut's Christmas Challenge 140 - inky and/or painty.

Hazel's other challenge - CHNC Challenge Extra for September - where, as always, the challenge is for anything as long as it's Christmas.

And, of course, Pixie's Crafty Snippets Playground Week 88 ... the snippets are the pieces of green Co'redinations card used for matting.

Edit Note: Hazel has suggested that I share this card on The Glory of Christmas challenge 15: 'anything goes' challenge which I'm delighted to do.

It's a complete departure from my normal with this card. The EM loves it - he is drawn to bright colours so he likes the combination of yellow, green and red ... the Boss just sniffed and went back to sleep ... for me the jury is still out. I might just have to sleep on it. 

That's me done for today. I plan an early night ... I've got a good book on the go, Sue Grafton's V is for Vengeance, almost at the end and very keen to find out whodunnit :)

I hope you have all had a lovely day and that you have an enjoyable weekend lined up. 

Take care everyone and happy crafting,

Sunday, 25 August 2013

Sunday Snippets

Happy Sunday Everyone,

It's a lovely sunny morning here in Ayr ... that will be because it isn't a Bank Holiday weekend in Scotland! If it was it would be tipping it down which, I believe, it is doing in the south of England. For everyone down there I hope the rain isn't ruining your holiday completely.

A bit of a different snippets post today. Just because it's Sunday and because I challenged myself to do this little exercise, and because I remembered to take the photos!

The challenge was, one, to make a one card, a baby card, using some of that massive pile of stash on my desk and, two, to immediately make another from the leftovers. Here's a shot of all the materials and equipment used.
And here's the first card ... made for this month's UKPC swap. The remit was for a baby card so I decided to stick to a fairly neutral colour choice, yellow. Admittedly a fairly vibrant shade of yellow but, frankly, I don't do yellow. It's just not my colour, not lemon, primrose, sunshine ... whatever shade it is, it's not for me ... so any papers and card that are included in any pack tends to get shoved to the bottom of the stack and forgotten. Anyway, I digress, I decided on yellow and white for this card.
I began by stamping two different sized flower heads (from Dawn Bibby's Flowers and Leaf stamp set) in shades of Frost White (Colorbox), Dried Marigold and Scattered Straw (Tim Holtz DIs) on the yellow card which was then cut to fit the white square card base I'd chosen.

The rocking horse (Hobbycraft) was stamped on to the smaller of two white pearlescent nesties (a gift from my crafting friend Cass, who, incidentally, has been creating stunning encaustic art work recently) and for the yellow layer I did my usual trick of tracing round the smaller of the two nesties and then cutting it out leaving a small margin all the way round.  A large faux pearl (Habico) in each corner finishes the front off.
Strips of the stamped card decorate the inside and back.
For the second card I've embossed the front of a standard A6 white card base (Cuttlebug's Kassie's Brocade) - a tricky process but a pretty result so worth the extra fiddling about :) A strip of leftover card has been matted on to a snippet of brown card and adhered to the left side of the front. The greeting was stamped on to yellow card, punched out with the smaller of the SU oval punches and then matted on to brown card - using the larger scalloped oval punch. For the floral embellishment the two sizes of flowers were stamped in Dried Marigold on to the last of the yellow card, cut out, edges inked with more of the DI, and layered together with glue gel. The flower on the greeting is made from two of the small sized flowers glued together. All the flowers have been finished off with one of the smaller pearls in the centre.

Finally, I even managed to squeeze two flowers from the remaining snippets to decorate the inside and back.


That done, I'm popping over to Di's at Pixies Crafty Snippets Playground - Week 87 to submit the snippet card and to see what all the other snippeteers have been up too. 

And, as it's Rudolph Day, I'll be back later with my offering for this month.

In the meantime, I hope you are all have a terrific day and a wonderful weekend, wherever you are.

Monday, 15 July 2013

Scottish Tag for Bella in South Africa

Afternoon Everyone,

Just a very quick post to share the tag I made to accompany Flat Susan on her journey to South Africa where she is now visiting Bella.  So glad to see she arrived safely and is enjoying Bella's hospitality.
As you can see I didn't stray from the predictable :) There is a Scottish castle, a thistle front and back, and the elusive Loch Ness Monster! All on a background of raindrops ... had to be, Scotland is, after all, known for it's wet weather.

Unfortunately, in all the flurry of packing and getting ready for the holiday I forgot to note down what materials I used to create the tag. And relying on my aged memory means something is bound to be missed but here's what I do remember.

The tag was inked with blue and green inks, stamped, using a variety of techniques and inks, with a selection from Claritystamp's Scotland stamp set and the fabulous Water Droplets textures stamp from Designs By Ryn, that Di, of Pixie's Crafty Snippet Workshop fame, very generously rewarded me, and quite a few others too, with recently for using an awful lot of snippets ... love this stamp and couldn't wait to get it inked up, so thank you again, Di :)

I've printed the names of all the places we visited on holiday around the outer edge of the back of the tag and a length of tartan ribbon provides the finishing touch.

I'd like to say I'd made some progress in the craft room today, but in all honesty I can't ... there is still much to be done yet before I can say the photo sort out is done.

Hope you have all had a lovely day so far. The sun is now out again and it's going to be a lovely evening here. 

Take care and happy crafting to you all,

Tuesday, 21 May 2013

Umbrella Man

Afternoon Everyone,

And a very warm welcome to Sarah, the newest follower of this blog ... lovely to have you join in and I hope you continue to enjoy reading about what I get up to craftwise or otherwise :)

Before I move on to my share for today, I'd like to take a moment to let everyone who has been affected in any way by the tornado that has hit the Oklahoma area know that I'm thinking of them. I know your President has declared it an emergency area so I can only hope that you will get all the assistance you need to help you through this terrible time.

Now to Umbrella Man ... I'm being kept busy making cards - it's been one birthday after another this month. This latest is for my oldest step-grandson.
He will be 22 in a few days - an age that calls for nothing too fussy when it comes to cards. So I've chosen to create both backing and topper with Tim Holtz Visual Artistry Stampers Anonymous Stamp Collection on Papermill Direct's kraft cardstock, layering them on to black card ... I think he likes black :)
The topper was sponged with TH Brushed Corduroy then over stamped with a texture stamp from the Tim Holtz collection, with the same ink and using the first and second impression stamping technique. Umbrella Man was stamped in Memento Tuxedo Black, the sentiment in Versafine Vintage Sepia and the flight of birds in ColorBox Frost white. The whole thing was finished of with a very light sponging around the edges with TH Black Soot before being matted on to the black card. It was finished off with a metal screw brad found among my stash - from Creative Expressions, I think. The background was made in the same way and then a length of washi tape - IndigoBlu's Wishi Washi tape.
The inside has a layer of kraft sponged and stamped in the same way as that on the front.

And I still haven't made a card for his sister, my granddaughter. I've hithered and swithered over this and still not decided what would make an appropriate card for her ... it looks as though it's going to be a last minute decision :(

I hope you are all having a great day. It's not bad here, it's not raining, it's warmer than it has been and the sun is trying to break through and even succeeding for short periods.

Do take care of you and yours, and happy crafting too.


Thursday, 15 November 2012

Magical Winter Tag

Afternoon All,

I hope you are all well and happily crafting away wherever you are.

Yesterday, on my workdesk was a pile of bits and pieces that I was working on, including this tag which I finished off later in the day. One for Di's Snippet Challenge as I've used a couple of snippets in the making.


First snippet, I used a piece of the paper I'd stamped using bubble wrap and paint to cover this small tag. (I've decided that I must use these bits of leftover painty, inky, experimental backgrounds immediately instead of dumping them in a box just to be forgotten!) Then I stamped snowflakes here and there using VersaMark which was then heat embossed with white powder - hard to see in the photo but much better in real life. Second snippet, the lace border .. it's a stamp - again white embossing powder on VersaMark onto a snippet of turquoise cardstock.


The deer die-cut (a very welcome gift from a friend - I don't have the die ... yet, sigh) has also been stamped with snowflakes and, this time, embossed with crystal powder before inking with TH's Peacock Feathers ink pad - I think I've said it before, love this colour!  He's been placed on a piece of gauze ribbon which I think adds to the frosty feel I was trying to achieve.

The silver snowflakes are from some trim I have had forever - I'm sure I only bought a yard of it but it does seem to be neverending ... ditto the bobble trim!!! The green trim is washi tape - new to me and I love it for the colour ... it's patterned with chevron stripes which are 'so on trend' :) Final snippet. the sentiment is from the same stamp set as the snowflakes and only used a tiny oval of smooth white card.

Materials used: 
A manila tag #5; a snippet of white card for sentiment; strip of turquoise cardstock for stamped lace trim
White card stamped with bubble wrap in green (Adirondack Juniper dauber) and turquoise (Pebeo Bermuda) paints
Hot of The Press Vintage Christmas stamp set; VersaMark Watermark ink pad; White embossing powder; crystal embossing powder
Deer die-cut chipboard shape; Tim Holtz Peacock Feathers ink pad
White gauze ribbon trim and white bobble trim from Ribbon Carousel; 
Green zigzag patterned washi tape - an ebay purchase
Silver snowflake trim; turquoise/white bakers' twine; Anita's turquoise gem - from stash

It's lunchtime at Casa Worthington so I'm off to snatch a crispbread or two and a much needed cuppa.

Thanks for looking and if you leave a comment I'll be delighted :)

Happy crafting,