Showing posts with label embossing. Show all posts

Sunday, 17 March 2019

Christmas Card Club - Cards 6/2019 - Festive Food

Hello Everyone,

It's another Christmas Card Club Sunday and Lorraine (Rainey's Craft Room) chose today's theme - Festive Food. 
Once again the theme threw me into a spin - another impossible challenge! I was convinced I had nothing related to festive food in my stash but, as you can see, I was so wrong. What's more festive than a cup of hot chocolate and a gingerbread man for dunking. 

Supplies used:
- a 5" square white card base
- red/white patterned paper to cover the base, trimmed to leave an eight inch margin
- a square of white satin finished card embossed with a snowflake die. This was my first try out with the thin die (from China) and it failed. The card was too thick and obviously needed the addition of a shim to create more pressure. Still, I'm glad I saved it because it made a very nice background for this card
This close up shows that I tried putting it through my die-cutting machine twice, the second slightly off - a rookie error!!!
- a scrap of blue card for matting the topper
- scraps of white card for the topper, gingerbread man and sentiment
- stamps from Winter Wonderland stamp set
- ink pad - Archival Ink Jet Black
- colouring - Spectrum AquaMarkers in reds in Crimson & Scarlet, Peacock blue & Fawn
- embellishments - dark blue gems
I cut a slit round the rim of the 'mug of chocolate' to slip the stamped, coloured and fussy cut gingerbread man into place. I used sticky tape to keep his feet in place and put a small piece of dimensional tape behind his head so he didn't get squashed when the card is in the mail. 

Please pop round to the other ladies' blogs to see their beautiful creations ... the links to them are on the right side bar. Fortnightly we post a Christmas card - the plan is to get ahead and avoid the last minute stress at the beginning of January. 

Thanks for popping by - your visits are much appreciated. 

Sunday, 18 November 2018

Sunday Snippets with Winter Botanicals

Hello Everyone ...

... and happy Sunday too. It's another beautiful day for us - dry and sunny with just a wee bit of a chill in the air. Perfect for autumn.

I'm still beavering away at the Christmas cards - needs must! Today, I have a set of four featuring a very pretty embossed topper using one of the folders from Winter Botanicals from Sizzix - a set of four.

This is one of the smaller folders which is just the right size to create a topper. Some time ago - many months ago in fact - I had a wee embossing session with scraps of card that were stashed away in my snippet box. When I dug out the four I've used here I thought they needed a bit of colour so I painted them using Winsor & Newton watercolours. Once dry I matted each topper on to a layer of red card - more scraps from the snippet box - before fixing them with dimensional adhesive to the card base which I'd already decorated with red gingham ribbon and a greeting. 

Here's a shot of some of the supplies used. The greeting is from the Forest Magic stamp set. The flowers and buds were embellished with Dovecraft's black enamel and yellow Stickles.
I've used a selection of cardstock to emboss on - watercolour, smooth white, satin - actually whatever came to hand at the time. Interestingly, the paint behaved differently on the various finishes but I rather liked that - the cards are all the same but different.

As it's Sunday and I've used snippets of card - even the red card used for matting is from different sources - I'm popping over to Pixie's Snippet's Playground  to submit these cards to Di's Challenge #339.

Saturday, 10 November 2018

A Christmas Delivery

Hello Everyone,

I hope you have all had a happy Saturday and are enjoying the weekend. I'm concentrating on making as many Christmas cards as I can in the shortest time possible at the moment. If I had spread it out better throughout the year, I wouldn't be in such a spin - my own fault entirely.

Happily, this card couldn't have been quicker to make. I'd embossed the background months ago during an embossing session ... an attempt to use up the mountain of scrap card that I had accumulated. My thinking then was that it would save time one day, and so it has. The folder used is Let it Snow' from Crafts-Too.

 A piece of leftover red polka-dot patterned paper too made the ideal mat to layer the background on.

The topper is an image that was fussy cut and upcycled from a lovely card received one past Christmas.

The centre of the embossed snowflakes are embellished with red Stickles to give the card a wee bit of sparkle.

Given that I'm in cardmaking mode now, I think I'll be sharing a few more in the days and weeks ahead. So many cards to make, so little time!

Sunday, 4 February 2018

Snippet Sunday

Hello Everyone,

I thought I'd have more cards to share with you for Pixie's Snippets Playground today but recent events have conspired against me. Instead I have just this two.

I used a part of an embossed sheet of card - Hunkydory I think - which came free with an order for ... it's so long ago I've forgotten what!

The base was made from a sheet of aqua card trimmed to create a 5" square tent style card. I cut the sheet of embossed card making best use of the design, trimming it to leave a ¼" border all round. The greeting topper is made up of two scalloped circles cut from a M&C Boutique die set (The Works), one from a snippet of silver card and the other from a piece of teal leftover from trimming the card front, and topped with a circle punched from a snippet of white card stamped with the greeting. The butterfly was also cut from a snippet of silver card using an X-Cut Dinky Butterfly die.

This card was made to use up the card base that I'd decorated, several years ago, with a flourish that I'd stamped in pink ink and then in Versamark and embossed silver powder. I made the topper using the tiny '4 You' embossed and die cut piece - found during the craft room sort out. I think the embossing folder & die came with the Cuttlebug and I've had that a good few years now. I wanted to layer it onto the same shade of pink as the ink on the background but a thorough search of my ink pad collection and I still haven't found it. So I've compromised with Pinflair's Hot Magenta Gentle Blends blended over a scrap of white card and cut out with a stitch edged square die, again from M&C Boutique. To finish the topper another larger square was cut from silver card.

So there you are. Two cards made from scraps and snippets and old bits and bobs found stashed away and forgotten. I can't say I'm making much of a dent on all the bits I've unearthed during the clear up but I'm enjoying the challenge and, bonus, there's now e a few more cards ready to use when needed.

Hope you are all having a lovely Sunday.

Tuesday, 27 October 2015

White on White Card

Hello Everyone

Today's share is the card I made for this month's UKPC swap. The theme was 'Whiter Than White' and this was what I came up with.
The flowers were made using three different flower stamps, from Dawn Bibby's Flower & Leaf stamp set. I stamped them on to heat resistant acetate with Versamark and then embossed with Papermania's Seafoam White powder. After which they were cut out to create the cluster trailing down the front of the card. Under the cluster is a fish tail shaped banner cut from a snippet of white card which was then embossed using a Cuttlebug folder, Bloom & Grow. To make the greeting band I took a scrap of white vellum, tore the edges, stamped and embossed the greeting, flowers and flourish in white, and, finally, wrapped it around the background panel.
The background panel is stamped, using Color Box Frost White ink and Dawn Bibby's Delicate Scrolls stamp set. Unfortunately, it's so subtle it doesn't photograph well at all, but this is the best shot I could get. The finishing touch is the white enamel dots from Marianne Design.

I'm submitting this card to the following challenges:

Shopping Our Stash #225 - Go Paperless - meaning no patterned paper.
Pixie's Snippets Playground -  where a lot of Snippety Celebrations for Week 200 are going on :) 

Take care all.

Happy Crafting,

Tuesday, 6 October 2015

Silver Dragonfly Card

Hello Everyone ...

... and happy Tuesday to you all. It's a damp dreary day here - ideal crafting weather for me, especially now that I have my craft room back. It's taking time to settle into some sort of crafting routine again and there are times when I can't find stuff, e.g. I spent far too much time looking for the pot of gilding wax I wanted for this card I'm sharing today - a card for Pixie's Snippets Playground - Week 197.
The starting point for this card came from the fabulous silver foiled frame which comes with many thanks from our lovely fellow blogger and Snippeteer, Greta. The base of the frame is funky foam which has been foiled in silver before being die-cut ...the funky foam gives the frame great dimension.

How I made the card:

  1. I chose a square black 5" square card and then cut a square from a snippet of white card just a bit smaller for the front.
  2. The white card was then embossed with a Dragonfly folder. As the width of the card is wider than the folder I had to emboss it in two passes through the machine.
  3. The edges of the embossed card were then gilded and buffed up before attaching it to the front of the base card.
  4. The frame was then added to the front.
  5. I then stamped and heat embossed the dragonfly in silver, twice - once on another snippet of white card and then on another of white vellum, before die-cutting both images. The two images were then glued together before fixing it to the middle of the frame.
  6. I then made three vellum roses using a spiral flower die. After rolling and gluing the roses into shape, the petal edges were touched with a little of the silver gilding wax before attaching them to the lower left corner of the frame.
  7. The final touch for the card front was to add pearls to the centre of the roses and two crystals to the dragonfly.

The inside is decorated with yet another snippet of white card which has a the dragonfly stamp on it - stamped with VersaMark and dusted with silver mica powder. I've purposely not added a sentiment because I think it's a card that would suit several occasions, e.g. silver wedding, birthday or sympathy.

Materials used:
Black 5" square base card
White card and white vellum snippets
The silver foiled frame from Greta
Craft Concepts Dragonfly embossing folder
Pebeo Silver gilding wax
Creative Dies Dragonfly die & stamp set, and Spiral Flower Die
VersaMark ink pad
Heat It Up Silver embossing powder
Crafty Notions Silver mica powder
Crystal gems and pearls
Just a shot to let you see the dragonfly's pretty wings.

I'm off to see what else I can make from all the goodies I discovered rediscovered during all the sorting out and organising I've been doing recently. It's amazing what can be forgotten when it's tucked away in drawers and boxes!

Wishing you all an enjoyable evening.

Happy Crafting,

Thursday, 11 June 2015

CHNC Challenge - Use Some Blue

Evening Folks

I trust you are having a very good Thursday. It's been 21°C in our back garden today so after a good few hours gardening, and a spell of sitting just taking in the rays, of course, I had to come indoors to cool down. Such a lovely change from the recent horrible weather we've had. All that sun and I have a Christmas card to share with you!!! However, I did make it especially for Hazel's CHNC Challenge the remit for which is that we use some blue this week.
The topper with it's lovely winter scene and greeting, is recycled from a card received last year. It's not too obvious in the photo but there's glitter on some of the branches and the snowflakes are glittery too.

Materials used:

- white A5 deckle-edged base card
- cardstock in three shades of blue
- an 8"x8" textured embossing folder - Textures Artist Collection Distress by Crafter's Companion - used on the lightest shade of blue cardstock 
- the topper matted and layered on to the mid and darker shades of blue cardstock
- blue satin ribbon
- a snowflake die from X-cut (Docrafts) and a snippet of silver mirror card - the snowflake was cut in half and tucked under the topper top left and lower right to create embellishments

Couldn't have been simpler to make but I love the combination of blues. And, it used up a couple of leftover scraps of cardstock (the mid and darker shades of blue) and that snippet of silver mirror card, not to mention that I got to recycle a very pretty winter scene ... I live to recycle :)

As well as CHNC Challenge 232 , I'm submitting this card to Hazel's other challenge:
CHNC Challenge Extra for June 2015 - where, as always, anything goes as long as it's Christmas
and also:
Pixie's Snippets Playground - Week 180 - where anything goes as long as a snippet or two has been used in the making.

That's me done for today. I'm off to do a bit of blog hopping now :)

Happy Crafting,

Saturday, 23 May 2015

Super Cool - Card Inspired by ...

... Julee over at Poetic Artistry!

With my mojo firing on less than all cylinders, I was blog hopping looking for some inspiration when I found Julee's latest creation here. I liked it immediately, it was just the design I was looking for, so I CASEd it! Here's my card.
If you popped in on Wednesday to check out my WOYWW desk you will recognise the topper and some of the cardstock. I was trying to decide what colours would look best with the image of the rock climber and as I mentioned on Wednesday, photographing the cardstock spread out on my desk really helped - something for me to remember in the future.

Here's how I made the card:

  • To make the base I scored and folded an A4 (8¼"x11¾") sheet of white cardstock to create an A5 (8¼"x5¾") portrait size card then rounded all four corners ... I did this to match with the topper and sentiment (Kanban Wild Side). Corner rounding was carried through all the elements for the card.
  • I then trimmed another piece of white card approximately ¼" smaller all round than the card front and embossed it using Crafter's Companion Pebbles folder. The edges were then inked with Milled Lavender distress ink.
  • Next I trimmed some deep mauve pearlescent card to measure just about an 1/8" larger than the embossed piece for matting. 
  • The embossed layer was adhered to the mauve layer, using foam pads for dimension, then both were added to the front of the card.
  • To make the topper embellishment: A piece of Black Magic Core'dinations cardstock was trimmed, eyeballing it, to make the panel under the topper - it measures approximately 4½"x2" - which was then sanded to reveal the pink core. Two scraps of card, pink and mauve, were used to create the flags which were then stapled to the topper. A length of purple trim was wrapped round the lower edge of the topper and knotted. All these elements were adhered together using foam pads and added to the front of the card.
  • Finally, the sentiment was added to the lower right corner.

A little pocket, created from the mauve cardstock, was added to the inside - perfect for adding a gift card - and a sentiment from the Happiest Birthday Wishes set (My Favorite Things) was stamped in black.
I made this card for my granddaughter's 15th birthday. As you can see from this photo, Jolene is a bit of an action girl and her ideal birthday treat is to spend a weekend in Aviemore, in the Highlands of Scotland, trying out all the various thrilling activities on offer there!

Had another busy day today. We went shopping for new curtains for our newly decorated bedroom then, as we were so near The Range, just had to pop in there ... it would have been rude not to :) A crafty haul and several £s lighter we came home to potter - read weeding out the ground elder for potter - in the garden. It's been such a lovely sunny day, you'd hardly know that it's a bank holiday weekend :)

Hope you have had an equally lovely day too. Thanks for visiting.

Happy Crafting,

Sunday, 27 July 2014

Sunday Snippets - Week 135

Hi Everyone,

I planned to post this earlier but the day has just run away from me somehow!

I hope you have all had a wonderful weekend.

It's just a little card, 4" square, that uses up all sorts of bits, bobs and snippets for Pixie's Snippets Playground. The topper is the leftover piece, the 'waste', after I'd die-cut the fern from Tattered Lace Lavish Blooms Leaves set, from grey card, backed on to white card and then layered on to dark blue Core'dinations. I distressed the edges of the Core'dinations with an emery board to reveal the Kraft core. The base has been embossed with a border from Cuttlebug Just My Type set. The embellishments, a scrap of tartan ribbon and a bright red enamel dot, are from stash.

I almost threw the 'waste' piece away until it occurred to me that it could look quite good with a backing of white card.

The card came together very quickly once I decided on the layout and pulled out the materials from the snippet drawer. In fact, choosing what colour of enamel dot to use took the most time ... there's a lot of colours in the tartan ribbon to choose from :)

The weather has finally broken here. We've had rain all day ... great for the garden, makes sleeping easier, but bad for The Boss. She hates the rain, won't go out in it at all, so she's had cabin fever all day!

I hope you've had a wonderful weekend and I wish you a good week ahead.

Happy Crafting,

Saturday, 1 March 2014

Winter Botanical Cards

Afternoon Everyone,

Goodness! March already!

And it's Saturday too, the day Hazel posts another challenge over at CHNC. This week,  #166, is calling for ribbon, twine or fibres and, as luck would have it, the cards from Wednesday's WOYWW post are finished and there's twine on them ... what a coincidence :)
Still struggling to find the best site in the house to photograph cards - especially when there's more than one to line up ... which is why this photo was shot in the kitchen!
As I explained on Wednesday, I've been experimenting with creating stamps using an embossing folder and moldable foam. Here's the step-by-step guide to how I made each card.

Step 1: Choose an embossing folder with a suitable design. I chose the largest folder from the Sizzix Winter Botanicals set thinking the floral pattern would be clear and look good. Open the folder out as flat as possible ready for the next step.

Step 2: Next take a block of moldable foam (Magic Stamp) and a heat gun. Heat the foam for about 30 seconds and then press the warmed foam onto to the embossing folder.

Step 3:  Ink up the foam, I used Rangers Evergreen Bough distress ink, and stamp on to a piece of white card - I used one of the many scraps of white card I have pre-cut to measure 3¾" x 2½". As you can see, the stamped image is not perfect, but I quite like the blurred distressed look.

Step 4: Mat the stamped image on to gold mirri card - another scrap pre-cut to measure 1/8" wider all round.

Step 5: Wrap twine, Docrafts Papermania Brown String, round the base of the topper and tie in a knot, incorporating a tiny bell in the knot.

Step 6: Stamp the greeting, this one is from a Molly Blooms Christmas stamp set that came free with a magazine, using Memento Tuxedo Black ink, in the bottom right corner of a white base card.

Step 7: Adhere the topper to the card - because of the twine I used Pinflair glue gel for this, it creates dimension and allows for the extra width of the twine.

Step 8: The final touch - the embellishments. Gold sequin stars added in the corners and some Suze Weinberg Jazz BeaDazzles glued to the centre of the large flower on the stamped image.
With the topper on the card above I tried to get a bit arty with water! First I inked up the stamp, sprayed water on it and then stamped, then repeated the stamping without the water. Again not perfect, but I think the watercolour effect looks very nice.

Note: I wasn't sure which side of the folder would give the best results, emboss or deboss, so did one side of the foam with the emboss and the other with the deboss. It's easy to heat and press one side of the foam block and then turn it over and heat and press the other side. And, after deciding which side gives the best image, heat the other and erase the image ready for using again.

As well as submitting the cards for the CHNC challenge I will be submitting it to Hazel's CHNC Challenge Extra for March - where anything goes as long as its Christmas themed.

I'm a day early but I think Di won't object to me saying I will be joining in the fun and submitting these cards to Pixies Crafty Workshop, Week 114, tomorrow - six snippets have been used up altogether :)

It's another beautiful day here, cold but sunny and after tapping the glass on the barometer I can report that it is up so the weather is definitely improving :) Whatever the weather is like for you I hope you are having a great weekend.

Happy crafting,

Friday, 21 February 2014

A 50th Birthday Card

Hi Everyone,

I've not been around for almost a week ... one of those nasty viruses is to blame ...  and there's been absolutely no action in the craft room! I'm still feeling less than 100% but thought I'd check in with a card that was completed before the bug hit.
Made for our fellow crafter, and WOYWWer, B-J's very significant birthday so, of course, the colours used are based on her favourites - lilac, lime green and turquoise - and as she loves them, a dragonfly had to be included.

The main piece started out as a square of white cardstock ... it's actually pearlescent card but I worked on the reverse side ... as recommended by Sheena Douglass. This bit of card has been subjected to just about every technique you can think of. First, a colour base was created by sponging it with ink in the three colours - Adirondack Brights Citrus, Rangers Shaded Lilac and Peacock Feathers distress inks. Next, water was sprayed over it and after leaving for a wee while it was dabbed with paper towel to create a lovely watermarked effect. Once dry, I decided I wanted some more inky interest on it so I inked up a Chicken Wire mask (Clear Scraps) with the Peacock Feathers which I then placed inky side down on to the card and passed it through the Cuttlebug, using just the plate configuration for die-cutting, not embossing ... this transfers the ink without embossing. Next up was the Thistle mast (Imagination Crafts) - I inked up only the insect/flourish corner detail on this mask ... those wee winged beasties look awfully like Scots midges to me :) ... using Shaded Lilac. That done, texture was added to it by dry embossing using a Fretwork mask (That Special Touch). The final touch was to apply silver gilding wax (Pebeo) around the edges.
The dragonfly was made using a Stamps Away stamp, VersaMark, silver embossing powder (Heat It Up) and, though it's not too clear in the photo, it's painted with H2Os in Royal Satin, Sea Spray and Just Peachy (from the Summer Fun set).
More of those pesky little midges made their way on to the inside :)

Other Materials Used:
Cardstock: American Crafts lime green for base; Core Color Core'dinations VaVaVoom lilac for matting and layering; Neena Solar smooth white for stamped topper and inside of card
Stamps: Sheena's A Little Bit Sketchy Only Words - Through the Rain for the sentiment; the numbers were included in a giveaway from Jo, Jozart last year -  NBUS, but deserved to be used much sooner so thanks Jo :)
Die for Topper: Spellbinders Nestabilities Labels Nine - the lilac mat was made by tracing around the die and cutting out.

I dipped into the snippets box for the Neena Solar for the topper so I'm skipping over to visit Di and the playmates at Pixies Snippets Playground - Week 112

I started to write this post up on Wednesday ... two days - that has to be a contender for the Slowest Post Ever Written Award :) It's just taking me a bit longer than usual to throw off this bug, one minute I feel perkier, the next I have to lie down for a while ... very frustrating!

So, I hope this finds you fit and well and having lots of crafting fun.

Take care and stay safe,


Sunday, 13 October 2013

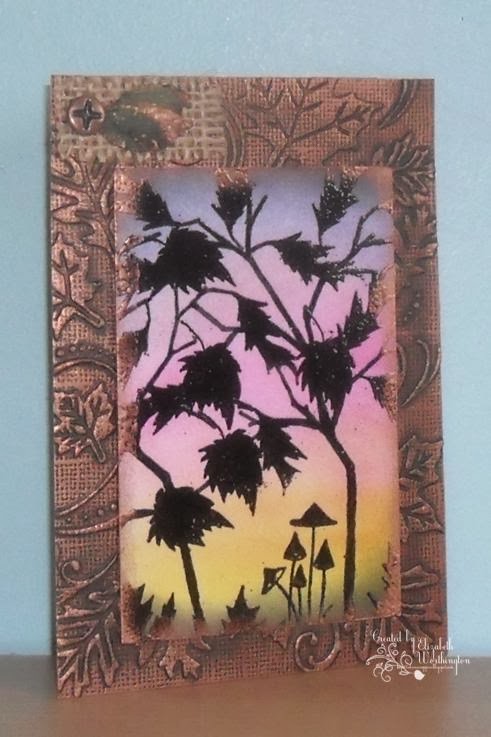
Sunday Snippets - Autumn Sunset and Another Altered Frame

Happy Sunday Everyone

Hope you are all have a lovely, possibly restful, maybe exciting, day :)

As it's Sunday it's time for a trip to Pixie's Snippet Playground - Week 94 and today, because it incorporates a couple of snippets, I have the sunset scene, last seen in it's unfinished state, on my desk on Wednesday.
The background, a snippet of white card, is sponged with combination of Tim Holtz distress inks in yellows, pinks, mauves, blues and black. The stamps, Lavinia's Bare Trees & Leaves and Toadstools, were stamped with VersaMark and heat embossed with a black powder. Finally, it was edged with Rub 'n Buff metallic wax, rather appropriately Autumn Gold, and matted on to a leftover scrap of embossed black card - the folder is the superb Fall Leaf Background from Darice - which has also been given the Rub 'n Buff treatment.
Just a tiny embellishment top left, composed of a scrap of hessian, a few gold waxed leaves and a bronze brad, to finish.
To frame it I altered a very old frame I had tucked away in my box of 'things to be recycled/altered'. In fact the frame is more than 43 years old ... I know this because for much of the 43 years it held a lovely photo of my baby son, then 11 months old, in it ... and he is now 44 years old :) As usual, I forgot to take a before shot of the frame which was a very battered cream with a gilt trim. Here's a shot of the back to give you some idea of the sorry state it was in.
It now has several layers of acrylic and one of a bronze metalic paint with a touch of Rub 'n Buff around the uppermost edge for good measure.
Looking so much better - there might even be another 40+ years in it yet :)

Off to sort out my wardrobe now and pack away anything I think I can live without for the next few weeks.

Take care and enjoy the rest of the weekend.

Friday, 2 August 2013

Snow Loved Snow Couple

Evening Everyone,

Yippee! The sun's been shining again, however it has also been a tad breezy ... in fact, the wind was so strong earlier it was shaking the birds right out of the trees. Still, it's been a great drying day :))

Today's make features one of my all-time favourite stamps - Sugar Nellie's Snow Loved - an oldie but a goodie.
And all because Hazel, over at Crafty Hazelnut's Crafty Challenge asked for a snowman or snowwoman. I remembered this stamp and thought why not both.

To make the topper the happy couple were stamped with Memories Black dye ink on to smooth white card (from Papermill Direct) and stamped again on printer paper to make a mask. After colouring the snow folk with ProMarkers (using a mix of blues, aquas, greys, greens, reds and brown) I did something I've been nervous of trying, I die cut it to leave the bottom of the image outside the oval shape (Cart-Us Ovals). And it's easier than I thought!
Once that was done, the image was masked off and snowflakes were stamped in the background using VersaMark. To do this, three tiny snowflake stamps from the Magical Christmas set from Hot Of The Press were placed together on a stamp block and then randomly stamped around the image with some of the stamping going off the edge. That done, Adirondack's Stonewashed blue ink was brushed over the stamping. The effect is subtle but the snowflakes are clear in close-up. Another oval was cut from a snippet of aqua card (Baja Breeze from Stamping Up) by tracing round the die and cutting out and then stamped with snowflakes and inked in the same way as the topper. Both were finished off with a sponging around the edges with Tim Holtz Peacock Feathers. The glitter on the topper is a fine pale blue one I bought at a stall at the SECC Hobbycraft show two years ago ... a little goes a very long way! The holly berries have had the Stickles treatment (Xmas Red).
   

The inside and back have been stamped with the snowflakes too ... I heard a card decorated like this, on all sides, described as a 360 degree card ... another new term for the crafting jargonictionary :))

Other materials used:
Dark blue mirror card; Cuttlebug Snowflakes embossing folder; Crafters Companions Die'sire Snowflakes dies; dark blue gems

I'm submitting this card to the following challenges:

Crafty Hazelnut's two challenges - CHNC Challenge 135 - snowmen or snowwomen and
CHNC Challenge Extra for August - where anything goes as long as it's Christmas.

Pixie's Craft Snippets Playground - #83 - the oval of Baja Breeze is admittedly the only snippet used here ... and it's quite a wrench to see it finally used up.

Jellypark Friends Friday Challenges - Christmas in July ... I know, it's August but this challenge is open for another five days :)

That's me done for today and I won't be around tomorrow. I'm off to my favourite craft centre, Cardwells, where there is going to be a craft fair and craft demonstrations going on. Of course, I'm going to be good and not tempted at all to fill a basket with crafting goodies ... on second thoughts, it would be rude not to :))

Take care and have a wonderful weekend whatever you are doing,

Sunday, 12 May 2013

Embossed Wax Paper Topper Card

Hello Everyone,

How do you know you are a real crafter? When you discover that you've sat all the way through dinner with bits of washi tape attached to the sleeve of your fleece!

And why was I walking around looking like an advert for washi tape? Well, it's easy to explain, I've been using my Cuttlebug and it had scraps of washi stuck to it, saved from a previous die cutting session :)

And this is why the Cuttlebug was out ... to emboss the white card for the base of this card topper. First time of using this Sizzix folder, Folksy Fun, but it's so pretty it won't be the last. 

I was sorting through my vast collection of snippets and happened on the lavender blue piece, the result of some experimentation with wax paper embossing some time last year, I think - the old memory is not as sharp as it once was. Anyway, I do remember that I embossed the wax paper with the Butterfly Meadow template, from Crafter's Workshop with the Cuttlebug. Once that was done, the wax paper was sandwiched between two pieces of white card and then ironed - this transfers the wax from paper to card which acts as a resist when sponged with ink - in this case, Tim Holtz Shaded Lilac. If you get up close and uncomfortable you might just discern a clump of grass and a couple of butterflies. Not the finest example of the technique but the colour is too pretty to waste and it is a perfect match for the lavender blue card used for matting. 
  
The silhouette stamp, from Kanban Crafts Spring Meadow set, is stamped in Archival Jet Black on front and in Memento London Fog inside. The set also contains a couple of  tiny single flower heads - one of which is stamped on the back of the card as a tiny finishing touch.

Materials: white card base; Generations Archival Cardstock in a lavender blue shade; smooth white cardstock; Sizzix embossing folder, Folksy Fun; Crafter's Workshop Butterfly Meadow template; Wax paper; Cuttlebug machine; Ink pads - Tim Holtz DI, Shaded Lilac, Ranger Archival Ink, Jet Black, Memento London Fog; Stamps - Kanban Crafts Spring Meadow, Wild Rose Studio Everyday Greetings; black/white gingham ribbon; small Woodware butterfly punch; Habico pearls; black ProMarker

I'm submitting this card to the following:

My To Craft - Challenge #221 'Show Us The Inside!'
Sweet Stampin' - Clean & Simple

And, of course, if there's snippets involved then I have to take a trip over to Di's, i.e.


Edited Note: At Brenda's suggestion I have also submitted this card to the Stamping Sensations May Challenge - Embossing and Texture

Nearly time to call it a day - there's a book by my bedside tempting me to settle down for a good read. 

I hope you have all had a great weekend and that you are rested, revived and raring to go for Monday :)

Take care and happy crafting,