Hello Everyone
I'm enjoying using up the Gelli plate prints as much as I enjoyed making them - playing with paints and inks might be messy but it's also fun.
This card was made for my granddaughter's 16th birthday. When I spotted the stamp set being given away with a copy of Making Cards & Papercraft magazine I just had to have it. The stamps reminded me so much of Shari.
Supplies used:
Front:
- base - white card
- layering & butterfly die-cuts - hot pink glitter card from American Craft's Dear Lizzy New Day Mixed Media pad
- background - piece of gelli plate print left over
- topper - smooth white card; Sweet Samantha stamp set - described as a motivational stamp set - from Making Cards & Papercraft February 2019 issue; ProMarkers - Blossom, Burnt Sienna, Cinnamon, Cool Grey 1, Ice Grey 1, Rose Pink, Satin
- Dies - Rectangle die set, butterflies from a set from a magazine
pink gems
Inside:
- Creative Dies - Number dies and Special Celebrations stamp set
Because the Gelli plate print had already been created some time ago, this was a quick and easy card to make.
This is another scheduled post while I take a break from the craft desk. I'll be back soon but in the meantime I hope you are having a great week.
Showing posts with label colouring. Show all posts
Tuesday, 2 July 2019
Thursday, 9 October 2014
Steampunk Train Birthday Card
Hello Everyone
I hope this finds you well and having a really good Thursday.
It's all go here at Casa Worthington. The painting of the hall ... delayed, if you recall, due to a back injury preventing the EM from finishing the job he had already started ... has recommenced. After months of painkillers and physiotherapy, I'm happy to report he is now back to full health, albeit still having to take things a little easier than before ... in other words, pace himself!!! It also means that my time in the craft room is limited ... ladders everywhere means access has been denied much of the time. So, I have very little to share at the moment but here is the card made for my SIL's 50th birthday.
With his main interests being football, cars and model railways I looked for a stamp that I thought would encompass some, if not all, of these and settled on this really quirky one from Lost Coast, Steampunk Grasshopper Train.
I stamped it in Memento Tuxedo Black ink and coloured it with a mix of ProMarkers and Sharpie pens, picking out some of the colours in the background patterned paper ... printed from a My Craft Studio CD, Tinkering with Steampunk. Red and blue mirror card was used for matting and layering. Printed ribbon (Ribbonbox) bought at the Hobbycraft Show in Glasgow, as far back as last October especially with this birthday in mind, and toning card candy were used for embellishments.


Inside and back were, as usual, decorated with leftover strips of the patterned paper.
One of the reasons that the stamp felt appropriate was because there is similar old-fashioned trains on the cushions I made for the birthday boy's train shed - you may have seen them in an earlier post here.
Time I made a quick exit. Another good reason for staying well away from the area being painted is that the fumes from the paint have triggered an asthma attack. Normal service will be resumed once the job is completed and all the fumes have dissipated.
Thanks for looking, comments are always appreciated ... if only to let me know that I'm not alone in cyberland :)
Take care, see you soon and, as always, happy crafting,
I hope this finds you well and having a really good Thursday.
It's all go here at Casa Worthington. The painting of the hall ... delayed, if you recall, due to a back injury preventing the EM from finishing the job he had already started ... has recommenced. After months of painkillers and physiotherapy, I'm happy to report he is now back to full health, albeit still having to take things a little easier than before ... in other words, pace himself!!! It also means that my time in the craft room is limited ... ladders everywhere means access has been denied much of the time. So, I have very little to share at the moment but here is the card made for my SIL's 50th birthday.
With his main interests being football, cars and model railways I looked for a stamp that I thought would encompass some, if not all, of these and settled on this really quirky one from Lost Coast, Steampunk Grasshopper Train.
I stamped it in Memento Tuxedo Black ink and coloured it with a mix of ProMarkers and Sharpie pens, picking out some of the colours in the background patterned paper ... printed from a My Craft Studio CD, Tinkering with Steampunk. Red and blue mirror card was used for matting and layering. Printed ribbon (Ribbonbox) bought at the Hobbycraft Show in Glasgow, as far back as last October especially with this birthday in mind, and toning card candy were used for embellishments.


Inside and back were, as usual, decorated with leftover strips of the patterned paper.
One of the reasons that the stamp felt appropriate was because there is similar old-fashioned trains on the cushions I made for the birthday boy's train shed - you may have seen them in an earlier post here.
Time I made a quick exit. Another good reason for staying well away from the area being painted is that the fumes from the paint have triggered an asthma attack. Normal service will be resumed once the job is completed and all the fumes have dissipated.
Thanks for looking, comments are always appreciated ... if only to let me know that I'm not alone in cyberland :)
Take care, see you soon and, as always, happy crafting,
Thursday, 25 September 2014
So Many Books - A Snippet Make
Good Morning Everyone,
I can't believe it is so long since I last posted and I've missed Annie's Friday Smiles, Di's Sunday Snippets, Cathy's In A Vase on Monday and Julia's WOYWW to name just a few of the my favourite things ... sounds like a cue for a song :)
I feel such a slacker but there's good reason for my absence, nothing craft related but other stuff that has kept me away from the craft room and, as it's in the same room, from my computer too. I hope to be able to tell you about some of what has been going on over the next few days but in the meantime I have this bookmark made from snippets to show you.
After making the EM's birthday card there was a couple of strips of the Brusho background left over. Really too good to toss but not enough to make another card. After much deliberation, rumination and cogitation, not to mention a fair bit of head scratching, I got the idea to make a bookmark. It's quite big, measuring 8½" x 3½" (21x8.5cm) - the perfect size for using with larger books and hard to lose too. I'm forever losing bookmarks, often creating a house-wide search!!!
To make the bookmark, I tore round the strip of background paper and adhered it to the black base. The stamp is an old one (NBUS) from Stamptivity ... so old I believe the company is no longer around. It was stamped with Memento Tuxedo Black and coloured with a mix of Sharpies and ProMarkers then cut out and adhered to a black mat. The sentiment, found on Pinterest, is made up from letters from Jillibean Soup Alphabeans, Newberg Navy. The silk tassel is from a pack of mixed colours that I was sure I found at Joanna Sheen's but, if I did, they don't seem to be available there now.
So there it is, my Sunday Snippets ... just a few days late ... for Pixie's Snippets Playground - Week 143.
Now, at the top of this post I hinted that I might be able to share some of the stuff that has been occupying - to the exclusion of crafting - of late. Well, here's just one of the them.
Yes, the EM's birthday present finally arrived yesterday ... yippee! We had begun to give up hope. Only a week late and after Argos had changed the delivery date several times. Flat pack of course, so we spent a fair few hours putting it together and positioning it just right in the Snooker Room ... was the spare room, now his happy place! Our grandson's are going to be delighted too ... I can foresee more frequent visits from them :)
Many thanks for popping in. I hope you are well and having a good week.
Until next time, happy crafting,
I can't believe it is so long since I last posted and I've missed Annie's Friday Smiles, Di's Sunday Snippets, Cathy's In A Vase on Monday and Julia's WOYWW to name just a few of the my favourite things ... sounds like a cue for a song :)
I feel such a slacker but there's good reason for my absence, nothing craft related but other stuff that has kept me away from the craft room and, as it's in the same room, from my computer too. I hope to be able to tell you about some of what has been going on over the next few days but in the meantime I have this bookmark made from snippets to show you.
After making the EM's birthday card there was a couple of strips of the Brusho background left over. Really too good to toss but not enough to make another card. After much deliberation, rumination and cogitation, not to mention a fair bit of head scratching, I got the idea to make a bookmark. It's quite big, measuring 8½" x 3½" (21x8.5cm) - the perfect size for using with larger books and hard to lose too. I'm forever losing bookmarks, often creating a house-wide search!!!
To make the bookmark, I tore round the strip of background paper and adhered it to the black base. The stamp is an old one (NBUS) from Stamptivity ... so old I believe the company is no longer around. It was stamped with Memento Tuxedo Black and coloured with a mix of Sharpies and ProMarkers then cut out and adhered to a black mat. The sentiment, found on Pinterest, is made up from letters from Jillibean Soup Alphabeans, Newberg Navy. The silk tassel is from a pack of mixed colours that I was sure I found at Joanna Sheen's but, if I did, they don't seem to be available there now.
So there it is, my Sunday Snippets ... just a few days late ... for Pixie's Snippets Playground - Week 143.
Now, at the top of this post I hinted that I might be able to share some of the stuff that has been occupying - to the exclusion of crafting - of late. Well, here's just one of the them.
Yes, the EM's birthday present finally arrived yesterday ... yippee! We had begun to give up hope. Only a week late and after Argos had changed the delivery date several times. Flat pack of course, so we spent a fair few hours putting it together and positioning it just right in the Snooker Room ... was the spare room, now his happy place! Our grandson's are going to be delighted too ... I can foresee more frequent visits from them :)
Many thanks for popping in. I hope you are well and having a good week.
Until next time, happy crafting,
Monday, 25 August 2014
Two Little Gift Angels for Rudolph Day
Afternoon Everyone,
It's the 25th and for me it's not only August Bank Holiday Monday but also Rudolph Day. Now Sarn, at Stamping For Pleasure, is a hard task master! To please her we are asked to make at least two cards!!! It takes me all my time to make one, so making another in much the same design is more than a little challenge. However, once more I've risen to that challenge, though this time I might have excelled myself because it's two cards that are almost identical.
Sometimes I amaze myself :)
The little angel bearing gifts, that's the stamp that has been sitting on my desk for weeks now, was stamped with a black dye ink and then coloured with a selection of markers. Glitter glue has been used on the wings, hat and smeared around the feet to indicate 'snow' ... after all, they are snow angels! Both toppers are matted and layered on to cardstock that picks out the shades used in the colouring.
Because of the white snowflake embossed paper layer, a piece left over from another project which was just big enough for both cards, the die-cut snowflakes, an X-Cut snowflake that is free with Docrafts Creativity Magazine this month, were just the right embellishment. Tip: rub intricate dies like this one with a tumble dryer sheet before cutting out - works a treat; those snowflakes popped out of the die no problem at all. The tiny round greeting stamp is an old one from Lily of the Valley. It's just the right size for cutting out with another X-Cut die - the smallest circle in the Nesting Circles set - and it makes the perfect centrepiece for a snowflake!
As well as Sarn's Rudolph Day Challenge mentioned above, I'm also submitting the cards to Di's challenge over at Pixie's Snippets Playground - Week 139 - as ever, must use snippets - the white card used to stamp on and the snowflake embossed paper.
I don't want to be alarmist but my calculator - scroll right down to the bottom of this page - tells me that we have 122 days to get all those Christmas cards done, that's scarily just 17 weeks, or even more scarily only three more Rudolph Days! At my rate of production that's only 6 more cards ... help!!! I think I'm going to have to try harder or prepare myself for burning the midnight oil in December.
Nothing for it, I better be off to see if I can make one or two more.
Happy Crafting,
Materials used: white squared shaped card bases; red, green, pink, blue coloured cardstock - various sources; snippets of smooth white card for stamping; the leftover snowflake embossed paper - maker unknown; Stampendous Gift Angel stamp; Lily of the Valley Christmas greeting stamp; Memento Tuxedo Black ink pad; ProMarkers in shades of red, green, blue, pink and grey; Crystal Stickles; Docrafts X-Cut dies - free snowflake and Nesting Circles set; green and pink card candy
It's the 25th and for me it's not only August Bank Holiday Monday but also Rudolph Day. Now Sarn, at Stamping For Pleasure, is a hard task master! To please her we are asked to make at least two cards!!! It takes me all my time to make one, so making another in much the same design is more than a little challenge. However, once more I've risen to that challenge, though this time I might have excelled myself because it's two cards that are almost identical.
Sometimes I amaze myself :)
Because of the white snowflake embossed paper layer, a piece left over from another project which was just big enough for both cards, the die-cut snowflakes, an X-Cut snowflake that is free with Docrafts Creativity Magazine this month, were just the right embellishment. Tip: rub intricate dies like this one with a tumble dryer sheet before cutting out - works a treat; those snowflakes popped out of the die no problem at all. The tiny round greeting stamp is an old one from Lily of the Valley. It's just the right size for cutting out with another X-Cut die - the smallest circle in the Nesting Circles set - and it makes the perfect centrepiece for a snowflake!
As well as Sarn's Rudolph Day Challenge mentioned above, I'm also submitting the cards to Di's challenge over at Pixie's Snippets Playground - Week 139 - as ever, must use snippets - the white card used to stamp on and the snowflake embossed paper.
I don't want to be alarmist but my calculator - scroll right down to the bottom of this page - tells me that we have 122 days to get all those Christmas cards done, that's scarily just 17 weeks, or even more scarily only three more Rudolph Days! At my rate of production that's only 6 more cards ... help!!! I think I'm going to have to try harder or prepare myself for burning the midnight oil in December.
Nothing for it, I better be off to see if I can make one or two more.
Happy Crafting,
Materials used: white squared shaped card bases; red, green, pink, blue coloured cardstock - various sources; snippets of smooth white card for stamping; the leftover snowflake embossed paper - maker unknown; Stampendous Gift Angel stamp; Lily of the Valley Christmas greeting stamp; Memento Tuxedo Black ink pad; ProMarkers in shades of red, green, blue, pink and grey; Crystal Stickles; Docrafts X-Cut dies - free snowflake and Nesting Circles set; green and pink card candy
Monday, 28 July 2014
Let The Music Play
Evening Everyone
Here's definitely something I made earlier, and then forgot to make a post about it.
It is a canvas board altered to fulfil the theme for the UKPC June Swap - music. I did write down all the materials used at the time but it's lost ... not surprising considering the amount of stuff there is in this craft room, sigh!
Anyway, senior moments permitting, I'll do my best to remember.
I began by sponging Gentle Blends in pink, green and yellow on to the board, blending the colours in until I was happy with them.
Next, I dabbed silver Buff-It randomly over the surface and then stamped an Inkylicious music script stamp in black ink. Or was it the other way round? I can't recall! However, I do remember that to get the random effect I didn't put the stamp on a block but just held it in my hand and stamped here and there until I was happy with it.
The tag was made with white card, sponged with the same Gentle Blends and edged with Pebeo silver wax. The phonograph stamp is from the Artemio Office set. The embossed corners are from a set of craft stickers from Craft Works, they've been given the silver wax treatment too. Once finished I layered the tag on to deep pink card before attaching it to the canvas board.
The title was typed on to white card on my vintage typewriter, then cut out and edged with black ink.
I'm amazed! I don't think I've done too badly remembering after all ... there's hope for me yet :)
Hope you've had as good a day as I've had and I wish you a good day tomorrow.
Thanks for taking the time to look.
Happy Crafting,
Saturday, 14 June 2014
Just For You - a NBUS project
Morning Everyone,
It's the weekend - yippee!!! The EM and I have decided to give ourselves a break from painting and decorating the hall ... this is turning out to be a mammoth project! So, as long as there are no interruptions I'm planning to get a bit of crafting done :)
In the meantime here's another card made previously which features a little stamp set that I bought many years ago, perhaps around 2006, just about when I started cardmaking. They were going for a song in the reduced bin at my local craft shop. I think. It was so long ago I can't even remember that accurately :(
The problem then was what to do with the stamps ... I hadn't a clue! I knew nothing about colouring back then, indeed all I had was one black ink pad, and I knew even less about card design. So, sadly, they really had never been used - NBUS as Darnell over at DJ Kard Kreations, calls them. It was Darnell who introduced me to NBUS and spurred me on to dig out the neglected, unloved and forgotten crafty goodies lingering in my stash and now, to celebrate reaching 500 followers, she has launched her NBUS challenge ... just the thing to spur me into action :)
The three images were simply stamped on to a leftover scrap of smooth white card, cut to shape with a square die, and painted with distress inks to match the background.
The background was made by swishing white card through distress ink, in shades of pink and red, and then spritzed with water several times to create an interesting texture ... well, I hope it's an interesting texture :) The card is finished off with one of my favourite greeting stamps and a few black sequins sprinkled here and there. As usual now, I'll list the materials used down at the bottom of this post.
If you have a collection of NBUS tucked away in you stash, and what crafter hasn't, now's the time to get them out and, like me, join in with Darnell's challenge - just click the link above or on the NBUS button to find out all about how to enter. She'll be happy to see you there :)
I'm off now to tackle the first project planned for today. Sewing, I think ... it's a wee while since I got the sewing machine out.
Whatever your plans are I hope you are having a great Saturday.
Take care and happy crafting,
Materials used: smooth black cardstock trimmed and folded to create a tent style card; smooth white cardstock for background, Ranger's distress ink colours, Picked Raspberry, Fired Brick, Spun Sugar and Iced Spruce; stamps - the wood-mounted stamps, there's no indication of name or maker on them, and Ladybug Crafts It's Only Words 2 for the greeting; Archival black ink pad; X-cut Square die set; black sequins for decoration

It's the weekend - yippee!!! The EM and I have decided to give ourselves a break from painting and decorating the hall ... this is turning out to be a mammoth project! So, as long as there are no interruptions I'm planning to get a bit of crafting done :)
In the meantime here's another card made previously which features a little stamp set that I bought many years ago, perhaps around 2006, just about when I started cardmaking. They were going for a song in the reduced bin at my local craft shop. I think. It was so long ago I can't even remember that accurately :(
The problem then was what to do with the stamps ... I hadn't a clue! I knew nothing about colouring back then, indeed all I had was one black ink pad, and I knew even less about card design. So, sadly, they really had never been used - NBUS as Darnell over at DJ Kard Kreations, calls them. It was Darnell who introduced me to NBUS and spurred me on to dig out the neglected, unloved and forgotten crafty goodies lingering in my stash and now, to celebrate reaching 500 followers, she has launched her NBUS challenge ... just the thing to spur me into action :)
The three images were simply stamped on to a leftover scrap of smooth white card, cut to shape with a square die, and painted with distress inks to match the background.
The background was made by swishing white card through distress ink, in shades of pink and red, and then spritzed with water several times to create an interesting texture ... well, I hope it's an interesting texture :) The card is finished off with one of my favourite greeting stamps and a few black sequins sprinkled here and there. As usual now, I'll list the materials used down at the bottom of this post.
If you have a collection of NBUS tucked away in you stash, and what crafter hasn't, now's the time to get them out and, like me, join in with Darnell's challenge - just click the link above or on the NBUS button to find out all about how to enter. She'll be happy to see you there :)
I'm off now to tackle the first project planned for today. Sewing, I think ... it's a wee while since I got the sewing machine out.
Whatever your plans are I hope you are having a great Saturday.
Take care and happy crafting,
Materials used: smooth black cardstock trimmed and folded to create a tent style card; smooth white cardstock for background, Ranger's distress ink colours, Picked Raspberry, Fired Brick, Spun Sugar and Iced Spruce; stamps - the wood-mounted stamps, there's no indication of name or maker on them, and Ladybug Crafts It's Only Words 2 for the greeting; Archival black ink pad; X-cut Square die set; black sequins for decoration
Sunday, 18 May 2014
Sunday Snippets
Evening All,
Happy Sunday ... hope you are all enjoying sunnier weather than we are here in Ayrshire. It's not raining so that's something, but I wish the sun would come out again.
You wouldn't believe that this snippet make was completed yesterday and I've only just got round to photographing it, which is why I'm late to Pixie's Snippet Playground - Week 125 today.
As is becoming my habit, I'm adhering to Jules Law, that is the right to be lazy and not list the materials used. I will say though, that apart from the cute wee hedgehog, another product of the recent colouring session, and the pink enamel dots, everything used was from the scrap mountain!
Sigh! It seems I missed the sunshine there too, not to mention the ducks ... they've flown off! Clearly there's been too much hilarity down at the pond!!!
Off to watch the first of the Chelsea Flower Show programmes this week so I'll wish you a very good evening.
Happy Crafting,
Sunday, 4 May 2014
Sunday Snippet Card - Let's Bee Friends
Afternoon Everyone,
And happy Sunday to you too.
I have a quick Sunday Snippet Card for Pixie's Snippets Playground - Week 123 to share with you today ... the haste is because we are off to the market and car boot sale for a rake about. The topper is another from the recent colouring session.
The cute image is one that came in a free pack in one of the cardmaking magazines bought last year ... coloured with ProMarkers and matted and layered on to scraps of pink and turquoise card.
I used a couple of scraps of leftover patterned paper (another magazine freebie I think) to cover the white card base and added a belly band created from a strips of white and pink card, both with the edges punched - the white with hearts and the pink scalloped - and trimmed with a length of flower printed ribbon.
The silver peel-offs I've used to decorate are from a sheet that is so old I've forgotten the name of the maker. As this is true of almost everything that went into the making of this card I'm claiming the right, as laid down by Jules, to take Sunday off and not to list them at all :)
I hope you've enjoyed the weekend so far. It's the May Day holiday weekend here but the weather hasn't been too good so far ... the sun seems to have gone on holiday too! So instead of sunning ourselves we went out shopping yesterday ... to Dunelm Mill ... just for some thread, that's all, honest! So I really don't know how several lengths of beautiful fabric dropped into my basket, but it did, and being a real softy, I hadn't the heart to do anything but pay for it at the cash desk :) Now, all I need to do is find the time to get the sewing machine out.
And for tomorrow we are planning a visit to Culzean Castle ... I have a notion to visit the walled garden ... looking at someone else's garden will be a welcome change from working in our weed-infested patch - the ground elder is beginning to get the better of me!
So whatever you are doing this weekend have a great time.
Happy crafting,
And happy Sunday to you too.
I have a quick Sunday Snippet Card for Pixie's Snippets Playground - Week 123 to share with you today ... the haste is because we are off to the market and car boot sale for a rake about. The topper is another from the recent colouring session.
The cute image is one that came in a free pack in one of the cardmaking magazines bought last year ... coloured with ProMarkers and matted and layered on to scraps of pink and turquoise card.
I used a couple of scraps of leftover patterned paper (another magazine freebie I think) to cover the white card base and added a belly band created from a strips of white and pink card, both with the edges punched - the white with hearts and the pink scalloped - and trimmed with a length of flower printed ribbon.
The silver peel-offs I've used to decorate are from a sheet that is so old I've forgotten the name of the maker. As this is true of almost everything that went into the making of this card I'm claiming the right, as laid down by Jules, to take Sunday off and not to list them at all :)
I hope you've enjoyed the weekend so far. It's the May Day holiday weekend here but the weather hasn't been too good so far ... the sun seems to have gone on holiday too! So instead of sunning ourselves we went out shopping yesterday ... to Dunelm Mill ... just for some thread, that's all, honest! So I really don't know how several lengths of beautiful fabric dropped into my basket, but it did, and being a real softy, I hadn't the heart to do anything but pay for it at the cash desk :) Now, all I need to do is find the time to get the sewing machine out.
And for tomorrow we are planning a visit to Culzean Castle ... I have a notion to visit the walled garden ... looking at someone else's garden will be a welcome change from working in our weed-infested patch - the ground elder is beginning to get the better of me!
So whatever you are doing this weekend have a great time.
Happy crafting,
Thursday, 1 May 2014
Have you seen the one with the giraffe, the frog and the chicken ...
... if you have, please let me know!
Why? Because this is one of the digi images (a NBUS of course) that was printed off eons ago and even though I have searched through my entire images file on the PC, took me forever too, I have been unable to find it ... therefore cannot attribute it to the creator, and I feel really bad about that :(
It's a really fun image that I thought would be perfect for a little boy's birthday. ProMarkers were used to colour it and, then to make it even more amusing for said little boy, I've added googly eyes - glued down with seriously strong glue - this little one has had a tendency in the past to put things straight into his mouth so I'm taking no chances!
The black card base is covered with Crafts-Too green polka dot patterned paper. The belly-band is just a scrap of forest green card (Papermill Direct) trimmed with an X-Cut scallop border edge punch and decorated with a leftover length of narrow green gingham ribbon ... there was a teeny-weeny bit left, just enough to make a faux bow!
The image is matted on to another scrap of forest green card - love that colour - and decorated in each corner with green card candi - Craftwork Cards Granny Smith selection. The white candi used is also from the same selection.
I'm submitting this card to the two following challenges:
Crafty Hazelnut's Patterned Paper Challenge for May - Hazel's requirement is always that anything goes as long as the card front is covered with patterned paper.
and, of course, I'm skipping over to Di's at Pixie's Snippets Playground - Week 122 - lots of stash used up today including the snippets of forest green cardstock and gingham ribbon.
It's short and sweet today ... lots to do here, lots of crafty projects planned, and lots that won't get done, I'm sure :)
I hope you are having a great day and everything is going well for you ... if it isn't here's a cyber hug if you need it and maybe the day will improve as it goes :)
Happy crafting,
Why? Because this is one of the digi images (a NBUS of course) that was printed off eons ago and even though I have searched through my entire images file on the PC, took me forever too, I have been unable to find it ... therefore cannot attribute it to the creator, and I feel really bad about that :(
It's a really fun image that I thought would be perfect for a little boy's birthday. ProMarkers were used to colour it and, then to make it even more amusing for said little boy, I've added googly eyes - glued down with seriously strong glue - this little one has had a tendency in the past to put things straight into his mouth so I'm taking no chances!
The black card base is covered with Crafts-Too green polka dot patterned paper. The belly-band is just a scrap of forest green card (Papermill Direct) trimmed with an X-Cut scallop border edge punch and decorated with a leftover length of narrow green gingham ribbon ... there was a teeny-weeny bit left, just enough to make a faux bow!
The image is matted on to another scrap of forest green card - love that colour - and decorated in each corner with green card candi - Craftwork Cards Granny Smith selection. The white candi used is also from the same selection.
I'm submitting this card to the two following challenges:
Crafty Hazelnut's Patterned Paper Challenge for May - Hazel's requirement is always that anything goes as long as the card front is covered with patterned paper.
and, of course, I'm skipping over to Di's at Pixie's Snippets Playground - Week 122 - lots of stash used up today including the snippets of forest green cardstock and gingham ribbon.
It's short and sweet today ... lots to do here, lots of crafty projects planned, and lots that won't get done, I'm sure :)
I hope you are having a great day and everything is going well for you ... if it isn't here's a cyber hug if you need it and maybe the day will improve as it goes :)
Happy crafting,
Friday, 21 June 2013
Clearing my desk of snippets, scraps and leftovers ... Day 6
Morning Folks
It's me again, not here, still there, but not for long ... we'll be setting off for home sometime tomorrow morning.
Hope you are enjoying this little series of mine. Here's today's share - something a bit different.
A scrapling! Appropriate for my little challenge, methinks. Super simple to make scraplings are 1.25" x 8.50" piece of cardstock folded in half, finished size is 1.25" x 4.25". This one would make a great bookmark, if only I could lay my hand on the tiny magnets I have stashed 'safely' away!!!
From the pile - white card, plaid patterned paper (Docrafts)
Additional supplies: stamps - V & A border stamp (Docrafts); inks - Memento dual markers in pink, mauve and green; trims - white lace and purple/lilac narrow ribbon from stash.
It's me again, not here, still there, but not for long ... we'll be setting off for home sometime tomorrow morning.
Hope you are enjoying this little series of mine. Here's today's share - something a bit different.
A scrapling! Appropriate for my little challenge, methinks. Super simple to make scraplings are 1.25" x 8.50" piece of cardstock folded in half, finished size is 1.25" x 4.25". This one would make a great bookmark, if only I could lay my hand on the tiny magnets I have stashed 'safely' away!!!
From the pile - white card, plaid patterned paper (Docrafts)
Additional supplies: stamps - V & A border stamp (Docrafts); inks - Memento dual markers in pink, mauve and green; trims - white lace and purple/lilac narrow ribbon from stash.
I'll be back with the last snippet make tomorrow, Day 7.
Hope you are all looking forward to the weekend.
Take care and happy crafting,
Tuesday, 4 June 2013
Country Diary Wild Roses
Afternoon Everyone
It's a lovely day here so I hope it is just as lovely where you are and that you are having a good day too.
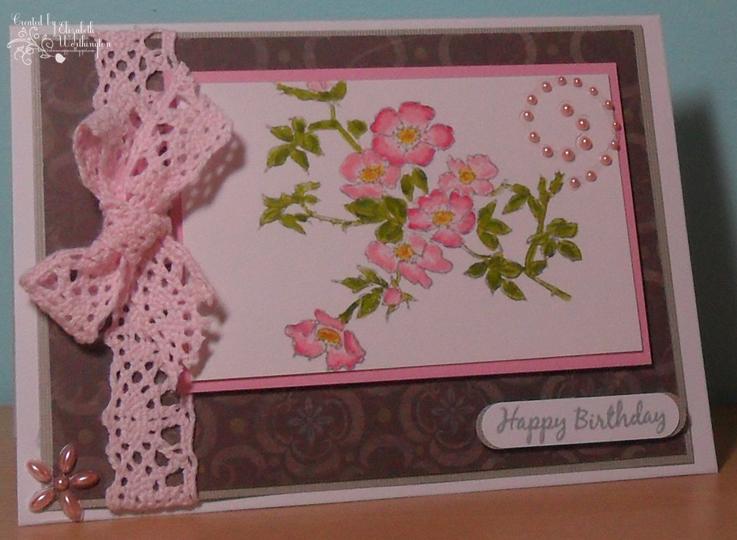
I've been practicing with Memento markers and colouring in these wild roses ... the image, and the greeting, are from a set of Country Diary stamps free from Cardmaking & Papercraft magazine. Using a grey ink pad, I stamped the image on to a scrap of smooth white cardstock, then coloured it in with the markers. I find that these markers do not blend in the same way as ProMarkers, however the effect is still pretty good.
All the materials, with the exception of the card blank, are leftovers and snippets from previous projects. The background paper is from one of K&Company's Speciality paper pads designed by Brenda Walton. I believe this is the first bow I've made from lace - if it isn't it's one of the very few! - and I'm very pleased with how pretty it looks.
Materials used:
It's a lovely day here so I hope it is just as lovely where you are and that you are having a good day too.
I've been practicing with Memento markers and colouring in these wild roses ... the image, and the greeting, are from a set of Country Diary stamps free from Cardmaking & Papercraft magazine. Using a grey ink pad, I stamped the image on to a scrap of smooth white cardstock, then coloured it in with the markers. I find that these markers do not blend in the same way as ProMarkers, however the effect is still pretty good.
All the materials, with the exception of the card blank, are leftovers and snippets from previous projects. The background paper is from one of K&Company's Speciality paper pads designed by Brenda Walton. I believe this is the first bow I've made from lace - if it isn't it's one of the very few! - and I'm very pleased with how pretty it looks.
Materials used:
- white A6 card blank (landscape)
- scraps of grey textured card, pink and white smooth card, K&Company's Flora & Fauna patterned paper
- stamps from The Country Diary of an Edwardian Lady which came free with Issue 91 of Cardmaking & Papercraft
- Memento London Fog ink pad and Memento Markers - Angel Pink, Rose Bud, Pear Tart, Bamboo Leaves, Dandelion, Cantaloupe
- Stampin' Up label punch
- Embellishments - pink cotton lace and pears from stash
I plan to submit this card to the following challenges:
Craft Dee Bowz - June - celebrate summer and include a handmade bow
Created With Love #44 - anything goes
Pixie's Crafty Snippets Playground - Week 75 - where, as ever, the only requirement is that some snippets have been used in the card - in this card that's almost everything!
I've cleared the desk for this afternoon - i.e. all cardmaking and scrapping stuff has been removed - for a sewing session. Starting with taking up the legs of the EM's jeans ... yes, he has spotted the potential of the new sewing machine already :)
But first, I'm going to nip into the garden and take some photos of the aquilegias - they are simply stunning at the moment, especially my favourite, the blue alpine one.
I hope the rest of the day goes well for you all and many thanks for looking.
Happy crafting,
Friday, 10 May 2013
Mystery Flower ...
... I have no idea what this flower is so it's very possible that the colours are all wrong!
The stamp is from Digi Stamp Boutique - from the Sketchy Flowers set - and if you know what this lovely plant is, I'd be grateful if you could let me know. Whatever it is, it's lovely and a joy to colour in (with ProMarkers). I've teamed it up with a greeting from Clear Dollar Stamps, the Quiet Rocking Chair set, another digital stamp which, with a bit of digital manoeuvring, tucked in very nicely under the leaf spray.

Once again, the stamp has been shrunk down for the insert and back of the card.
Supplies used were - white Papermania textured cardstock, the digital stamps already mentioned, ProMarkers in the following colours: Leaves - Lime Zest, Pear Green & Marsh Green, Flowers - Dusky Rose, Ruby, Burgundy
Tools - Serif CraftArtist Professional, PC and printer
Short and sweet today and I can't linger - look what the postie has delivered:
Lovely, aren't they? I'm sure many of you have a collection already but, until now, I've been happy to colour with either ProMarkers or AquaMarkers, and even occasionally with water colour pencils. I did invest in two, yes, TWO, distress markers but they are so pricey!!! It would take me years to build up a complete collection. However, while watching a few videos by Gina K on Stamp TV, I discovered Memento Markers. Call me slow, well I did ... I've been using Memento ink pads for aeons :( So I shopped around and find these going very reasonably at BG Payne Crafts ... so there goes my crafting pocket money for the month :)
I'm sure they can't be compared to distress markers, they probably behave quite differently, but I'm willing to give them a fair trial, try out new techniques, e.g. 'pouncing' and 'kissing' - don't you just love crafting terminology? So that's me off to play, I mean, put them through their paces :)
I hope you are all well and having a good week.
Happy crafting,
Friday, 16 March 2012
Sweet Friend - another wee card and Arihanna's first photos
Morning Everyone,
From deepest, dampest Ayr, I hope you are all well and perhaps enjoying, if not sunny, at least drier weather wherever you are.
I finally managed to complete this wee card started a couple of weeks ago but the finish delayed due to the move - enough said!
The cute topper is one from an embossing folder, Cindy Loo collections by Cuttlebug, that has four topper shapes included in it - very useful. This one features two woodland friends, a deer and a squirrel in what I think is an orchard ... well, it is an orchard now with gems to represent lovely juicy red apples. I coloured the embossed side with ProMarkers in greens, greys and browns and added tiny gems for eyes. All the edges are inked with yellow DI. The embossed trim along the edge of the card was done using a border folder. This edge was trimmed down and a piece of scalloped edge punched DP adhered.
To conceal the back of the green trim, he inside is trimmed with the other DP, also scalloped edged. The strip of green DP is there to disguise the line that was left during the embossing process.
The back has the patterned paper wrapped around from the front on one side and the leftover half of the scalloped circle from the front too - well, it seemed a shame not to use it :)
Materials used to make this card:
It's been long awaited but the EM has finally worked out how to email photos from his mobile to me so here is the first photos of our beloved great-niece Arihanna.
Apologies for the quality - the next job will be discovering how to improve that on his mobile. Arihanna was not too impressed with her great-uncle snapping away.
That's my huge sausage fingers in foreground :(
Yesterday evening she decided to join in her Granny's telephone call to me and proved that she has immensely powerful lungs for one so young :))
Right, I'm off to have elevenses and then I've a layout I want to work on, fitting in some commenting at some point during the day too.
I wish you all a wonderful weekend and for those of you who are not feeling so good, I wish you a speedy recovery.
Happy Crafting,
From deepest, dampest Ayr, I hope you are all well and perhaps enjoying, if not sunny, at least drier weather wherever you are.
I finally managed to complete this wee card started a couple of weeks ago but the finish delayed due to the move - enough said!
The cute topper is one from an embossing folder, Cindy Loo collections by Cuttlebug, that has four topper shapes included in it - very useful. This one features two woodland friends, a deer and a squirrel in what I think is an orchard ... well, it is an orchard now with gems to represent lovely juicy red apples. I coloured the embossed side with ProMarkers in greens, greys and browns and added tiny gems for eyes. All the edges are inked with yellow DI. The embossed trim along the edge of the card was done using a border folder. This edge was trimmed down and a piece of scalloped edge punched DP adhered.
To conceal the back of the green trim, he inside is trimmed with the other DP, also scalloped edged. The strip of green DP is there to disguise the line that was left during the embossing process.
The back has the patterned paper wrapped around from the front on one side and the leftover half of the scalloped circle from the front too - well, it seemed a shame not to use it :)
Materials used to make this card:
- Kraft card trimmed to make a 4" square card
- White card for embossing and the die-cut greeting circle
- The paper is from Basic Gray's Out of Print 6"x6" pad - currently one of my favourites because there's a nice mix of designs featuring taken from books and newspapers, I think. The selection includes designs suitable for male and female cards making it a very useful collection to have.
- Embossing folders all by Cuttlebug, Cindy Loo and Just My Type
- Die: Spellbinders Splendid Circle
- Stamp: Everyday Greetings from Wild Rose Studio
- Inks: TH Scattered Straw, Memento Rich Cocoa
- ProMarkers, various greens, browns, and greys
- From stash: card candy, Oranges & Lemons; Anita's gems
It's been long awaited but the EM has finally worked out how to email photos from his mobile to me so here is the first photos of our beloved great-niece Arihanna.
Apologies for the quality - the next job will be discovering how to improve that on his mobile. Arihanna was not too impressed with her great-uncle snapping away.
That's my huge sausage fingers in foreground :(
Yesterday evening she decided to join in her Granny's telephone call to me and proved that she has immensely powerful lungs for one so young :))
Right, I'm off to have elevenses and then I've a layout I want to work on, fitting in some commenting at some point during the day too.
I wish you all a wonderful weekend and for those of you who are not feeling so good, I wish you a speedy recovery.
Happy Crafting,
Monday, 5 March 2012
Gilded Cage - another 4x4 card
Hello Everyone,
I hope you've all had a happy weekend and that Monday hasn't been too bad for you either. My weekend was busy ... not crafting busy, but being with family busy :)
Unfortunately, I've had the mother and father of all headaches today so I've spent it quietly pottering about. In fact, most of my time has been taken up with embossing with the Cuttlebug. I dug out all those folders I've either never used, shame on me, or have not looked at for quite some considerable time. I also cut up two 12"x12" sheets of card, one white and the other Kraft, to make 4" square card bases - you can get 4 from one sheet.
However, after all that playing around, I've only got one wee card to share with you.
The Swiss dotted edging is from one of the first set of embossing folders I bought ... in fact it came with the Cuttlebug ... and I think I may have used it only once in all that time! It's a border folder and, unfortunately, not only does it do the embossing, but it also leaves a line caused by the edge of the folder, which I really didn't want. To disguise this, I butted the patterned paper right up to the line and then used a very fine gold peel-off edging to cover it completely. The stamped image was a tester from a previous cardmaking session ... I'd saved it in my stash thinking it might come in useful one day. It is coloured with ProMarkers and glitter has been added to the cage - making it the gilded cage of the title :) The leaves were also tucked away in my stash - the result of an evening watching TV! The flowers were punched from the contrasting patterned paper and blinged up with a yellow gem in the centre.
Strips of the patterned paper and gold peel-offs decorate the inside.
The base patterned paper is wrapped round the back and trimmed with a peel-off too. And a punched flower made from the two papers adorn the back.
Here's a list of the materials I used:
As I said earlier, I spent some time visiting family this weekend and caught up with my little great-granddaughter, Rhian. My granddaughter, her mum, moved house last year and now lives quite a drive away and we don't see them as much as we'd like so it was lovely to catch up. Rhian is growing fast as you can see from this photo taken with her adoring great-granddad.
And here's another close up. Her eyes are a most unusual grey/brown colour.
Hopefully, the headache will have gone and I'll be more productive tomorrow and have something completed to share with you.
In the meantime, I wish you all a good night and see you tomorrow.
Happy Crafting,
I hope you've all had a happy weekend and that Monday hasn't been too bad for you either. My weekend was busy ... not crafting busy, but being with family busy :)
Unfortunately, I've had the mother and father of all headaches today so I've spent it quietly pottering about. In fact, most of my time has been taken up with embossing with the Cuttlebug. I dug out all those folders I've either never used, shame on me, or have not looked at for quite some considerable time. I also cut up two 12"x12" sheets of card, one white and the other Kraft, to make 4" square card bases - you can get 4 from one sheet.
However, after all that playing around, I've only got one wee card to share with you.
The Swiss dotted edging is from one of the first set of embossing folders I bought ... in fact it came with the Cuttlebug ... and I think I may have used it only once in all that time! It's a border folder and, unfortunately, not only does it do the embossing, but it also leaves a line caused by the edge of the folder, which I really didn't want. To disguise this, I butted the patterned paper right up to the line and then used a very fine gold peel-off edging to cover it completely. The stamped image was a tester from a previous cardmaking session ... I'd saved it in my stash thinking it might come in useful one day. It is coloured with ProMarkers and glitter has been added to the cage - making it the gilded cage of the title :) The leaves were also tucked away in my stash - the result of an evening watching TV! The flowers were punched from the contrasting patterned paper and blinged up with a yellow gem in the centre.
Strips of the patterned paper and gold peel-offs decorate the inside.
The base patterned paper is wrapped round the back and trimmed with a peel-off too. And a punched flower made from the two papers adorn the back.
Here's a list of the materials I used:
- White card for base, cut to measure 8" x 4" and folded to form the 4" square card
- Cuttlebug and Cuttlebug Embossing Borders Folder, Just My Type
- Basic Grey paper pad, Out Of Print
- Snippet of white card for stamp, Crafty Individuals stamp, C1-320, Memento Ink Pad, Rich Cocoa
- ProMarkers - Buttercup, Pastel Yellow, Pear Green, Marsh Green, Sandstone
- Woodware Punches, daisy (2 sizes), leaves and corner rounder
- Other items: glue pen, dark gold glitter, yellow gems, various adhesives
I plan to submit this card to the Fat Pages and Cards with an Attitude challenge #8 - Anything Goes
As I said earlier, I spent some time visiting family this weekend and caught up with my little great-granddaughter, Rhian. My granddaughter, her mum, moved house last year and now lives quite a drive away and we don't see them as much as we'd like so it was lovely to catch up. Rhian is growing fast as you can see from this photo taken with her adoring great-granddad.
And here's another close up. Her eyes are a most unusual grey/brown colour.
Hopefully, the headache will have gone and I'll be more productive tomorrow and have something completed to share with you.
In the meantime, I wish you all a good night and see you tomorrow.
Happy Crafting,
Subscribe to:
Posts (Atom)